Live Multi-Layer Slap Comps with Copernicus and Solaris in Houdini 20.5
With Houdini 20.5, SideFX adds a refresh of the COPS context through Copernicus. Copernicus has the intent of becoming a full-fledged compositing context so you can do your final 2D compositing inside Houdini. Previously, this was also possible to an extent, but the older version of COPS was somewhat limited.
Copernicus is still quite early in its development, mostly focusing on establishing an efficient procedural texturing package similar to Substance Designer in its first iteration. However, another interesting addition that was slightly overlooked is the ability to preview composites directly in the Hydra viewport inside Solaris. SideFX refers to this feature as Slap Comp.
In the default configuration of Houdini 20.5, the Slap Comp feature is mostly limited to previewing your renders with 2D grades and adjustments as well as adding a backplate. This can be useful in itself, of course, but what I really wanted was a way to preview all of my render layers slapped together, dynamically switching between the active layer. This way, I can view the final composite of my render with all of the layers and see any changes I'm making on the active layer in context.
Out-of-the-box, this is not possible in the current version of Copernicus. However, I've developed an HDA that does exactly this by dynamically layering render layers and switching the active render layer through a context option. If you want to jump straight to that, you can choose the Multi-Layer Slap Comp HDA section on the left side menu. Please be sure to check out the guide first, however, as the node requires a bit of setup.
Copernicus Slap Comps
Basic slap comp setup in Houdini 20.5
Basic Setup
Before we dive into my custom HDA I wanted to show how to set up a basic slap comp in Copernicus using the built-in tools provided.
The setup is a little unique, but luckily SideFX provides a Recipe for it so you can set it up rather quickly.
First, you'll need to open up the /stage context (Solaris) and drop down a COP Network (make sure you pick the new one and not COP Network - old). Then, inside you'll need to drop down the recipe called Slap Comp Block . This will automatically set up the network the way it's needed for the slap comp functionality to work.
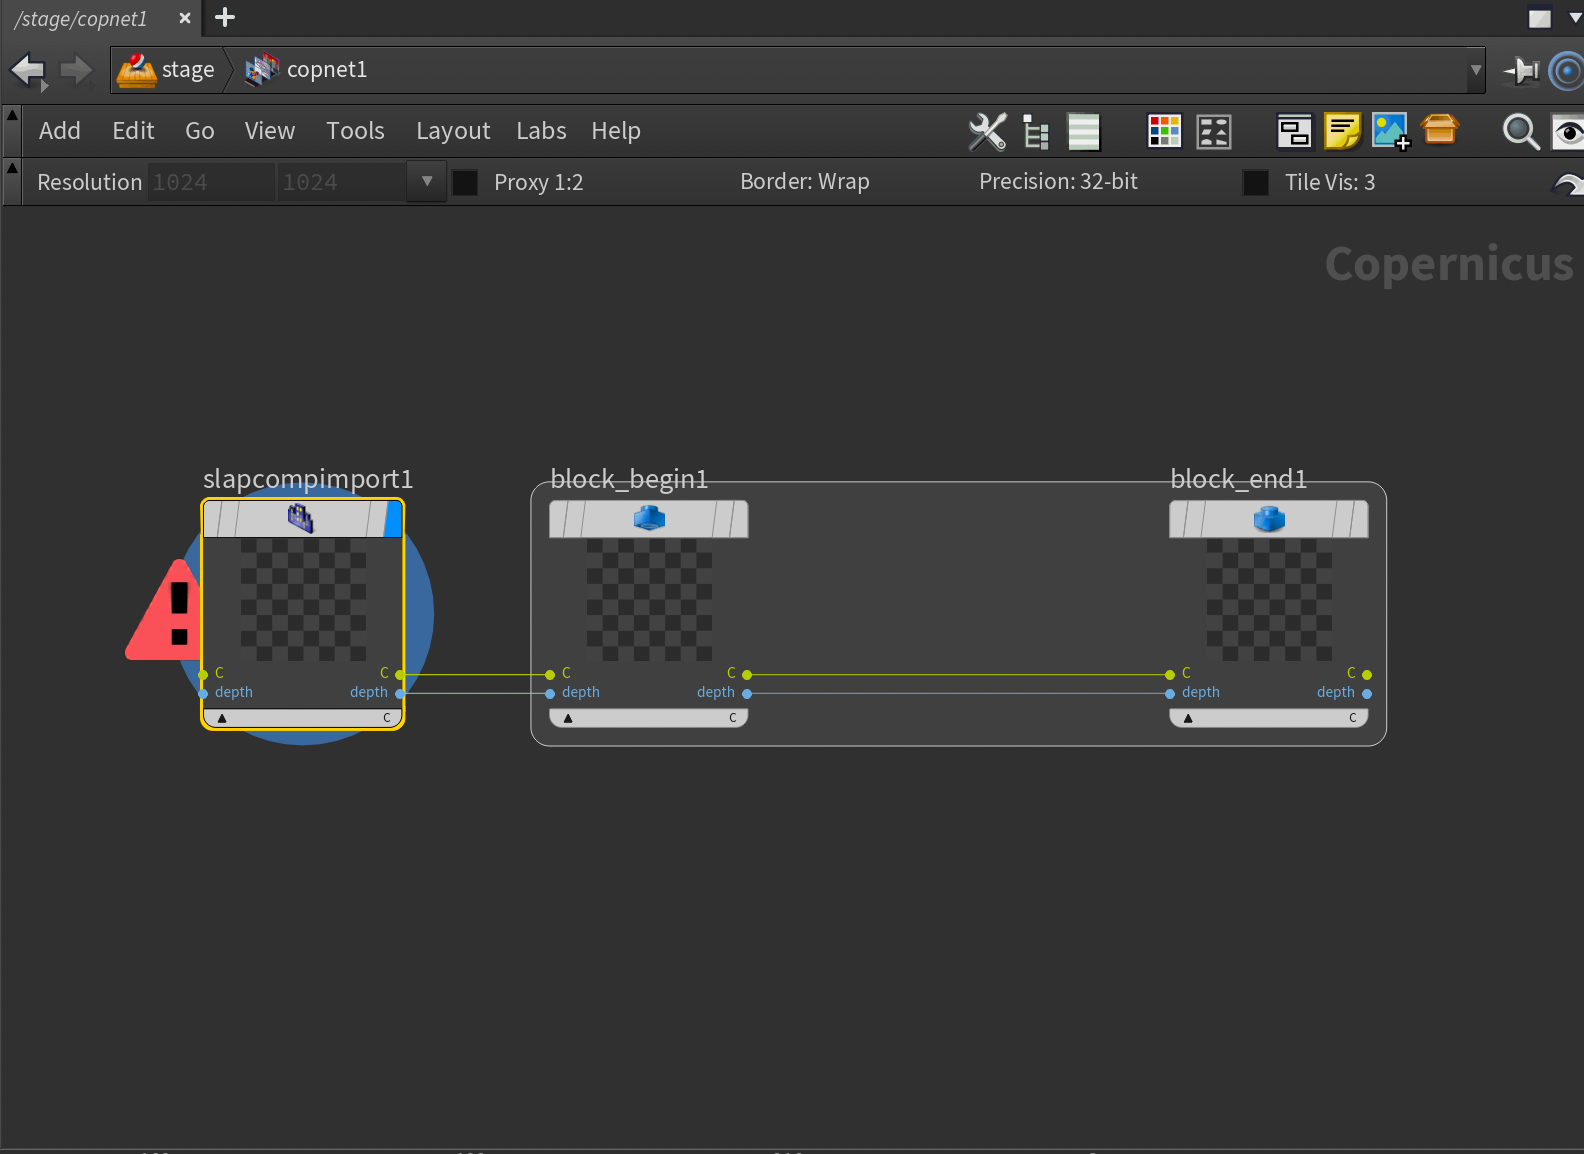
Initially, you'll get an error on the Slap Comp Import node. Don't worry about this; it's just complaining that it's missing a C AOV - it's only missing this because we haven't rendered anything yet in Solaris.
Let's break down what's going on here and the anatomy of the slap comp block.
Slap Comp Import
The Slap Comp Import node is what's responsible for retrieving your render from Solaris. Think of it as a container for your active render. It will retrieve all available AOVs dynamically and connect them to the rest of your network.
Block Begin/End
The Block Begin/End nodes may look familiar from SOPs. They can be used in a large variety of ways, including creating for-loops. In general, think of them as defining a function with in- and outputs. In our case it creates a sort of function for our slap comp that can be invoked by Solaris - so any nodes you want to add to your slap comp should be added inside this block (between Block Begin and Block End ). The only important option for slap comps here is found on the Block End node with the Register as Slap Comp Block . This option signals to Solaris that the output of this block can be used as a slap comp in the Hydra viewport. If you used the recipe to set this up, it should already be turned on.
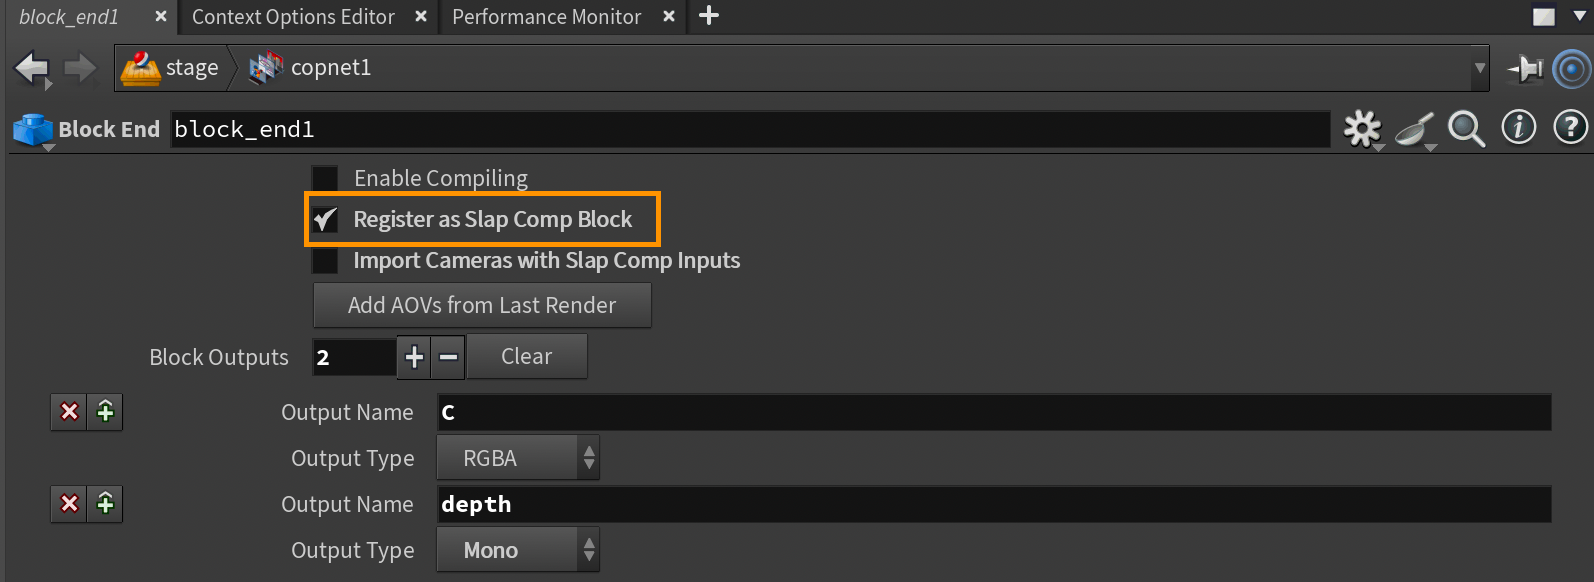
Register as Slap Comp Block parameter.Example Usage
Let's quickly take a look at how to use this basic setup. Add an Over node and plug the C of Block Begin into the FG, and a Constant node set to some color and the Signature parameter set to RGBA. You'll also need to plug the Block Begin node into the source input of the Constant node to make sure it uses the same resolution as our render.
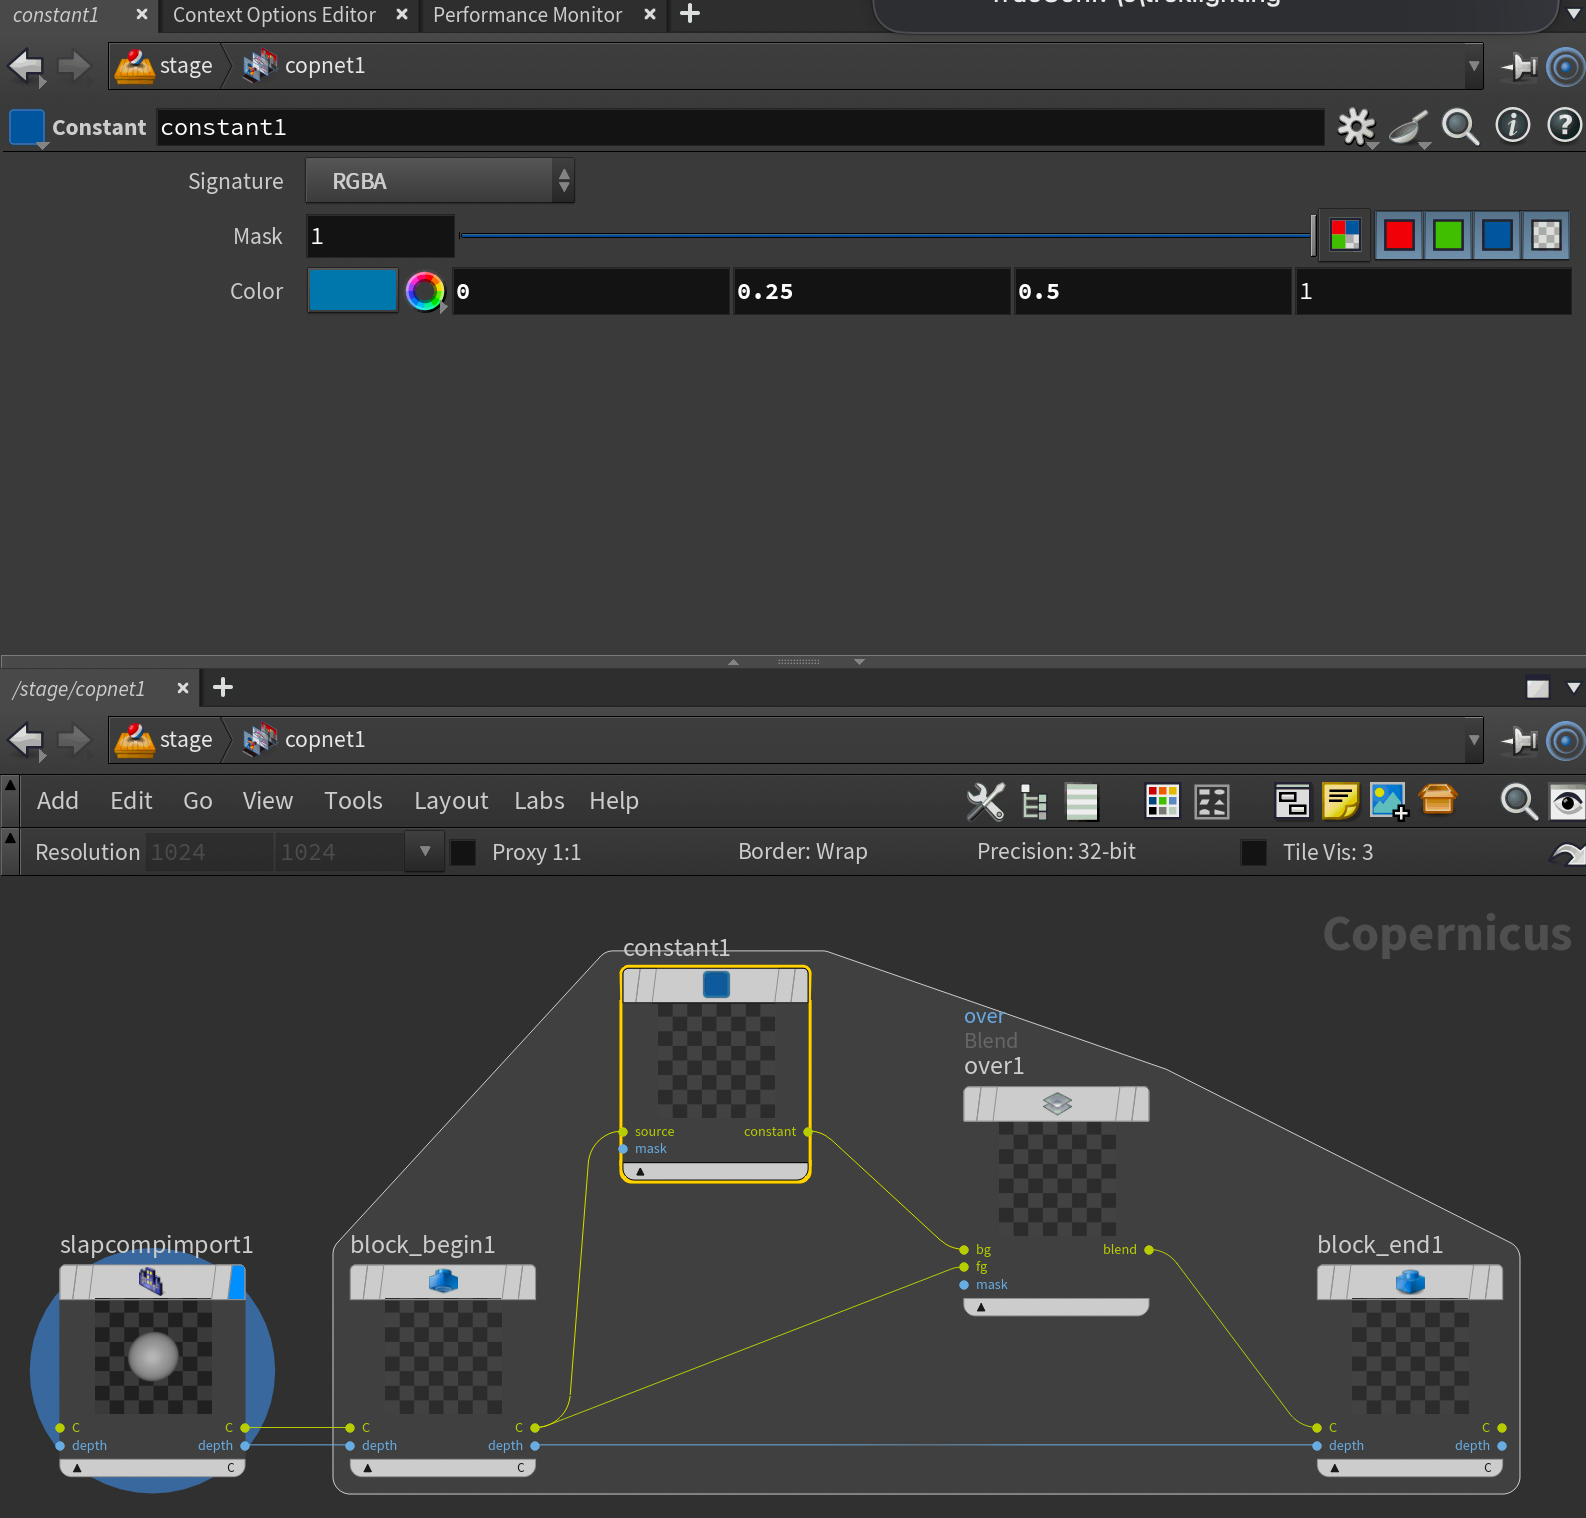
Now, if you jump back up to /stage (Solaris), we can finally test our setup. Add a sphere or something you want to render, then switch to Karma CPU or XPU in the viewport. Please note that the slap comp functionality doesn't work in Houdini GL.
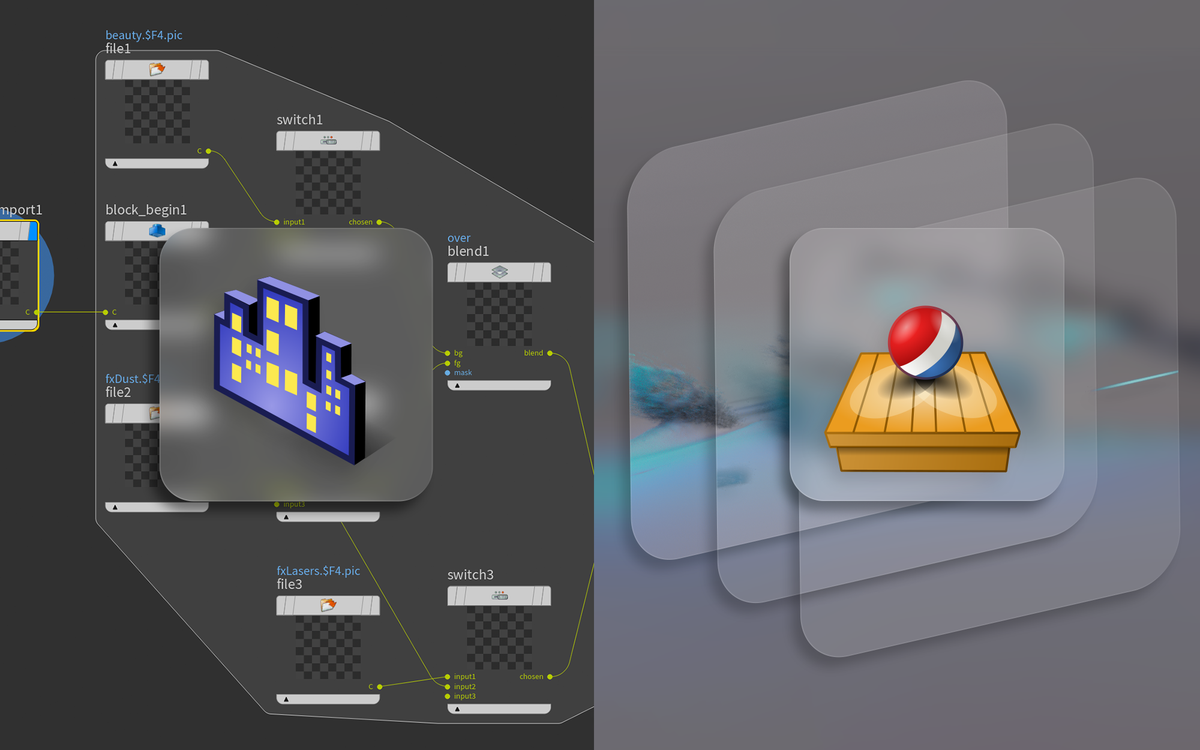
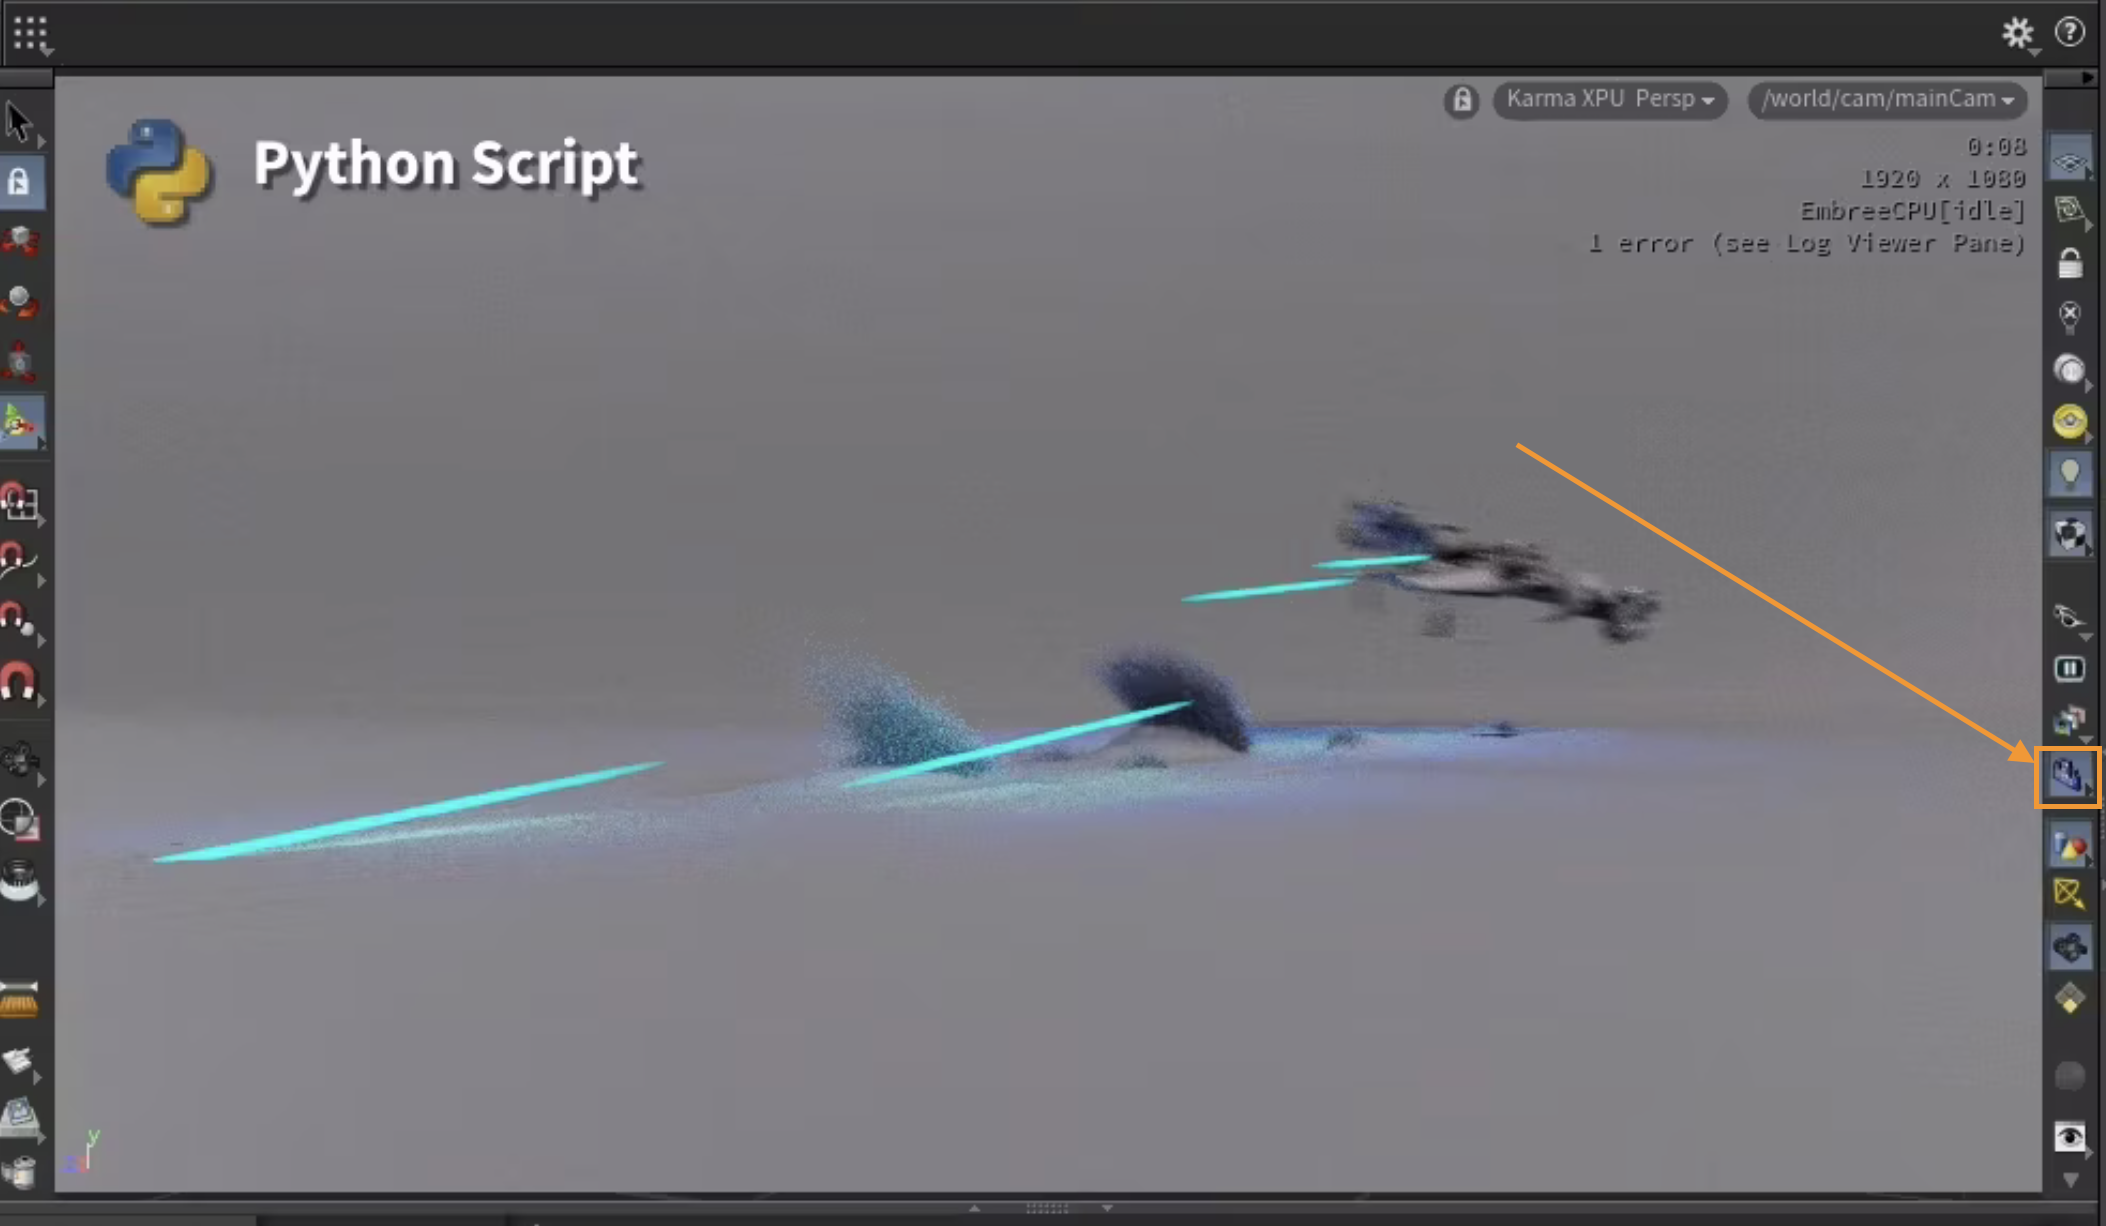
Now that we're rendering you'll need to enable the slap comp in the Hydra Viewport. You do that by clicking the Slap Comp icon on the right toolbar (it looks like a set of purple buildings).

And voilà! We got our slap comp working. Any changes you add inside the Slap Comp block will appear in your Hydra viewport as long as you have the slap comp toggle enabled.
Multi-Layer Slap Comp HDA
Custom solution for viewing slap comps with multiple live renderlayers.
When I first tested the new Slap Comp features, my initial reaction was that it needed a way to preview multiple render layers together. Usually, when you render a shot in production, you'll have more than one layer. For example, you may split different elements of the shot into their own layer (a layer for the environment, vehicles, fx, etc.) for easier control in compositing and faster render iterations.
However, when you do this, you're not always able to preview all the layers together until you do a composite in a 2D compositing software like Nuke.
I’ve put together this HDA to propose a way to do this using the new Slap Comp functionality in Houdini 20.5. I hope SideFX will do something similar in a more integrated way, but until then, I hope this will be a good starting point.
First, I will show you how to download and install my HDA repository, and then I'll discuss how to use the Multi-Layer Slap Comp Node in Solaris. It requires a little bit of setup, so please check that out before using it. Let's get into it!
Download and Install akjTools
I've packaged this HDA into a GitHub repository called akjTools that I'll continue to update as I develop new tools. For now, it only includes the feather tools from my previous article and the multi-layer slap comp node. This is just to give you an easy way to access my tools and keep them updated.
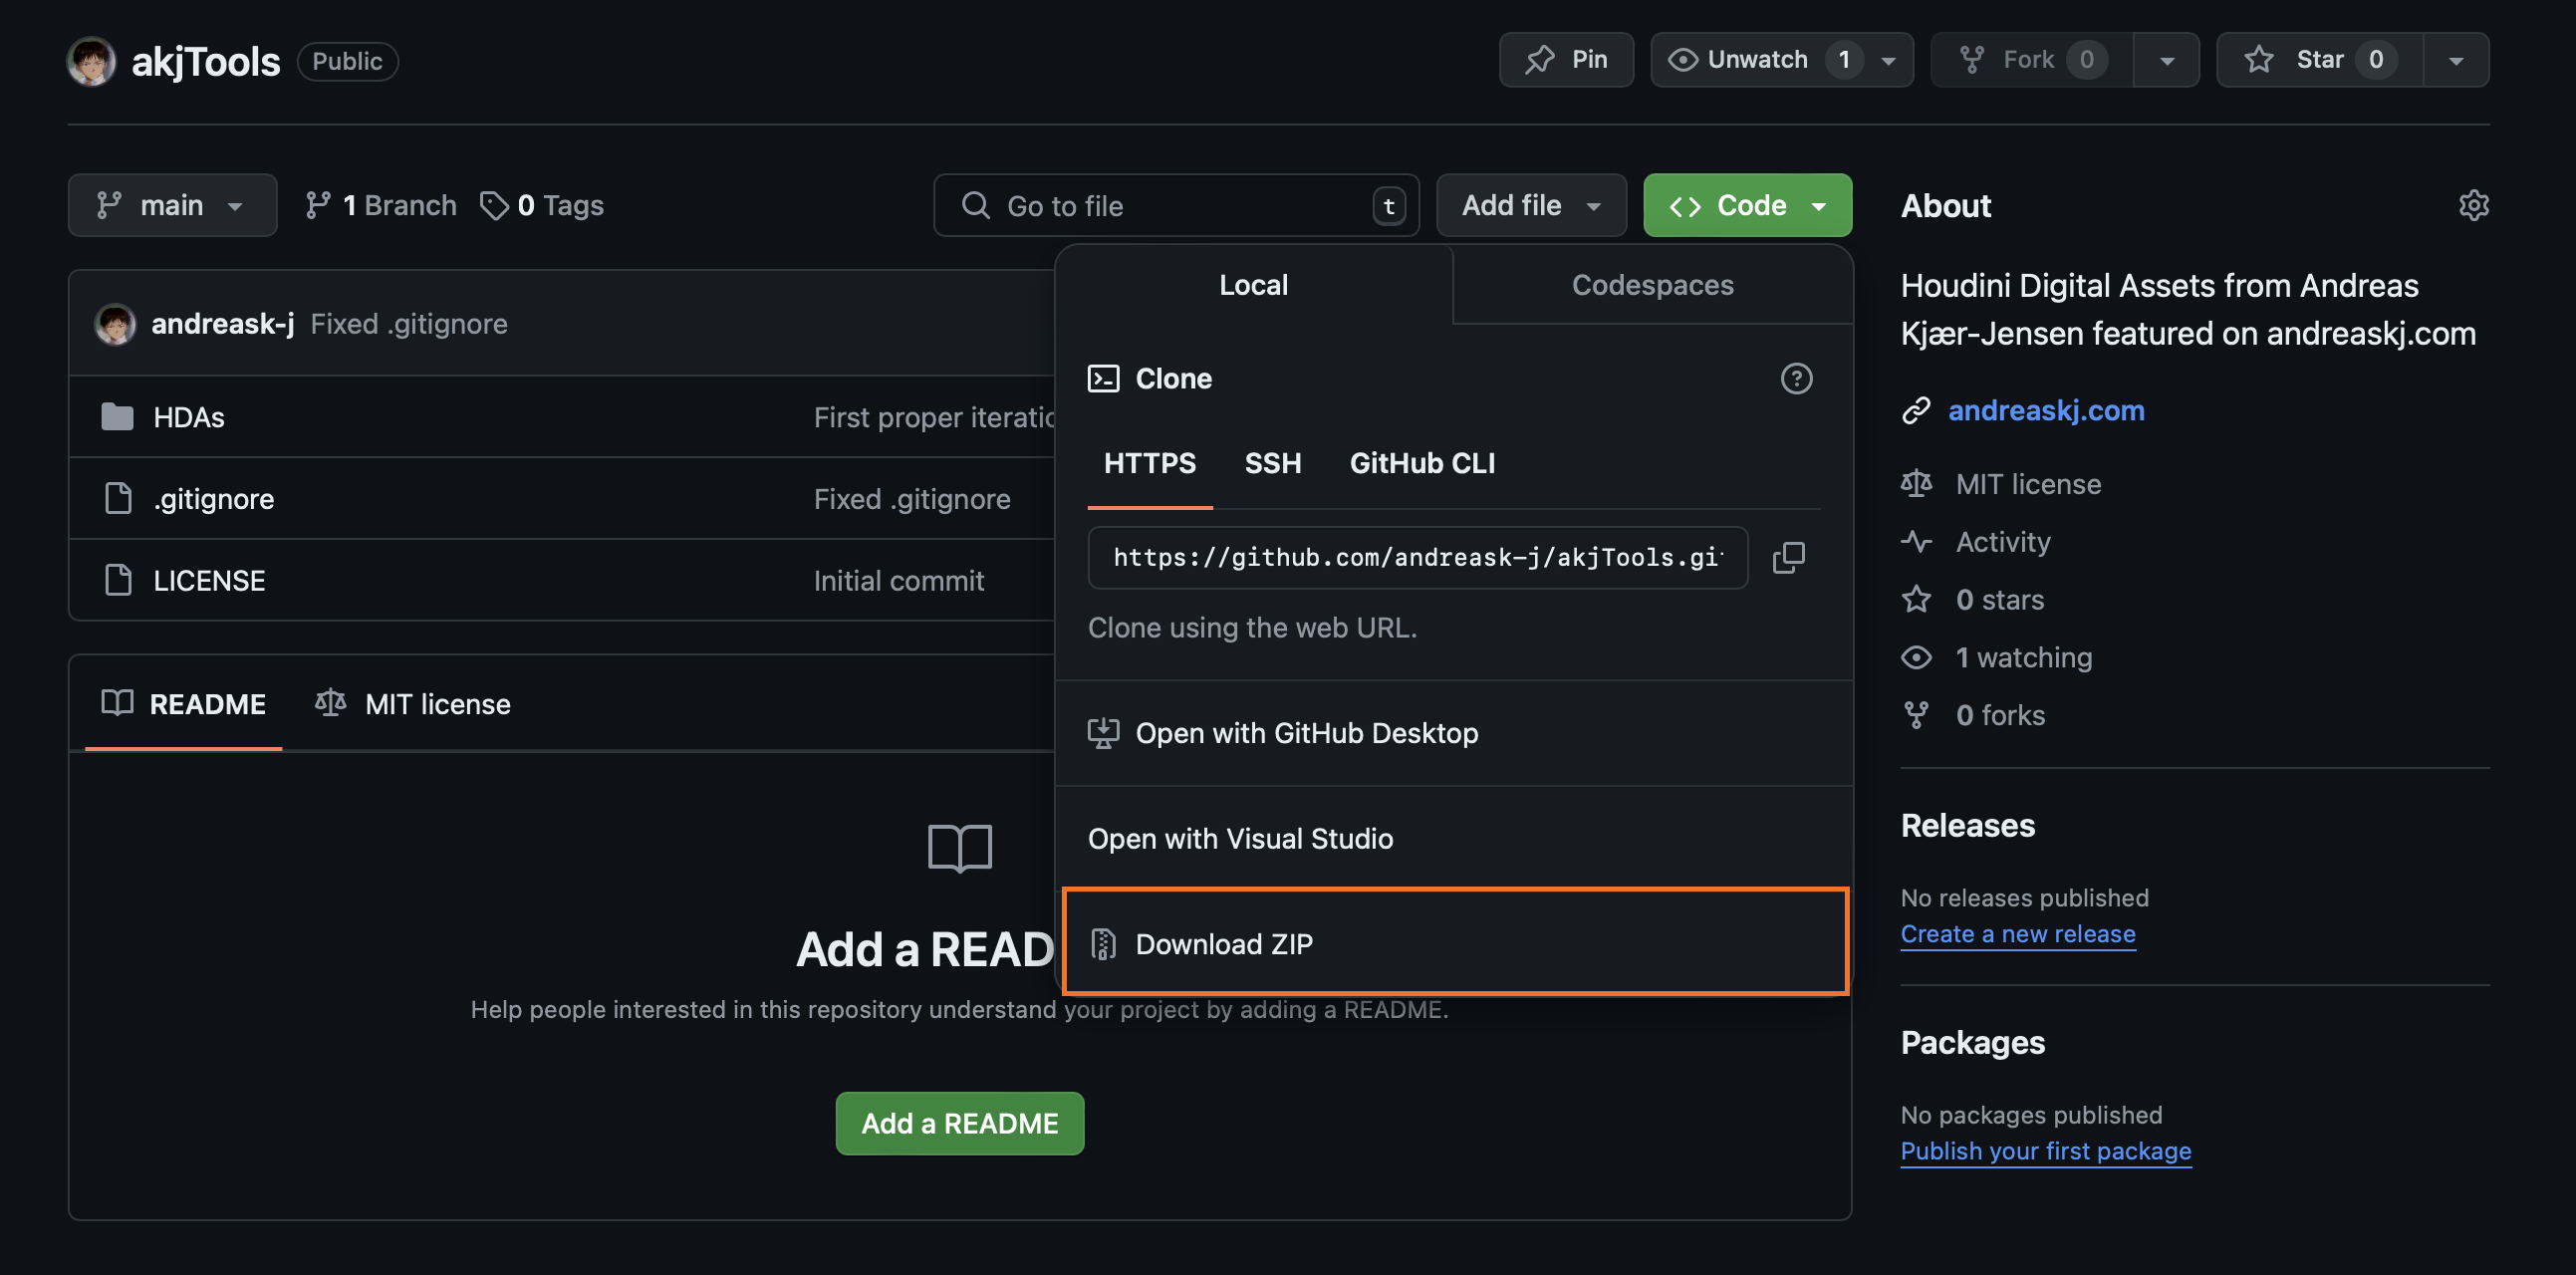
You can find the repository here: https://github.com/andreask-j/akjTools
If you're comfortable using git you can clone my repository and go from there. If you're not comfortable using git you can download the repository by clicking the <> Code button in the top right and clicking Download ZIP in the dropdown. This will download the whole repository for you. Save it in your Documents folder or somewhere else you can remember.
Once it's downloaded, unzip it and save the path to the new folder generated.
The installation process is super easy. You can do it however you want since it’s just a collection of HDAs. But I recommend this method:
- Go to your houdini packages folder. If it doesn't exist, create it.
macOS:~/Library/Preferences/houdini/X.Y/packages/
Linux:~/houdiniX.Y/packages/
Windows:%HOME%/houdiniX.Y/packages/ - In the folder, create a new file called
akjTools.jsonand open it in a text editor. - In the
akjTools.jsonfile, type the following and save the file:
{
	"hpath" : "<Path to akjTools>"

}
For example, in my case it akjTools.json looks like this:
{
	"hpath" : "/Users/andreaskj/Repositories/akjTools"

}
Example of akjTools.json - remember to add your own folder path.
Now when you launch Houdini, you'll have access to all of the nodes included in this repository! And if you ever want to update the nodes, you'll just have to pull my latest git repository or re-download it and replace the folder.
Using Multi-Layer Slap Comp HDA
In the following section, I'll explain how to use the Multi-Layer Slap Comp HDA and explain a few caveats. I'll first describe it in written form, but I've also included a video walkthrough of the HDA at the bottom.
Usage of the Multi-Layer Slap Comp HDA requires 2 things:
1. A first version render of each layer written to disk
2. A unique context option value for each layer
Let's take a look at how this is set up with a more practical example.
In this example scene, I have a render of a spaceship flying through a grey scene and shooting some lasers at the ground.
Final composited render.
It consists of 3 layers. A beauty , fxLasers , and fxDust render layer.beauty is the layer consisting of all the geo (spaceship, ground impacts, backdrop)fxLasers is the render layer that contains the lasersfxDust is the render layer that contains some additional ground impact dust volumes

beauty , fxLasers, fxDust render layers in that order.This is a pretty common way of splitting up a render in production, so it's easy for the compositors to dial in individual elements. Some people split up a lot more than this, and others less. It largely depends on how much control is needed in 2D.
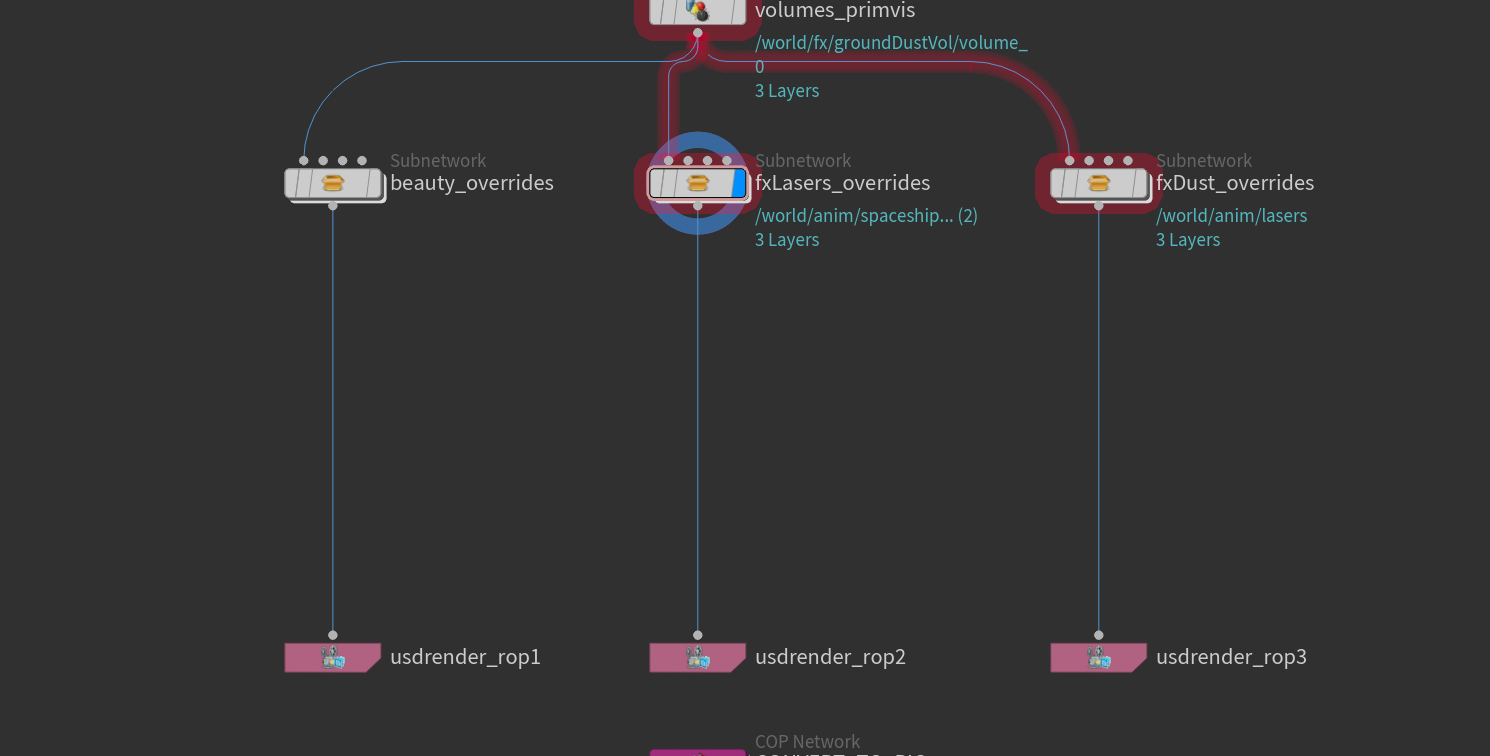
Here's how the network looks in my scene. Essentially, I have a separate stream for each render layer, ending with a USD Render ROP.
Now let's get into the setup. I'll start with a big disclaimer unfortunately:
Once you've rendered out your image files (and converted them to .pic), you can start setting up the context option for each of your render layers.
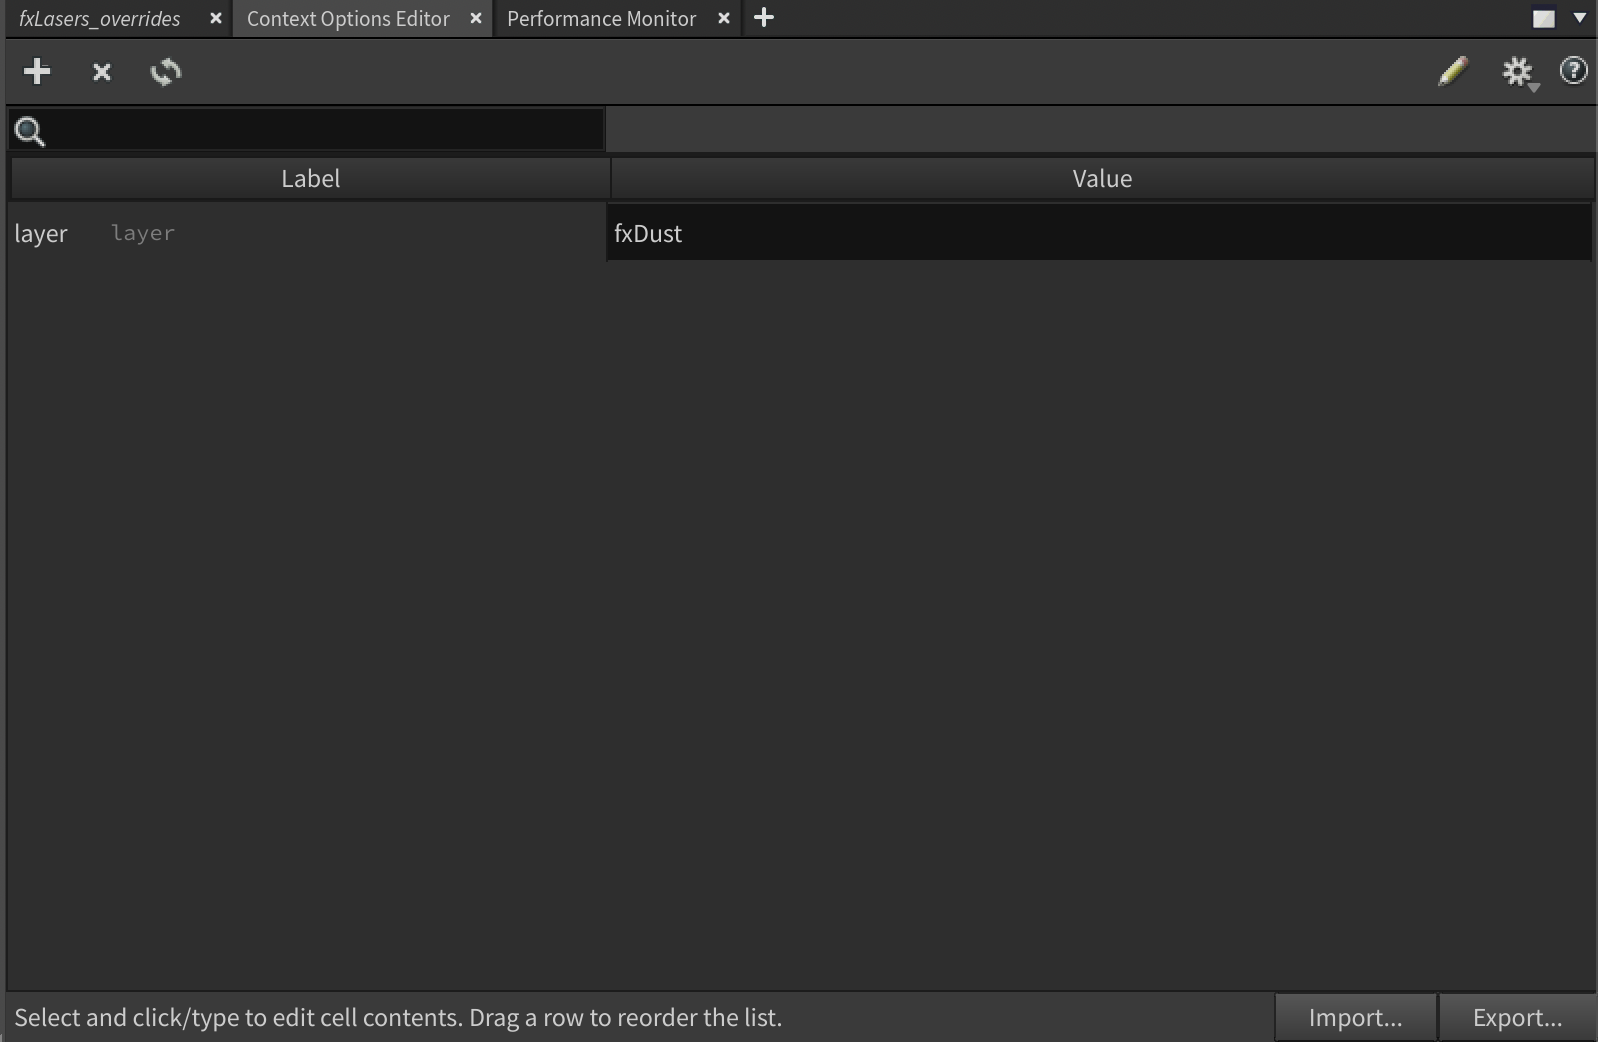
If you're unfamiliar with context options, they're essentially a form of "global variable" that you can refer to in your entire scene using @<context option> . If you're interested, I cover them a bit more in depth in the video further down. You can preview and interact with the context options through the Context Options Editor (under the Solaris sub-menu in the Pane Tab menu). They're especially useful for things like multi-shot workflows.
There are multiple ways to set up context options in Houdini, but for our case I recommend using a Python Script LOP. Don't worry if you're not familiar with Python or coding in general, it's only 2 lines of code.
For each render layer stream you want to add a unique Python Script LOP and type the following code:
import hou

hou.setContextOption("layer", "layername")
All you need to do is replace the layername portion of the code with the name of your render layer. The first option ( "layer" ) should always be called layer because that's the context option that my HDA is looking for.
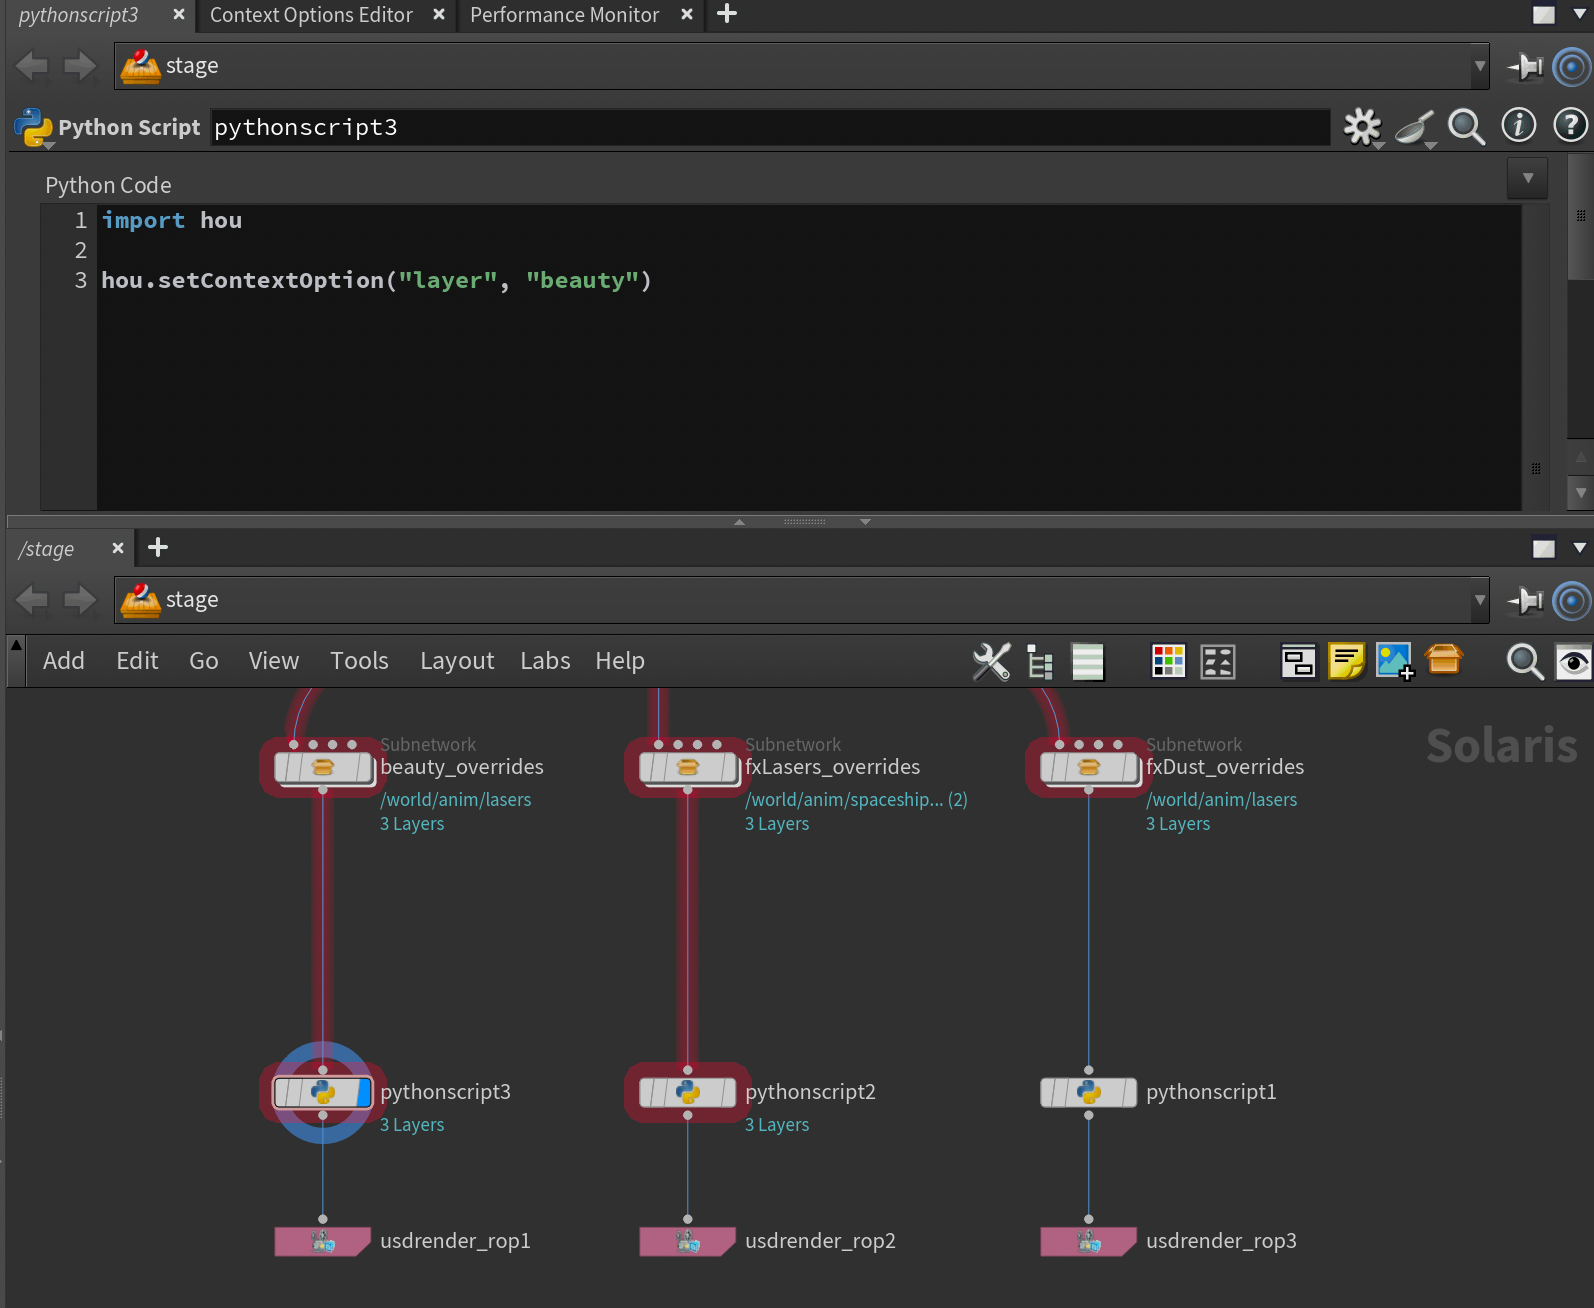
Python Script LOPs. Notice that I have a unique one for each layer.The reason we need to set up these context options is simply to enable the Multi-Slap HDA to figure out which render layer you're currently viewing so it can correctly layer the other render layers accordingly.
Python Script LOP. This forces the python code to force-cook and set the context option.With all the preparations done we're ready to start using the Multi-Slap Comp. Drop it down by searching for it in the TAB-menu or looking under akjTools in the TAB-menu. This is a LOP, so it needs to be created in the /stage context. If you can't find it, make sure you've installed my HDA repository as mentioned in the previous section.
With the node created you need to manually add your render layers by adding each of them using the + button. Then, in the Layer Name field you need to use the exact name you used in the Python Script LOP earlier. You'll also need to fill out the Layer Output field with the path to your image output (the .pic file). In the example below I've linked it to the output file parameter of the .pic conversion network I set up.
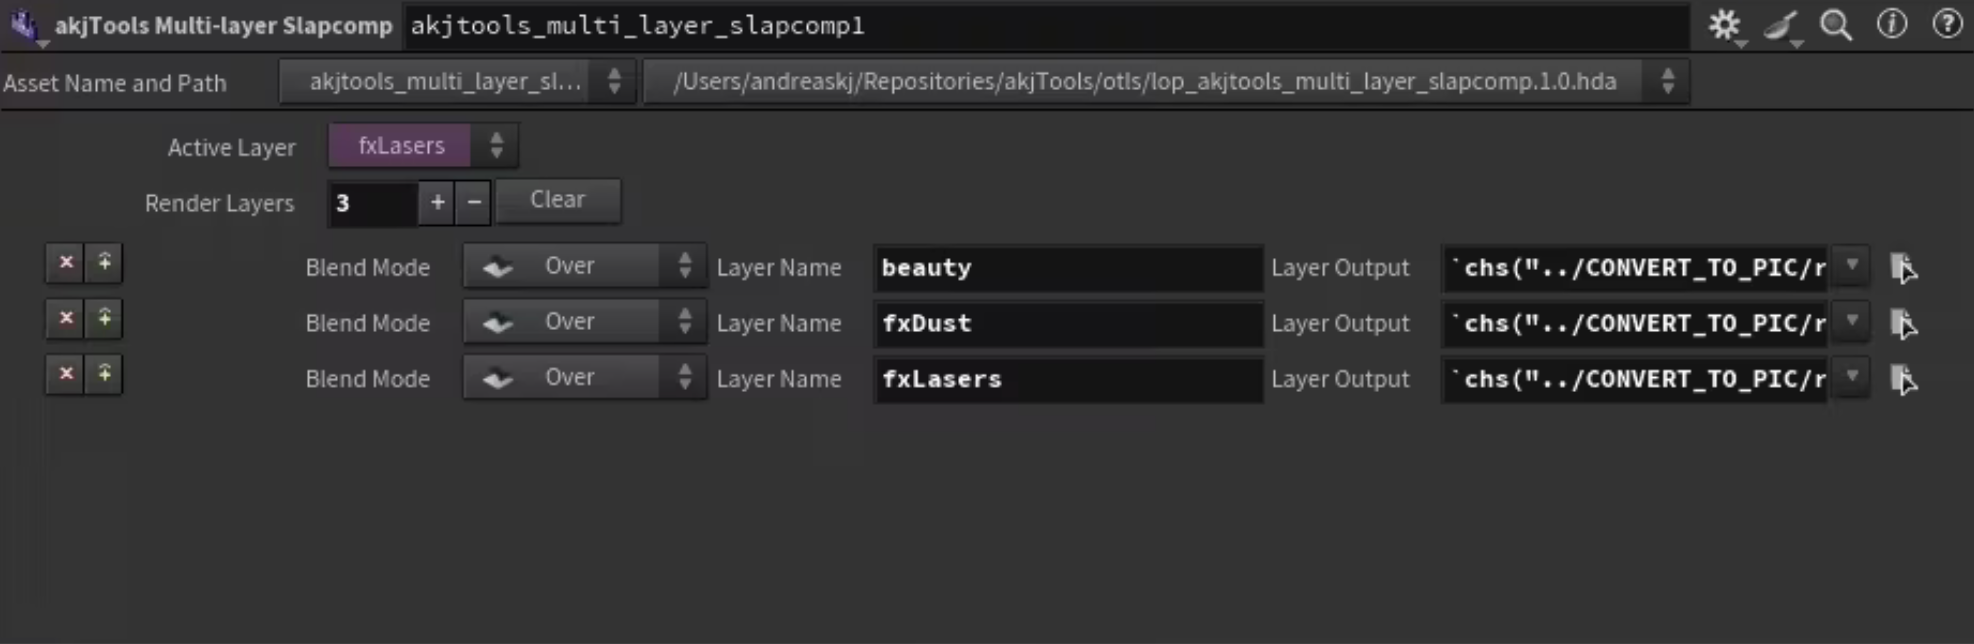
Active Layer field. This is useful for checking which layer the HDA thinks you're viewing. It will automatically update every time you change layer context. If you're having issues with it not using the right active layer, try to enable and disable the Python Script LOP corresponding to the render layer you're currently viewing.With all of this done you'll need to press the Slap Comp icon in the viewport while rendering with either Karma CPU or Karma XPU . Now you'll be able to jump around rendering and refining different layers while previewing them in the context of the slap comp with all the other layers stacked on top. See the video below for a more hands-on example.
Demo showcasing HDA and showing how to set it up.
Conclusion
Hope you found this tool useful! Copernicus adds a lot of really interesting functionality to Houdini, and I'm excited to explore it further. Let me know if there are any topics you'd like me to cover in the future.
I'll also update this blog post as soon as SideFX has fixed the issue with .exr files in Slap Comp.
Thanks for checking out this article, and as always, if you found it interesting and would like to read more, please feel free to subscribe to my newsletter below to get my posts directly to your inbox!