Creating and animating a Bird in Houdini (+ Solaris Feather Export HDA)
At the tail-end of Houdini 20, I wanted to finally dive into one of the big headliners for this release - the new feather system. This was a big topic to dive into and I learned a lot in the process. I'm excited to share some of my findings, and I hope this article will be useful for the creation of your own birds and creatures!
I will cover the entire process from groom, rigging (APEX), character FX, and shading using Karma XPU and Solaris. Birds are super exciting because we get to touch various Houdini subjects to address the complex nature of creating and simulating feathers.
Please do note that the rigging/APEX section of this article won't be available until Houdini 20.5 comes out. I had the opportunity to test some of the features of Houdini 20.5 a little early and the additions made to the APEX rigging workflow are significant, especially when it comes to birds. Please consider subscribing to my newsletter if you'd like to get a notification as soon as this part of the article becomes available!
With that out of the way, let's dive into creating some feathered friends!
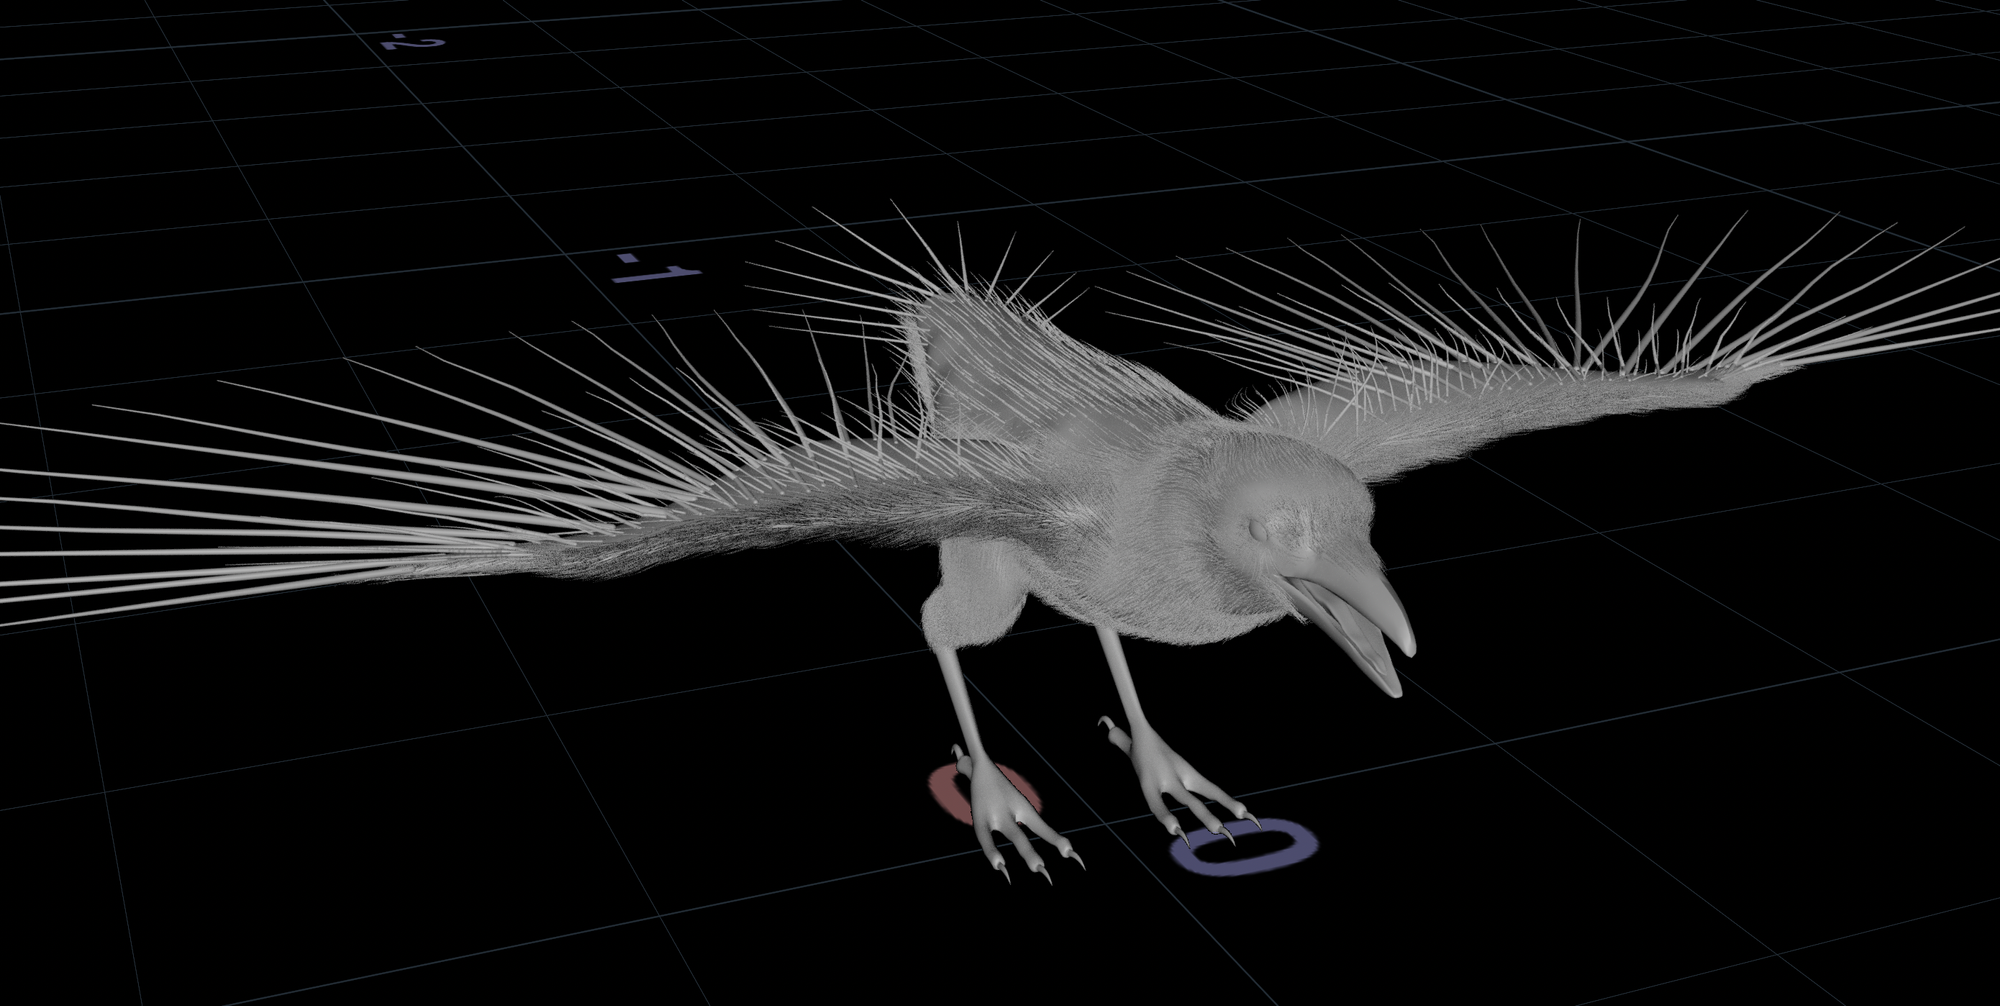
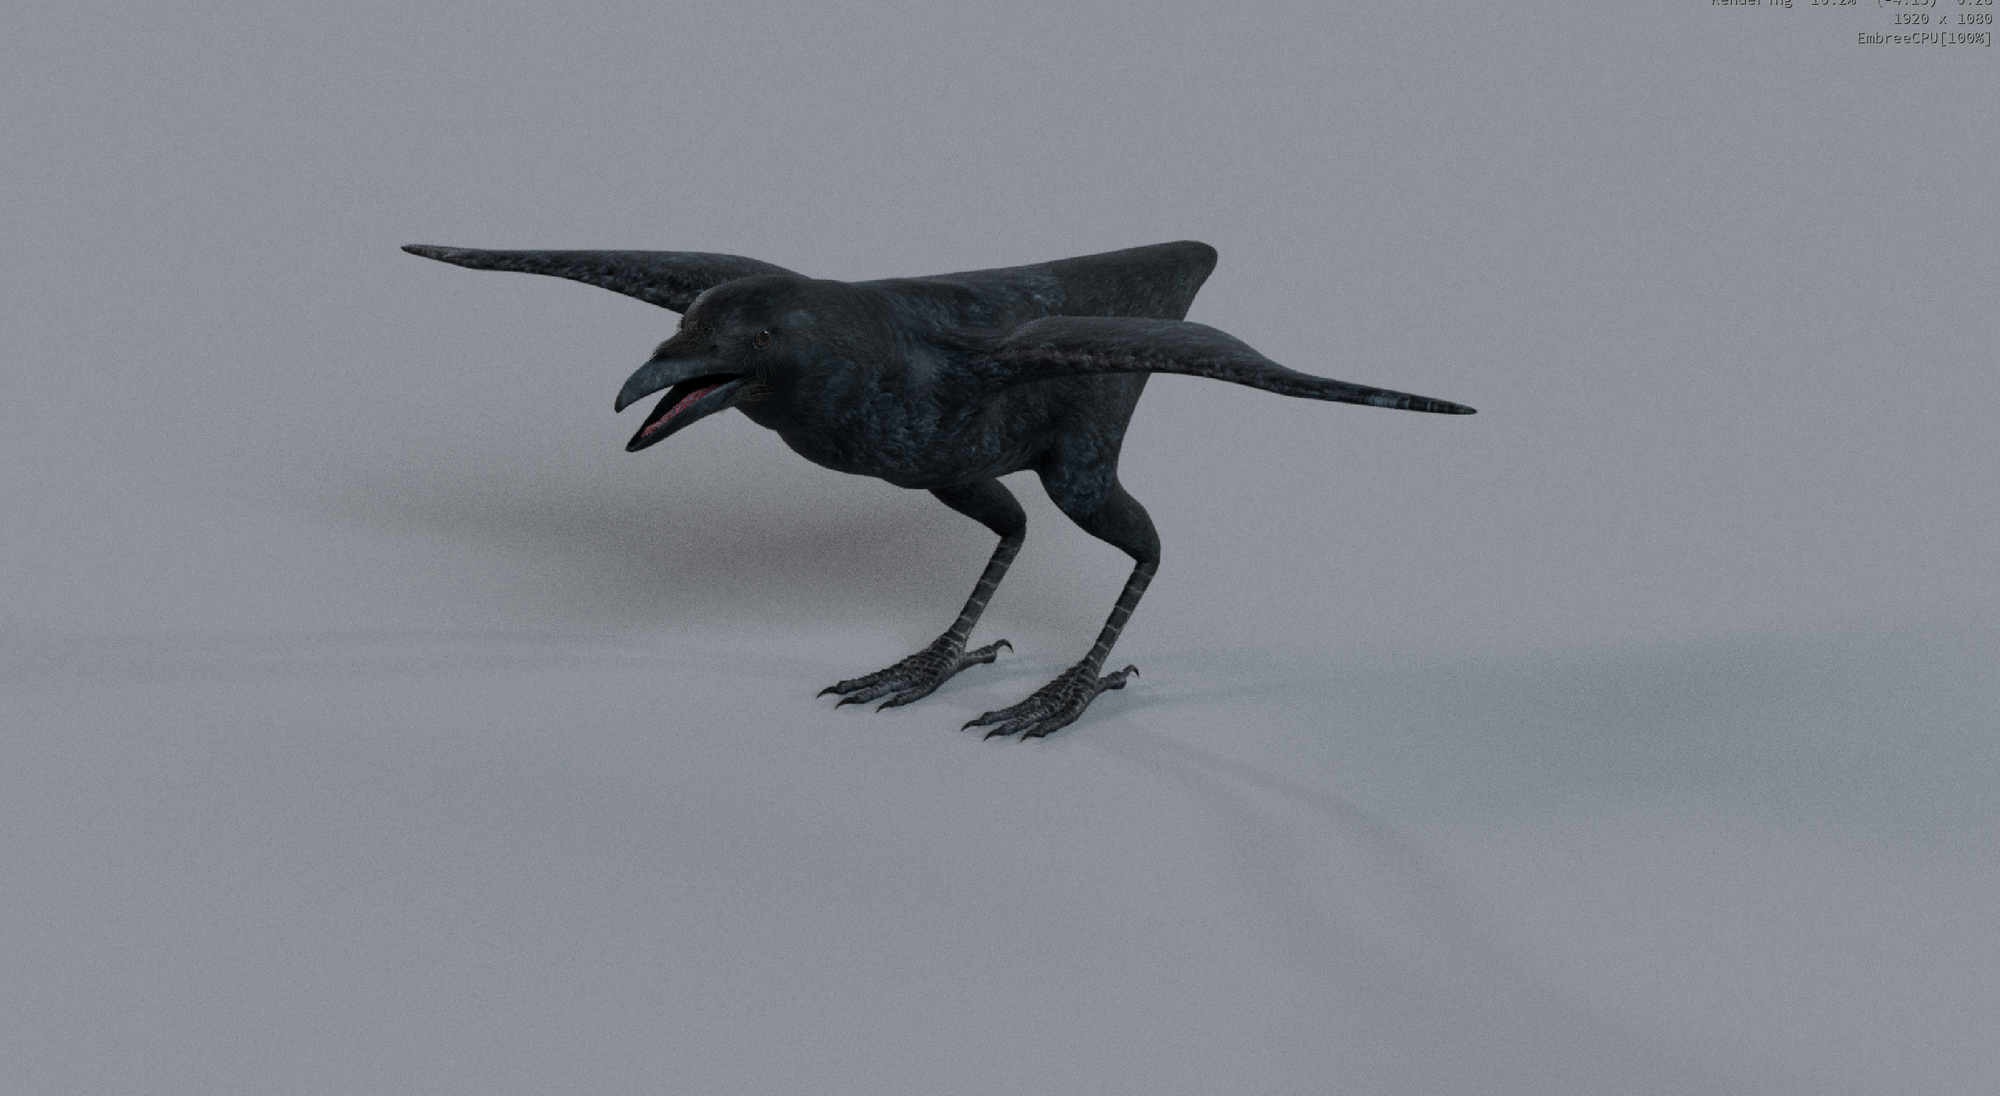
Final render of crow with animation and feathers
Feather Atlas
Generating our feathers
Feathers in Houdini
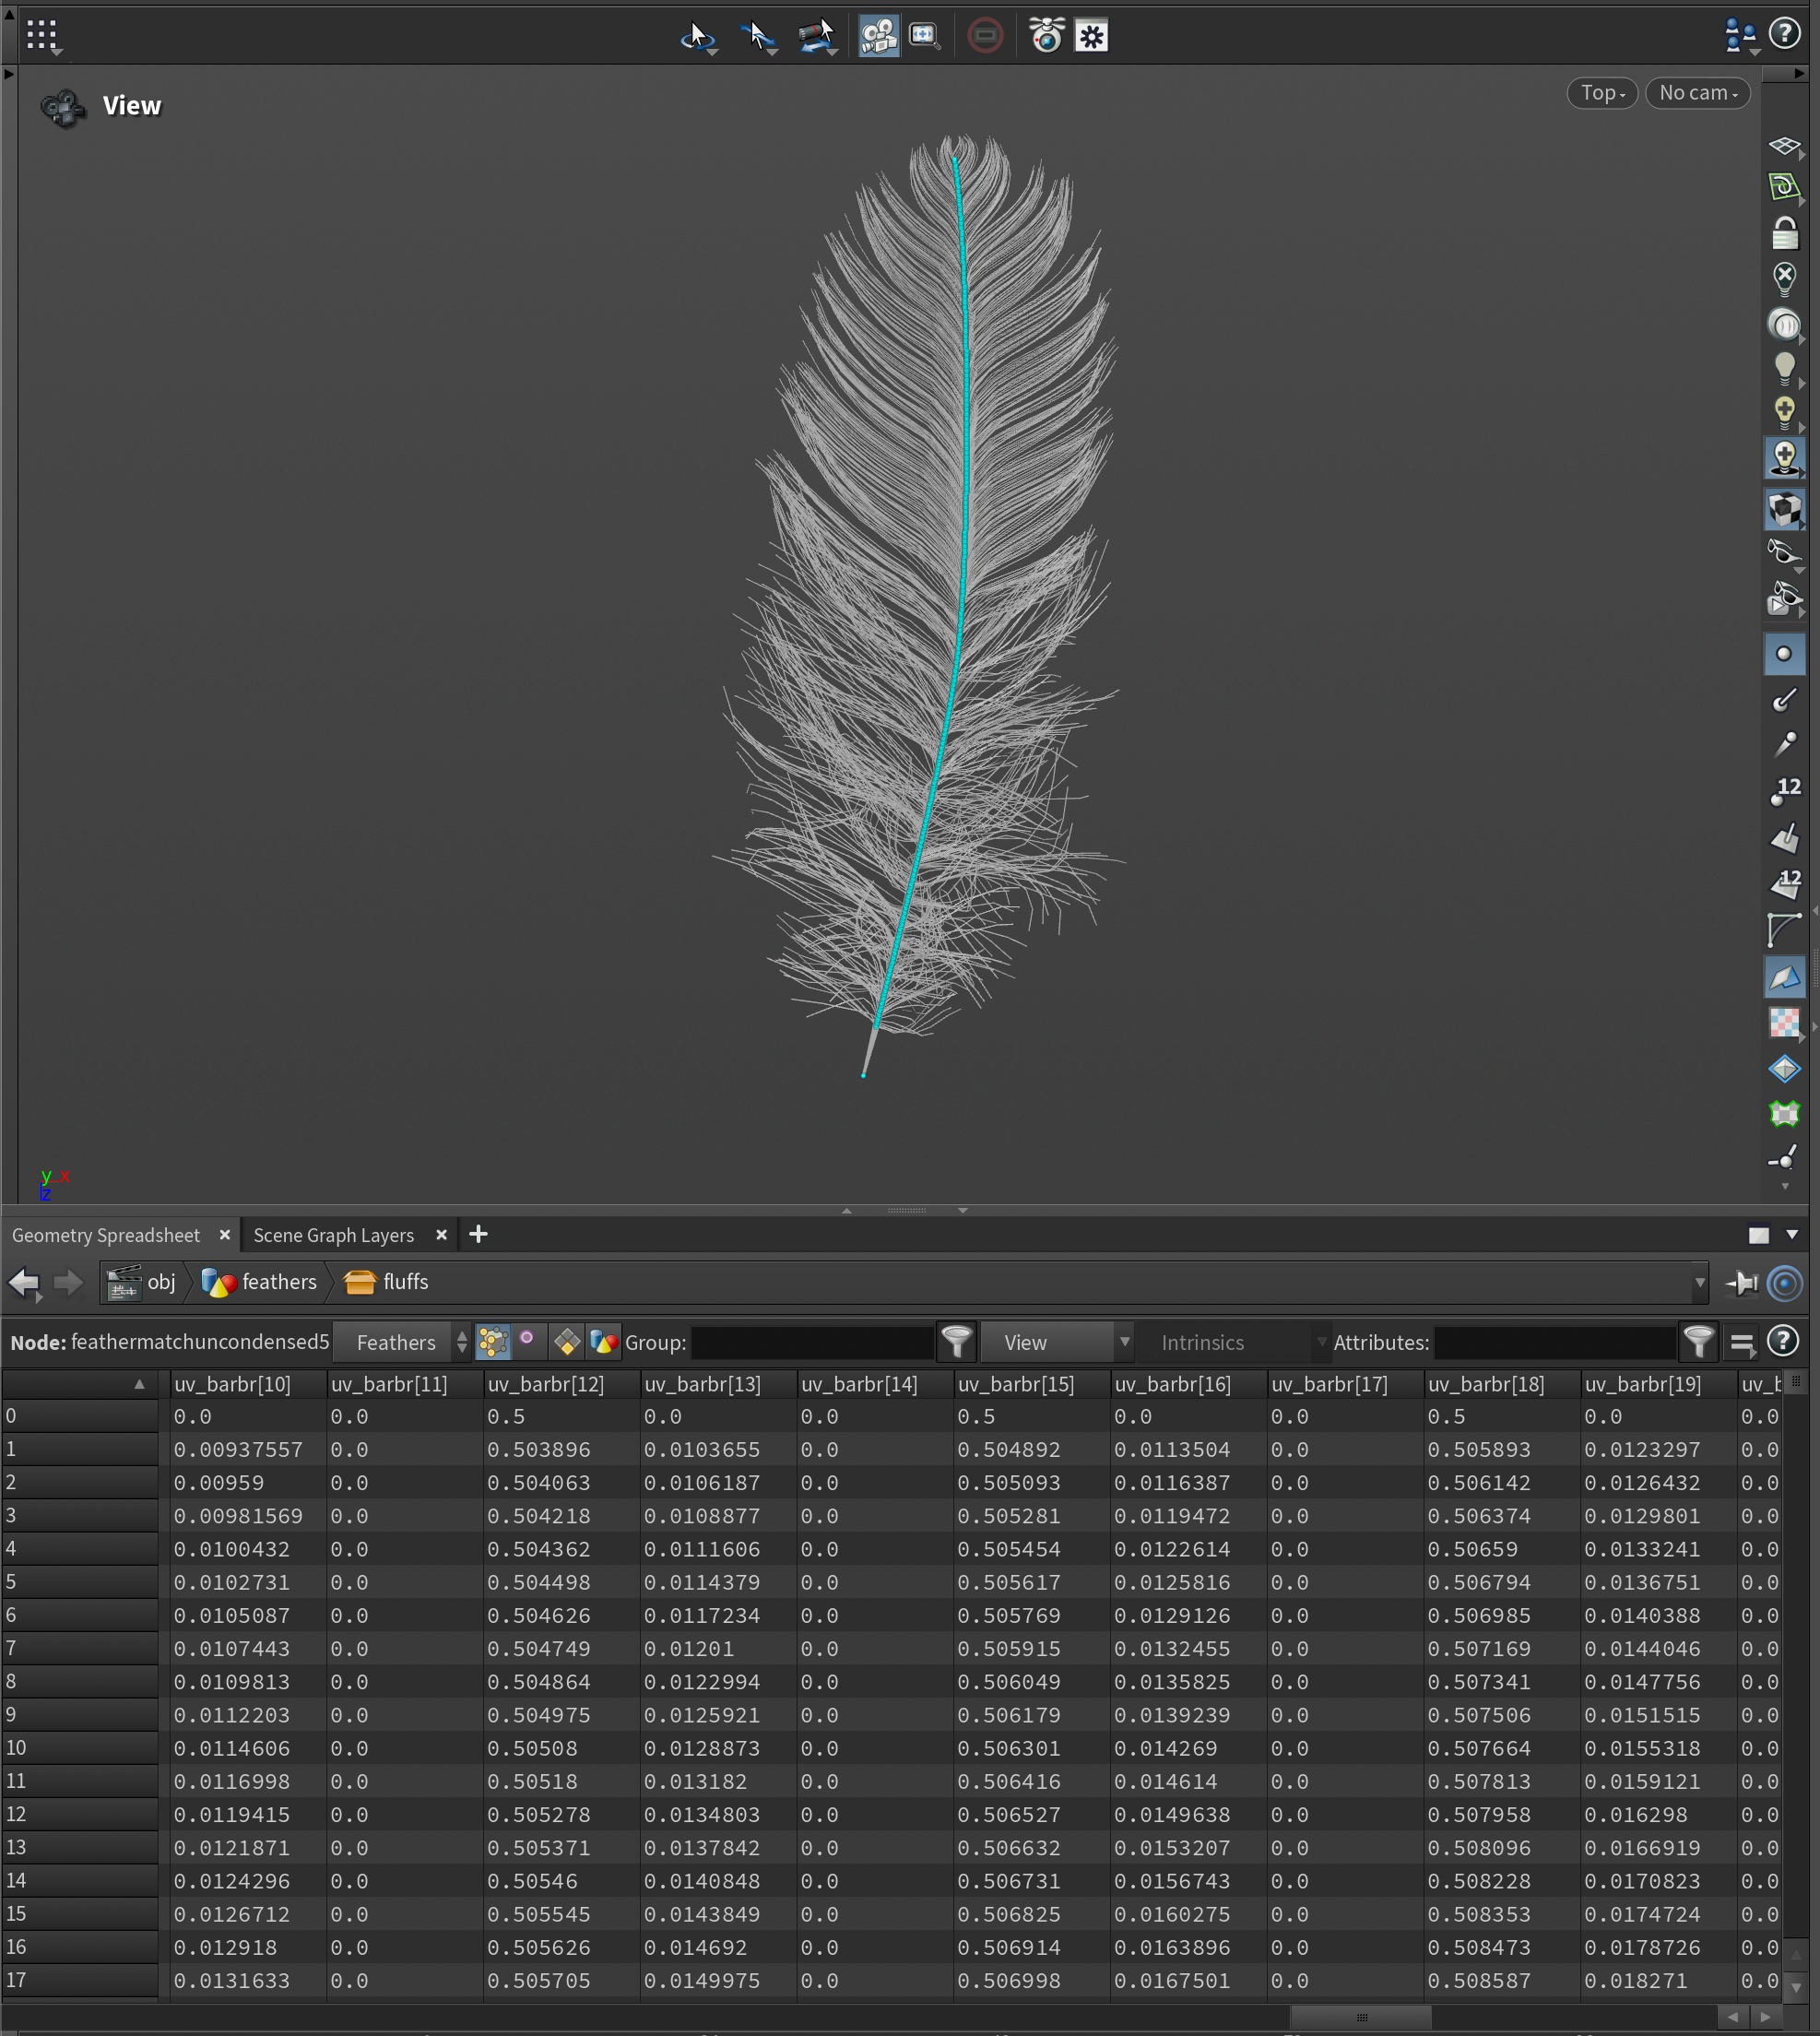
The new feather system in Houdini provides a very resource-efficient approach to storing what would otherwise be very heavy pieces of geometry. You have two representations available for feathers - condensed and uncondensed. Uncondensed is raw geometry where each barb has its own individual geometry, whereas condensed feathers only contain the shaft itself in raw geometry. In a condensed feather, the location of the cvs/points of the individual barbs are instead stored as 1-dimensional arrays of size x on each point of the shaft (P_barbl and P_barbr) where x is equal to the number of points on the barbs multiplied by 3 (so you have a value for x, y, and z position on each barb point). In addition, you also have attributes like barborient , uv_barbl and uv_barbr to represent orientation and UVs on the barbs. The viewport is still able to render the barbs for you, but since it's technically not "raw" geometry it can be rendered in a much more resource-efficient way.
Luckily you can go back and forth between uncondensed and condensed feathers as much as you like using nodes such as Feather Match Uncondensed SOP and Feather Uncondense SOP to utilize the best of both worlds. It is however recommended to go back to condensed feathers before starting to groom (unless all you want is to render a couple of close-up feathers).
Geometry node and turn on Shade Open Curves in Viewport. Otherwise, you'll not see any of your barbs in the condensed state.
Drawing a feather
Drawing a feather in Houdini is very easy and quite artist-friendly. The easiest way to generate one is using the Feather Shape Organize SOP node. The first input of the node takes in a Shape Curve which is essentially the line of the shaft + the outline of the feather. I recommend starting at the bottom of the shaft and drawing that curve first for the best results. In my setups I always used a Curve SOP node and hand drew the needed curves - but in theory you could use any SOP node that generates curves.
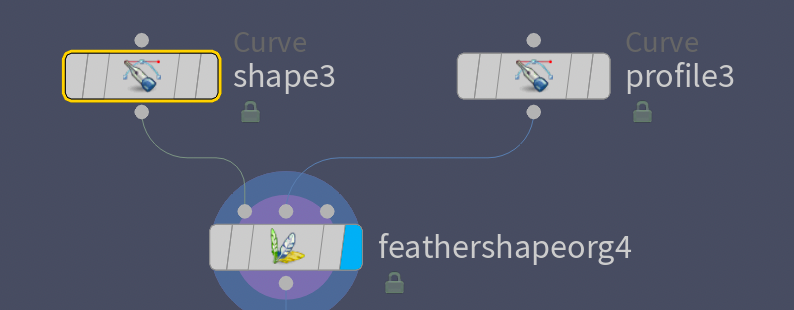
The second input takes the profile curves and is optional - but recommended. Essentially they are just curves that represent the overall flow of the barbs in different areas of the feather.
When you plug these into your Feather Shape Organize SOP it will automatically create groups necessary for Houdini to use them as schematics for generating feathers. You can be quite loose in drawing these curves, all of the details will come in the following sections. I recommend using some reference of real feathers to trace on top of for better results (more on that later).
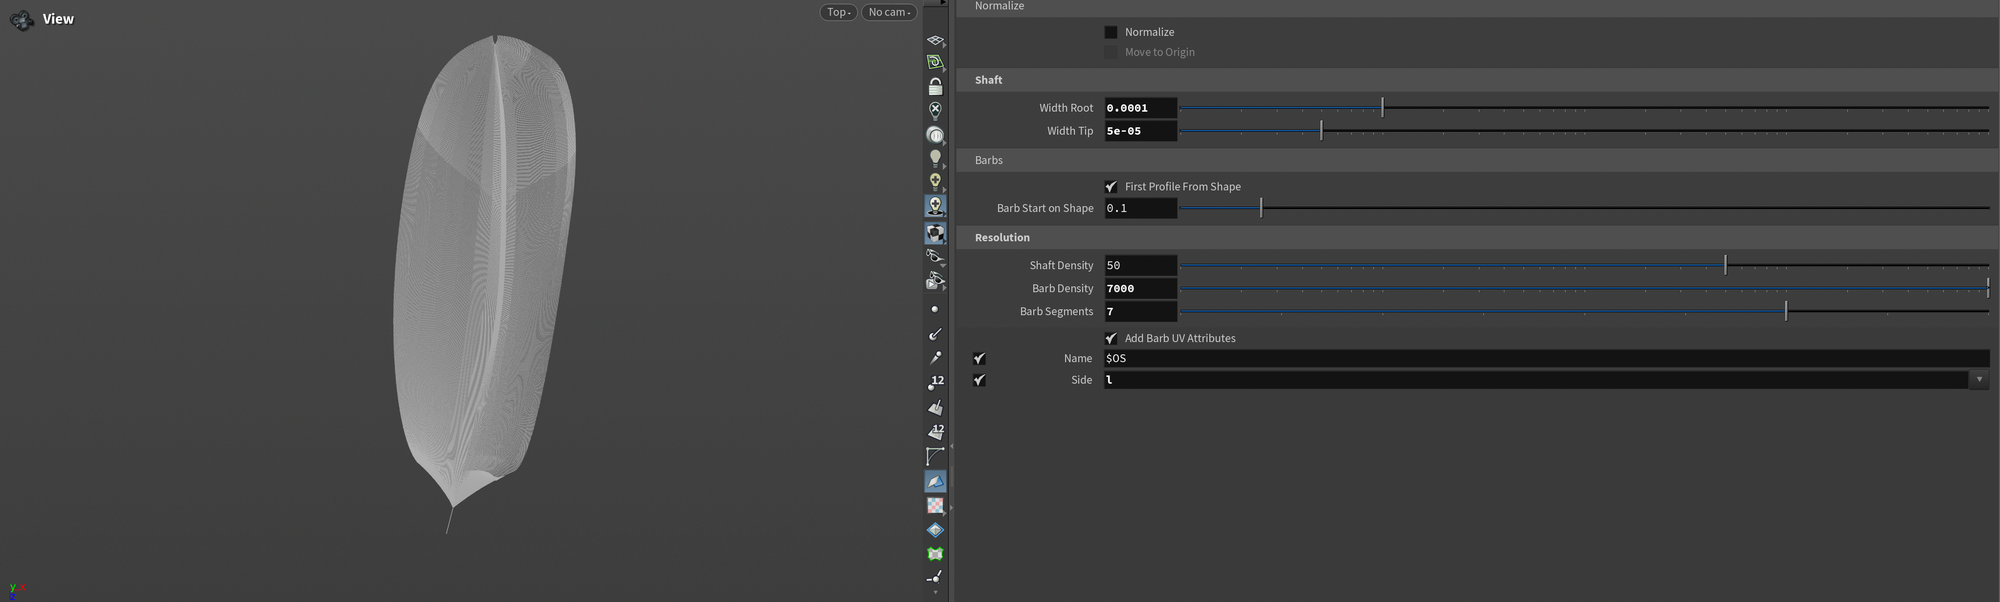
Finally, you can plug the output of the Feather Shape Organize SOP into Feather Template from Shape SOP to generate your first condensed feather!
On this node, you'll also be able to set the resolution, width, name, and sides. I recommend setting the Side and Name parameter to something that makes sense (for Side that'll usually be l). This will become very important when we start grooming. For the Barb Segment parameter it's also important to keep an eye out. This parameter should always be the same for all of your feathers as merging feathers with different Barb Segment values can produce unexpected results (I believe this is because this parameter controls the size of all of your P_barbl, P_barbr , etc. attributes, and Houdini doesn't know what to do when merging attributes of different sizes).
Great! Our current feather is quite simple though, let's start looking at adding some details.
Adding details
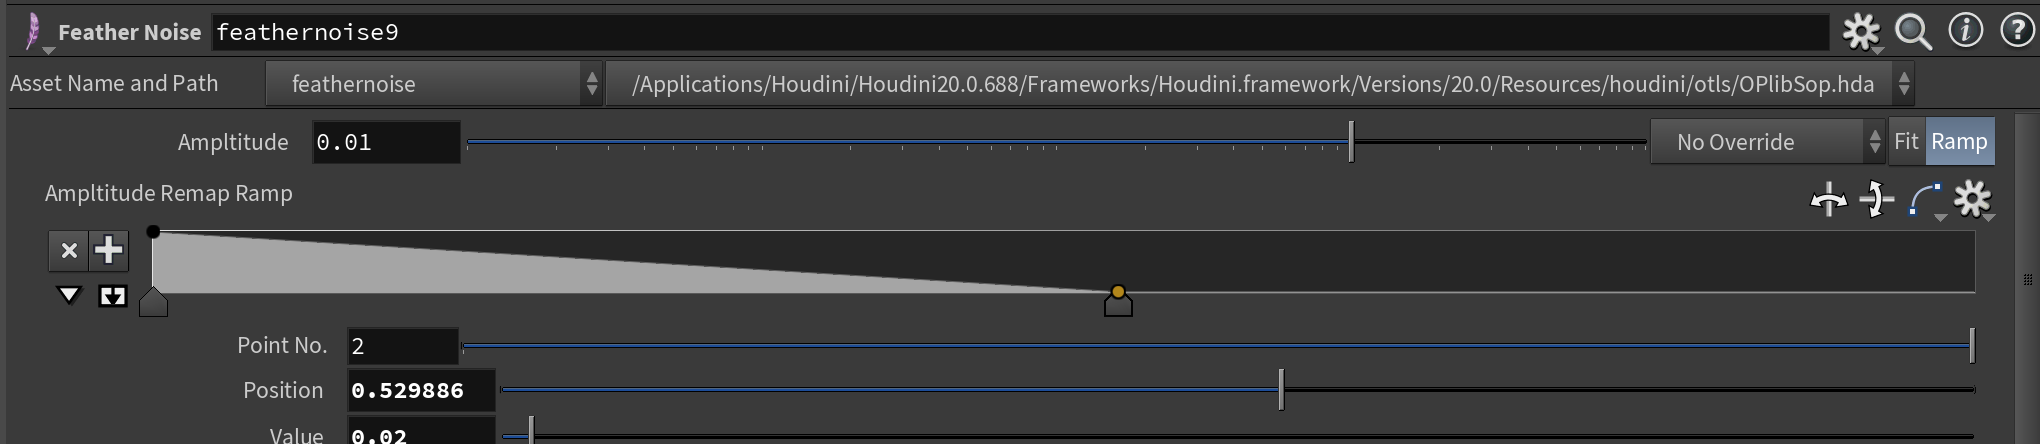
By default, the feathers are usually not very interesting visually so you'll have to add various details like noise and clumping. There are a variety of approaches to this (especially if you're working uncondensed) but for most use cases you'll be using a combination of the specific feather nodes like Feather Noise and Feather Clump . However, you can also use normal Guide Process nodes that you may have encountered if you've ever done grooming in Houdini.
In my case, I ended up using a combination of all the above to achieve the look of my feathers. This is a very artistic process so it's very dependent on the look you're going for. I recommend playing around with the different nodes until you find a workflow you like.
For more specific tricks I had a lot of good results doing various levels of clumping using Feather Clump nodes based on an attribute generated in an Attribute Randomize . In my case, I set the Attribute Randomize to be either 1 or 0 (so clump or no clump), then plugged that into the Split Attribute parameter of my Feather Clump .
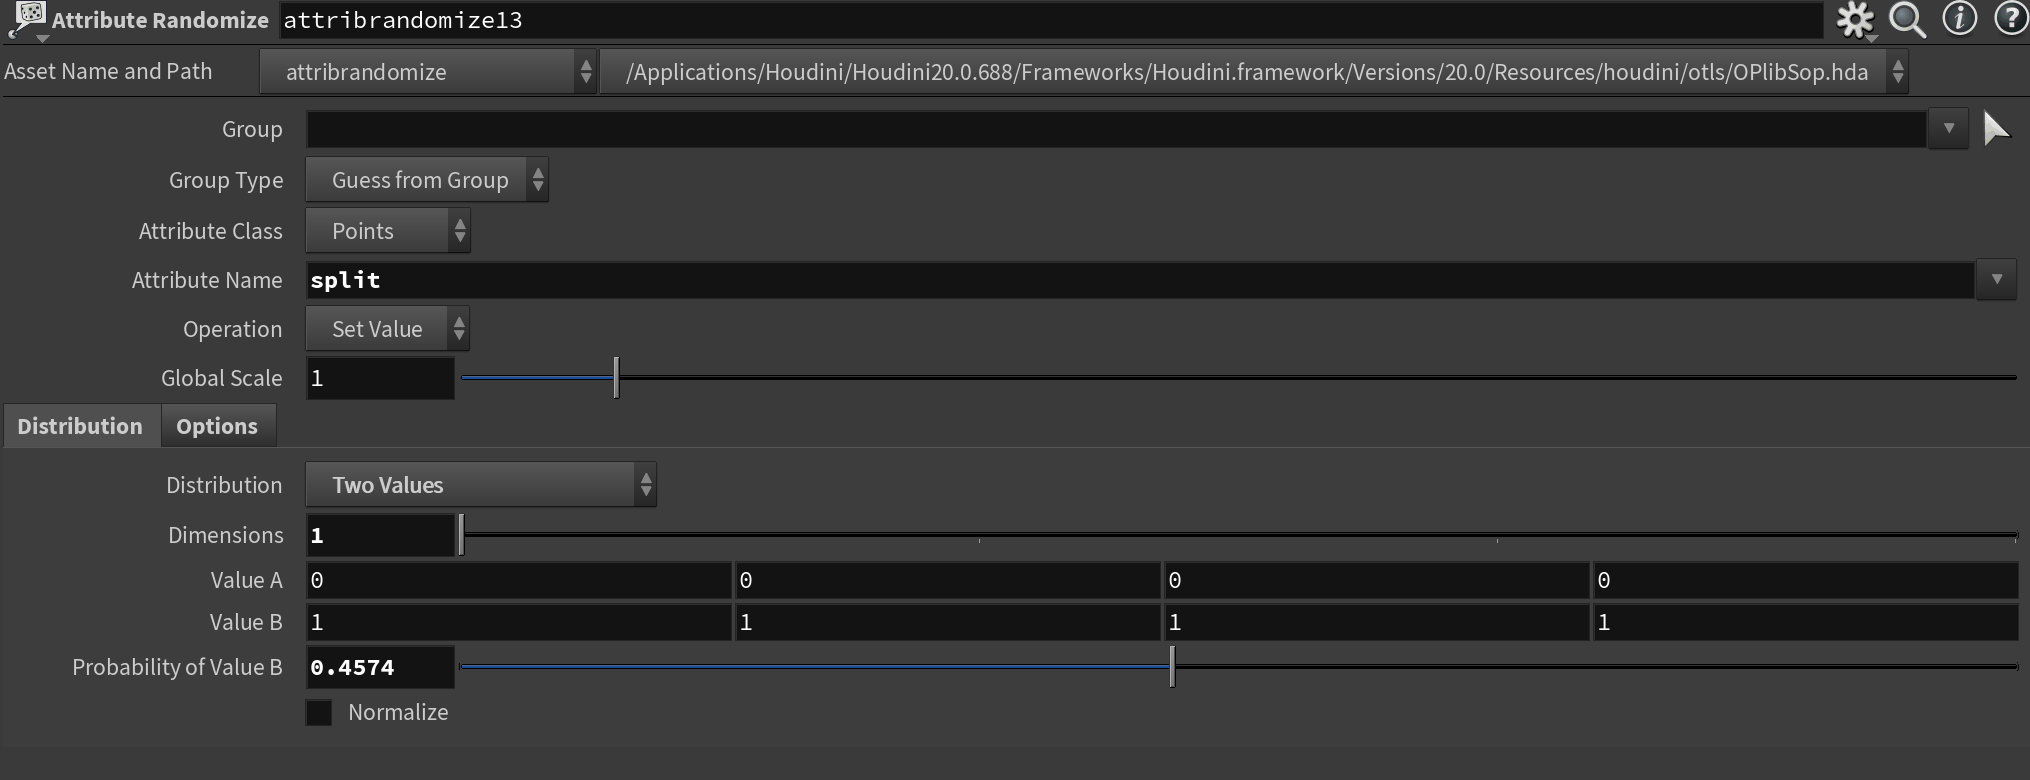
Operation parameter to something other than Set Value .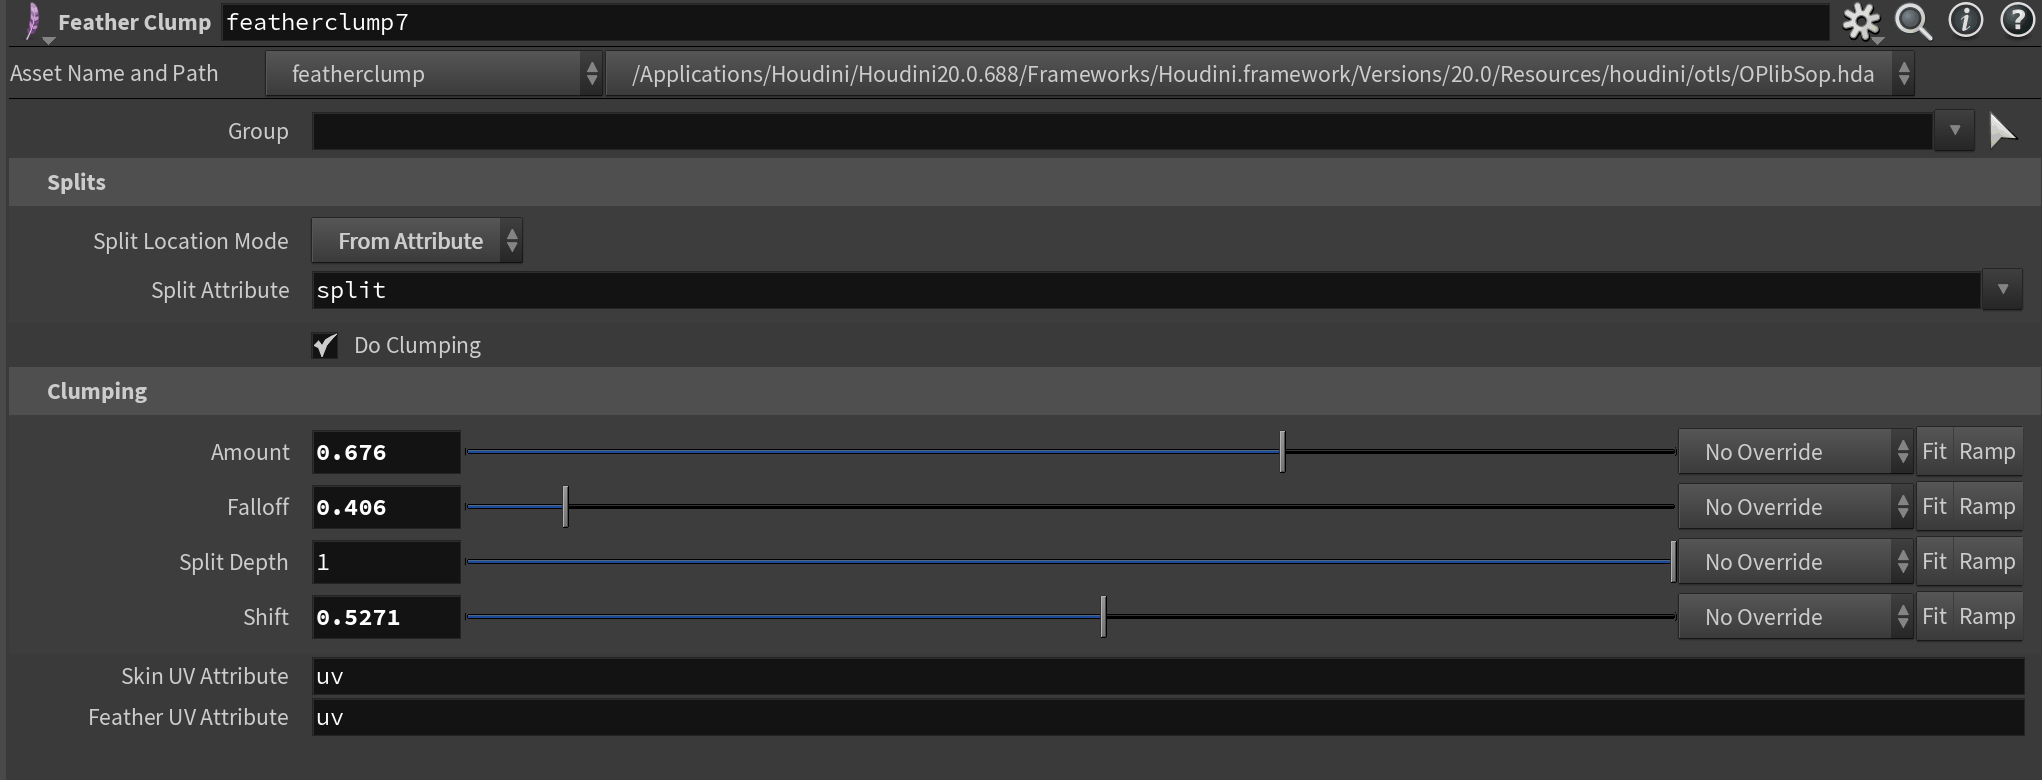
split attribute in Feather ClumpAnother great tip is to utilize the Ramp button in your feather and guide groom nodes - it allows you to control how the node affects your feather along its surface. I used it all the time. When using Guide Process nodes there's also a useful Masking tab to explore.
Feather NoiseCreating a Feather Atlas
Usually, you want more than one type of feather for your bird. For this purpose, you can create what's called a "feather atlas", which is essentially just a larger collection of feathers for different areas of the bird.
I highly recommend finding good references for this task. I used a mixture of the Feather Atlas and Featherbase . Both of these websites are free and have great atlases of feathers from many different species, sometimes even with scale measurements. The idea is that you can load these into your Houdini scene as a background (Press "D" in the viewport and go to "Background") and then trace on top of them using the top view. You don't need to worry about where in world space you draw your feathers, Houdini automatically figures out where the root of the shaft is when you start grooming.

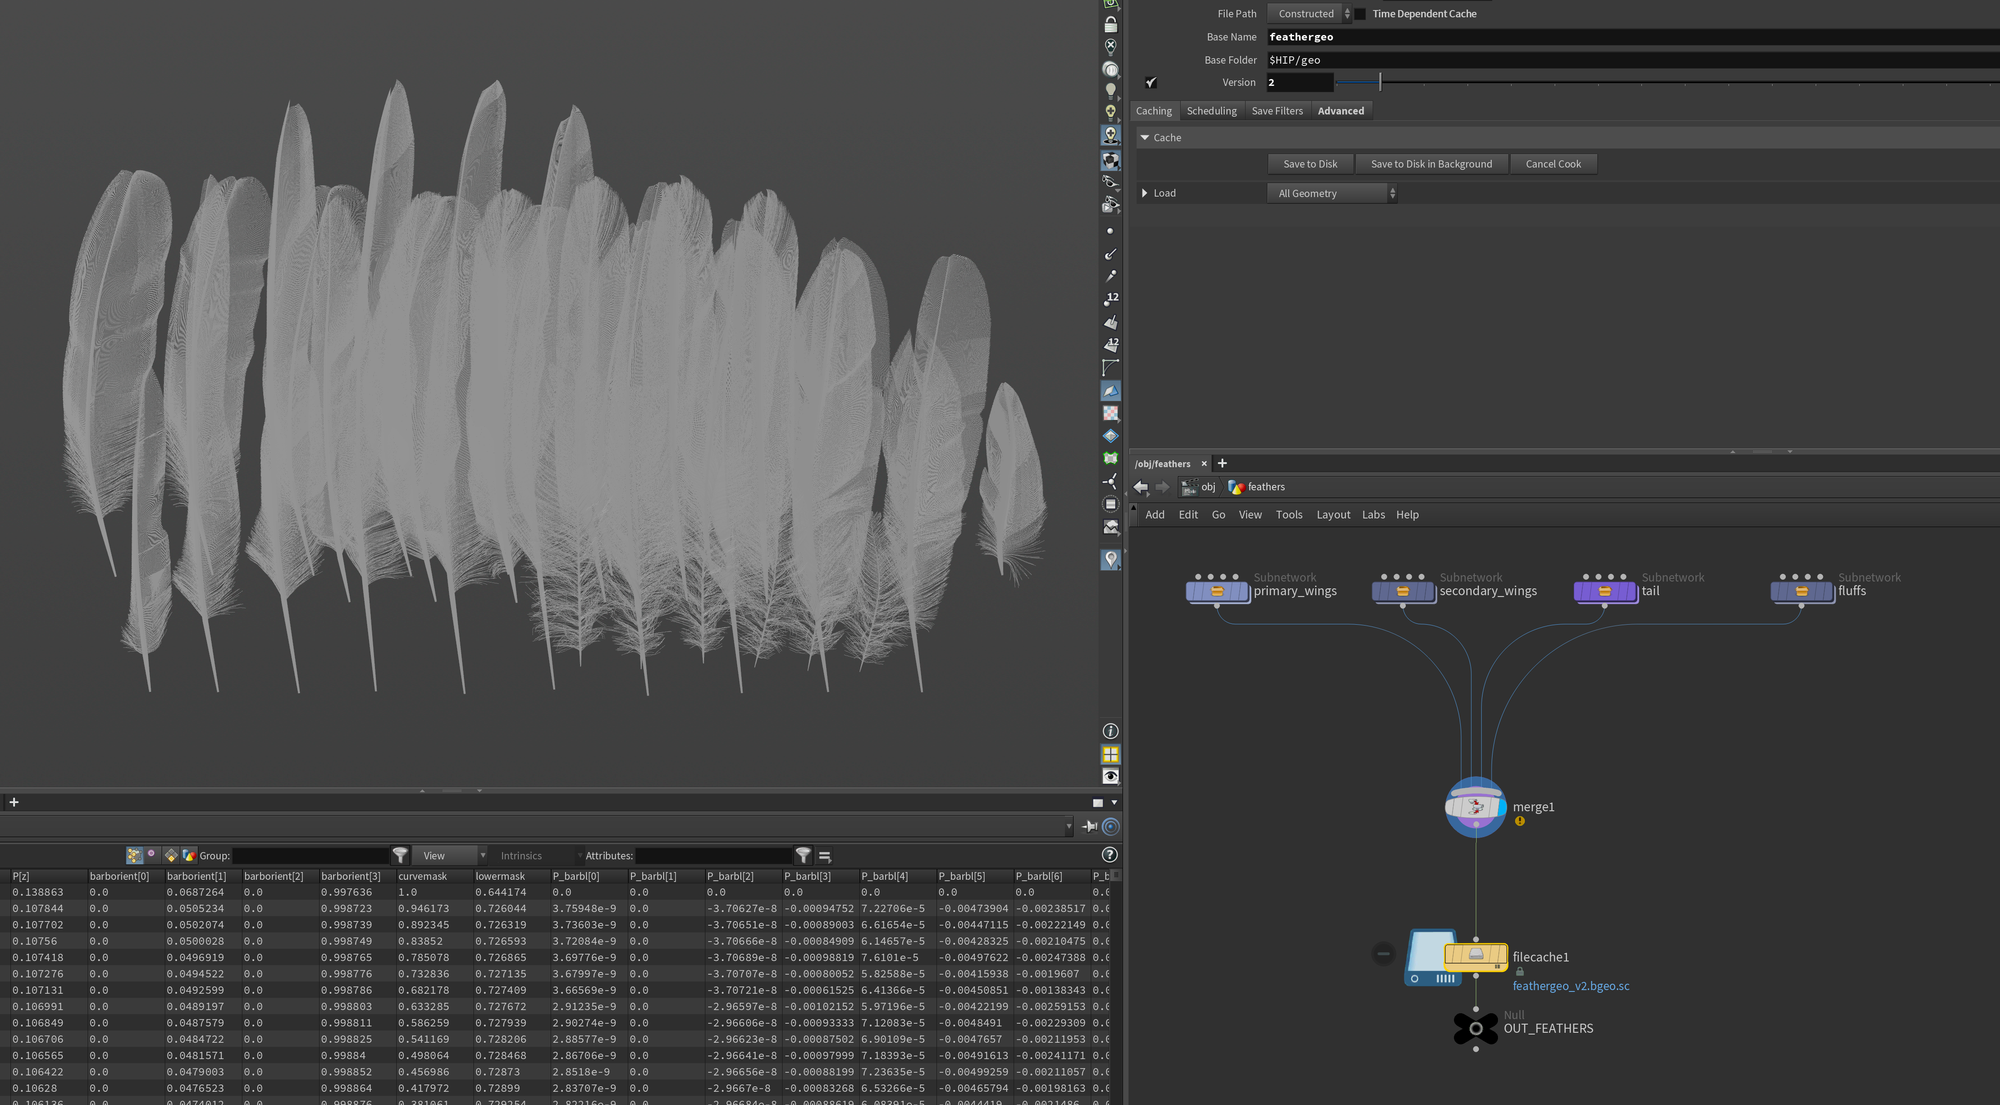
In my example, I created 4 different groups of feathers, each containing 5-10 feathers. These included primary feathers, secondary feathers, tail feathers, and some down feathers (fuzz). I then merged them all together in one output and saved it using a File Cache node so I don't have to recook my network.
Grooming
Applying the feathers to our mesh
With a nice library of feathers, we can finally start the grooming process. This is another very artistic process with several different approaches. I primarily used two different techniques in the groom setup for my crow - manual and scattered. Later I'll also show you how I exported my groom to USD and prepared it for rendering.
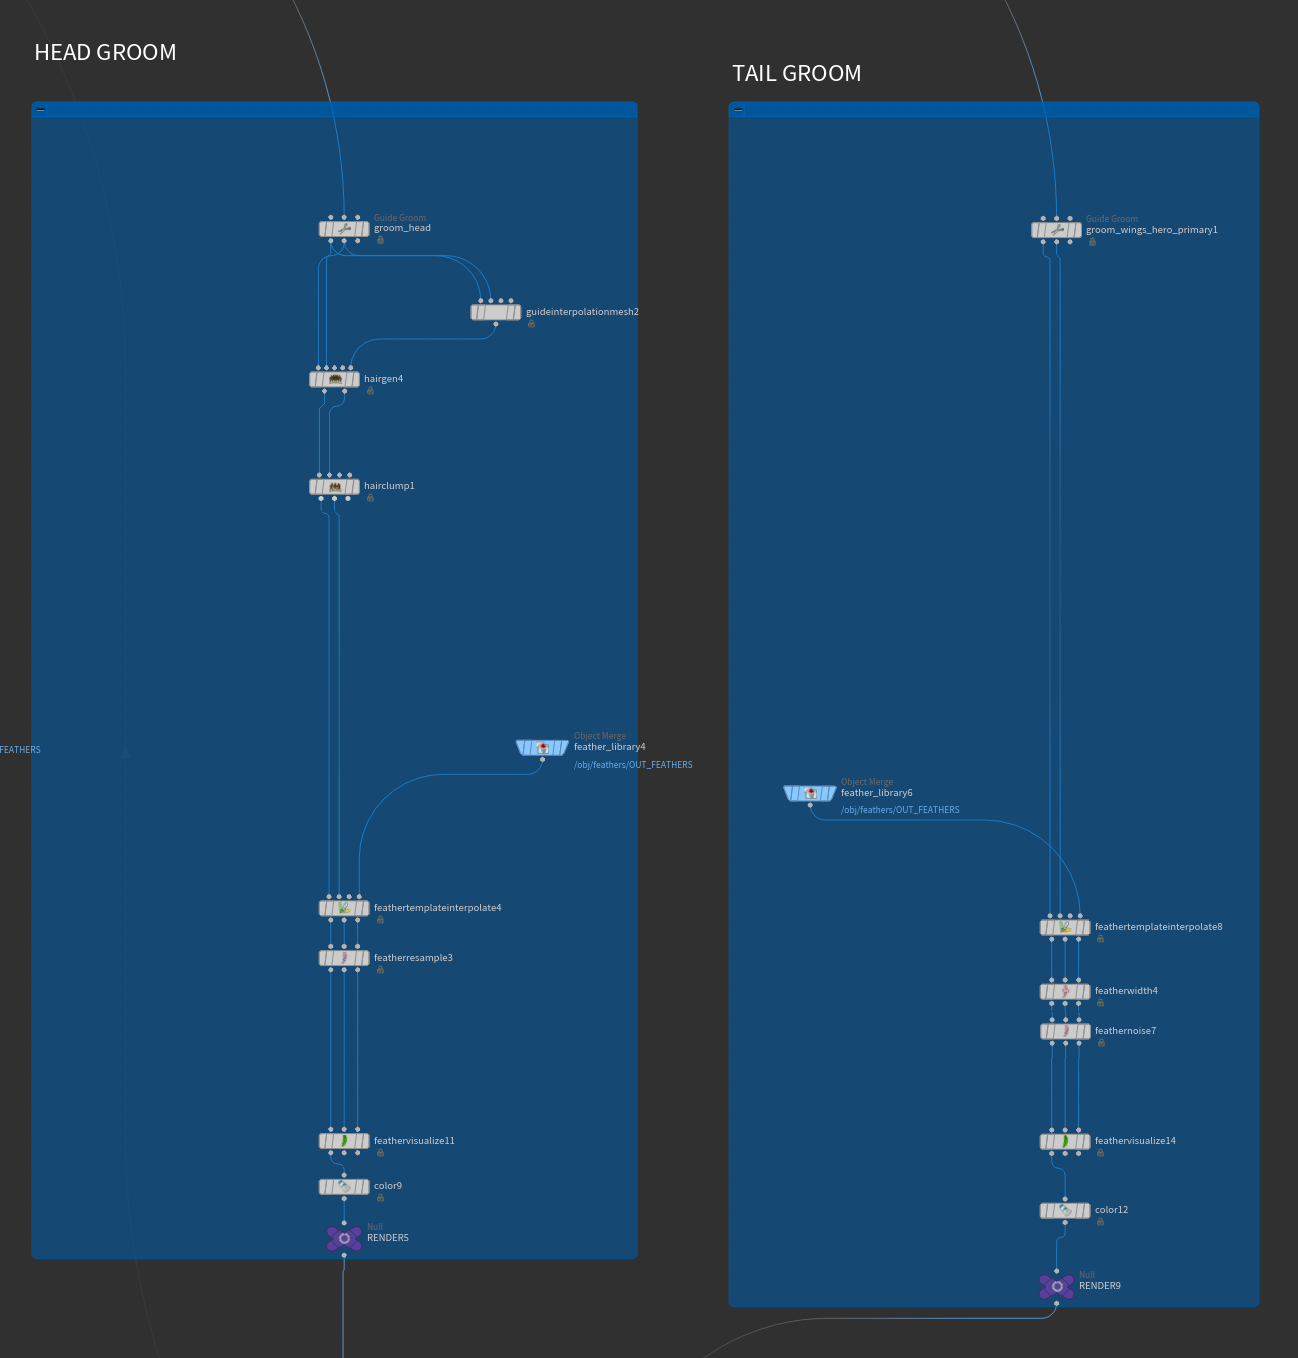
In my setup, I split the groom into separate parts that I exported individually (wings, body, tail, etc.). I mainly did this because I found merging feathers a little tricky. It's possible to do (usually seems to behave best when you merge your guides before doing Feather Template Interpolate ) but it was very easy to get strange artifacts and broken feathers. Therefore I exported each area/groom separately and assembled everything in Solaris for rendering. If you want to preview them combined in SOPs you can use a Merge Packed. This approach simply behaved more consistently for me. If someone has experience resolving this in a better way I would love to know!
Manual Grooming
The manual workflow consists of hand-drawing feathers on your base mesh using a Guide Groom node and then interpolating those curves into feathers. This is great for more specific areas like the wing and tails that often require exact placement of feathers.
This approach is very straightforward. You start by adding a Guide Groom node and plugging your mesh into the second input of the node. You then need to adjust a couple of settings to make the node work with feathers (it was originally designed for regular fur/hair).
First, you'll need to open the Feathers tab in the node parameters and toggle Create & Output Feathers . You'll also need to plug in a path to your feather atlas that you created in the previous section into the Template Geometry SOP parameter. Below this, in the Tempalte Group parameter is where you select which feather you want to scatter - notice that it's picking up the names we gave each feather earlier. Changing this won't change all the feathers you applied to your Guide Groom node - it will only affect anything you place after changing this parameter.
Next, you'll need to also turn on Create and Maintain orient Attribute in the Orientation Attributes section and set the Orient Attribute Name parameter to barborient. This is important as it is what decides the orientation of the barbs and needs to be maintained throughout your groom. You can also set an Active Name for easier grouping of grooms later, as well as turning on Mirror Groom to work on both sides of your character at once - but all of this is optional.
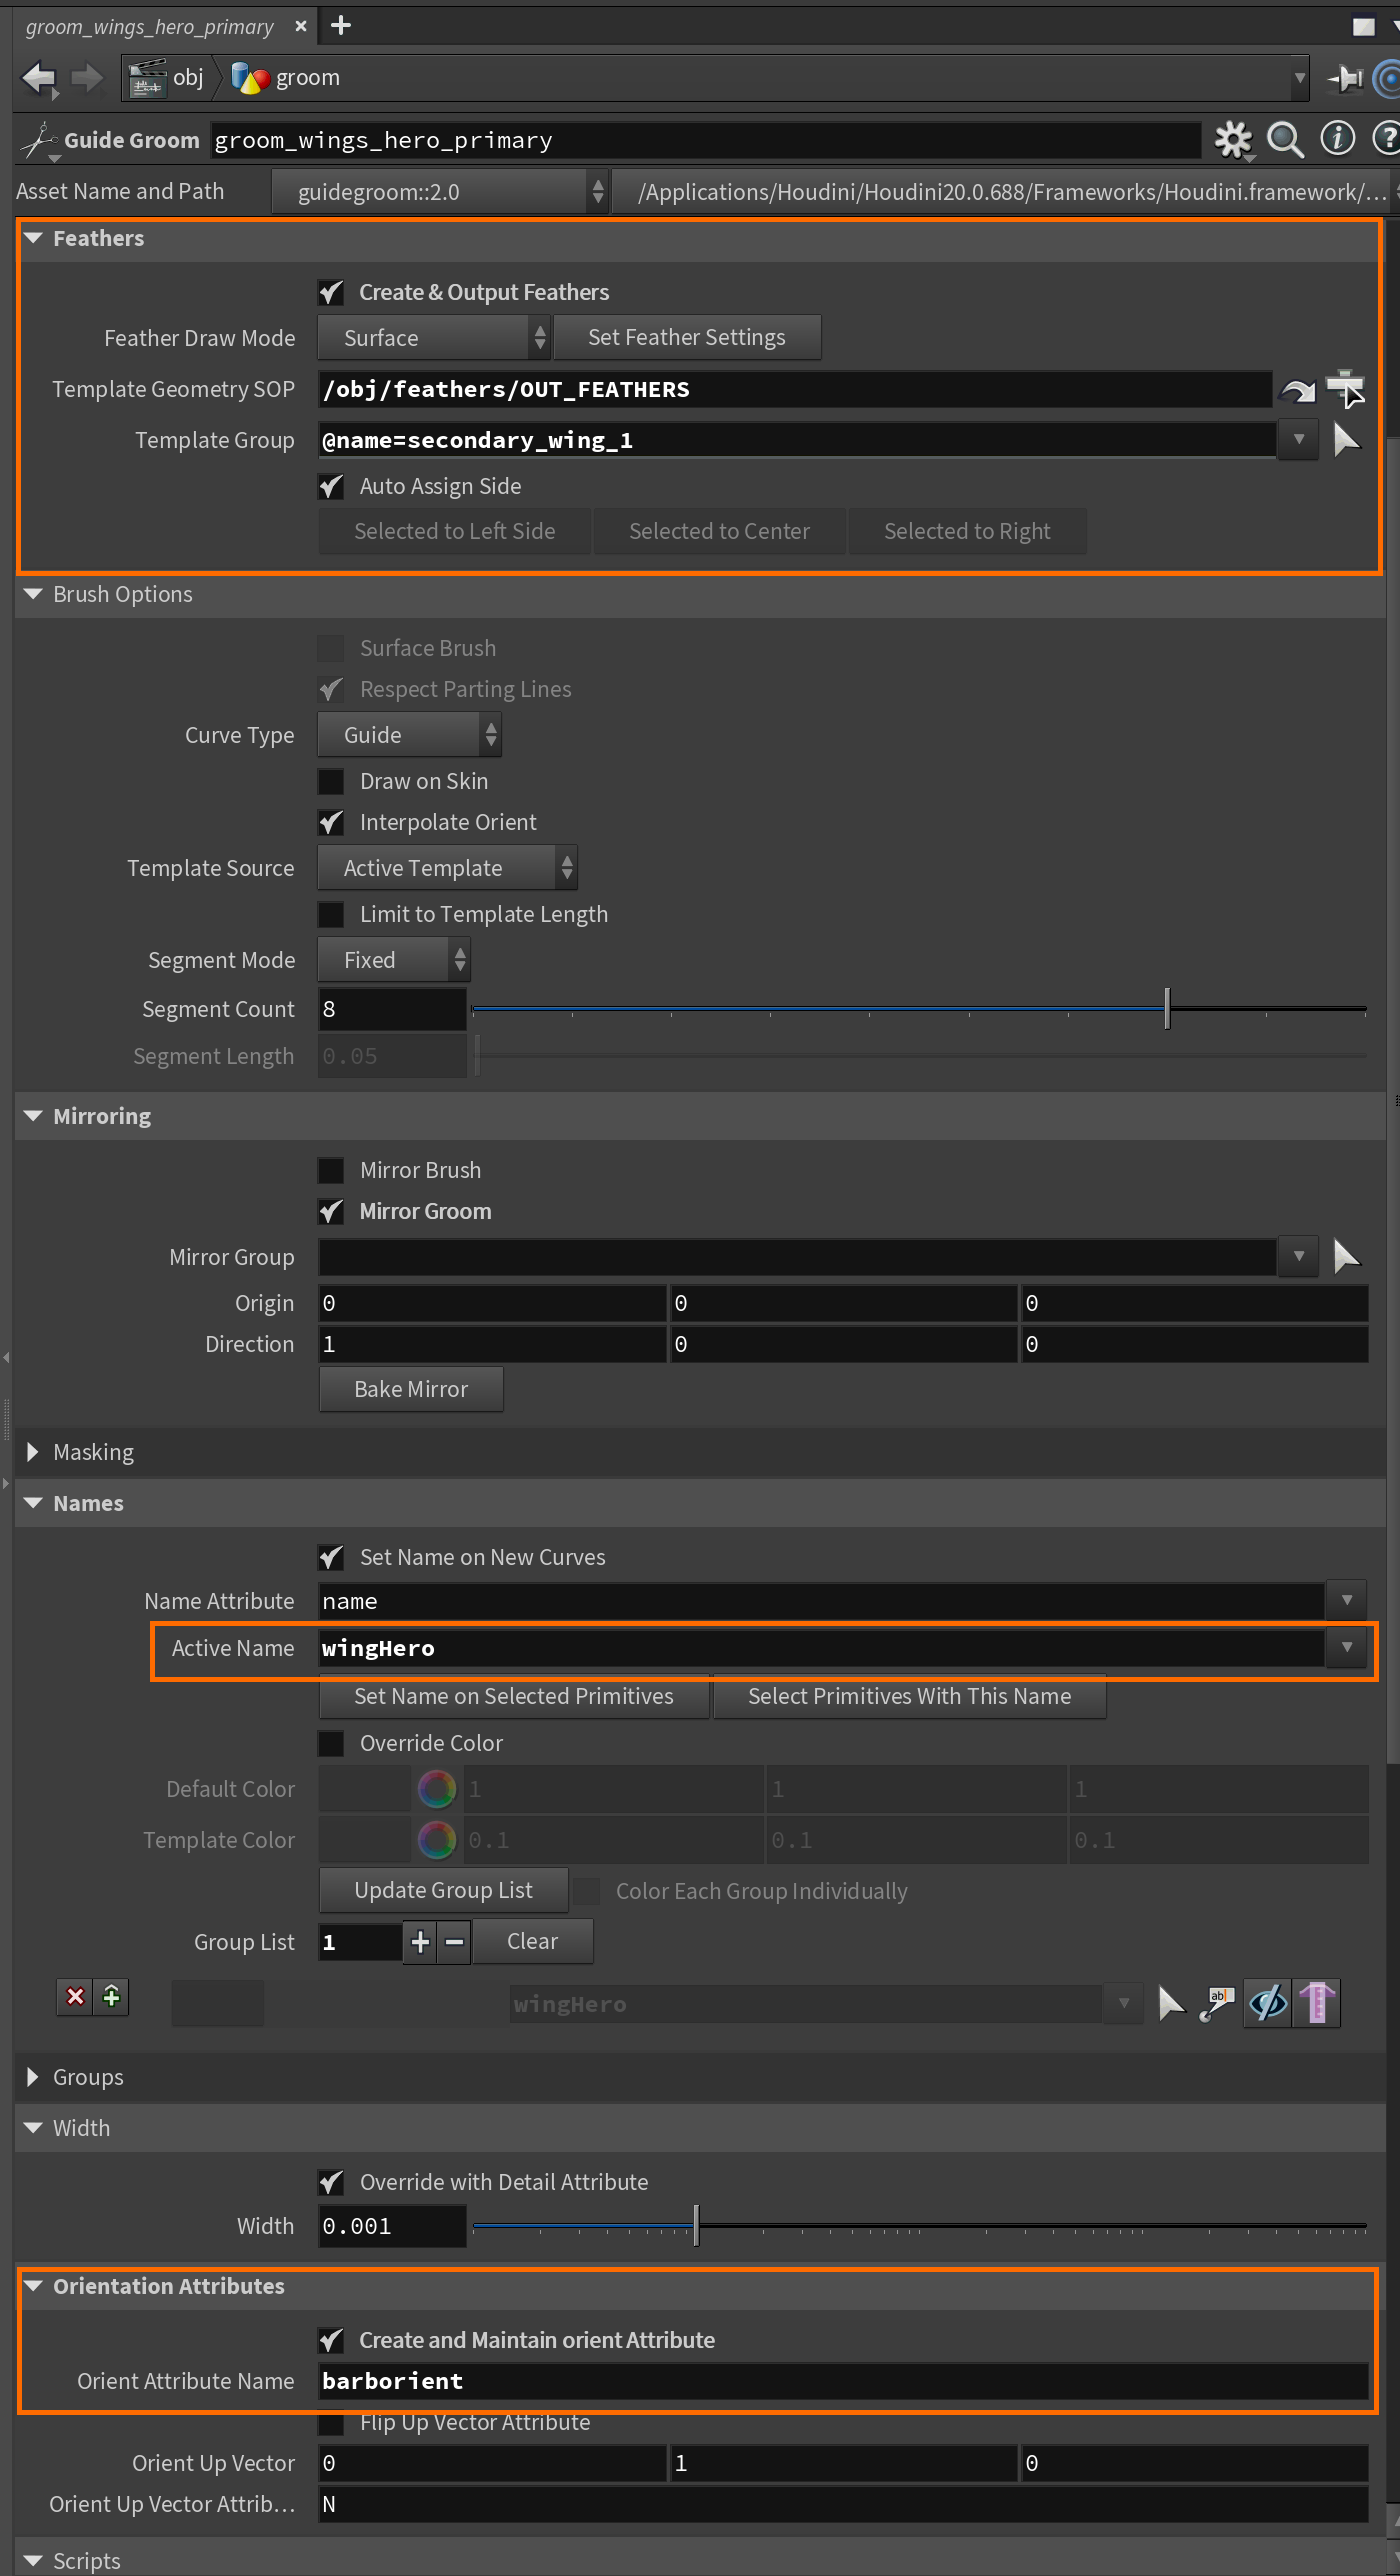
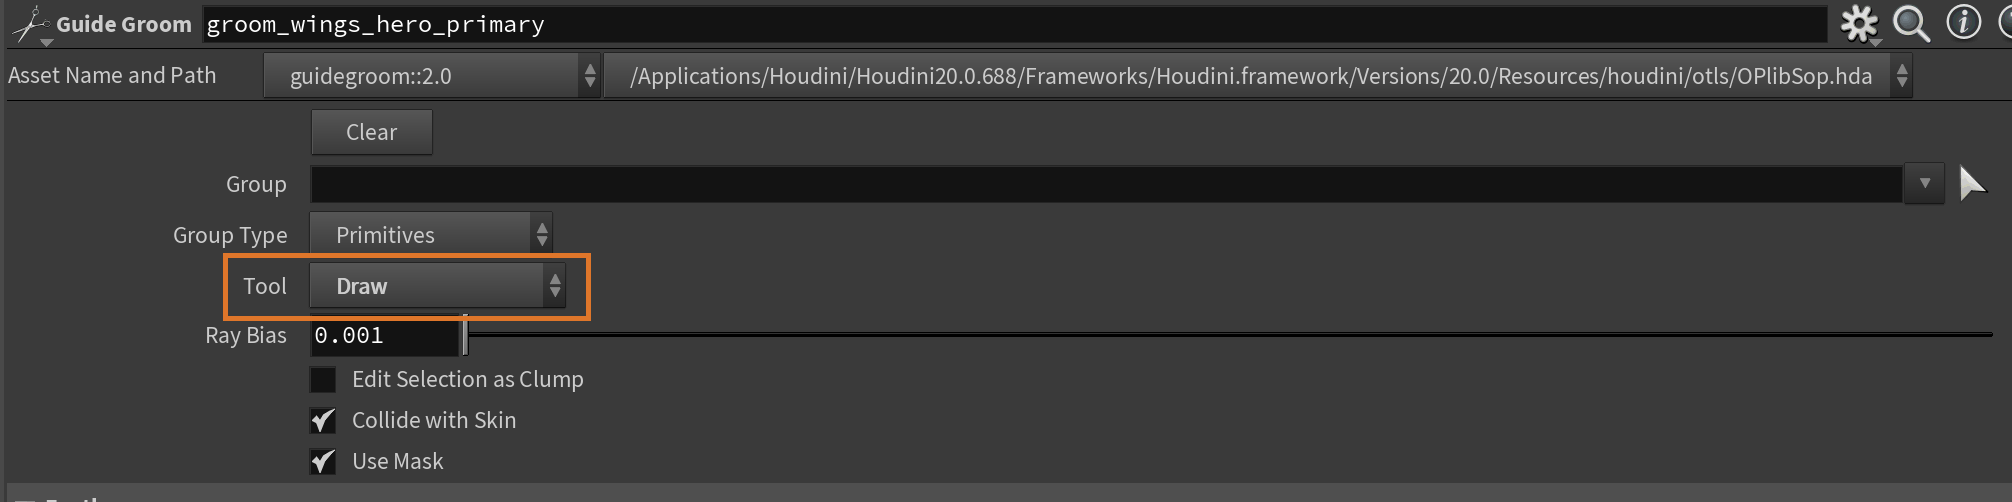
Guide Groom settings for feather grooming.Now you just start drawing your feathers! You can draw them in a couple of different ways, I recommend using the Draw tool to start with, then modify the result using the other tools in the dropdown.
Guide Groom nodeI also recommend templating your mesh (hold down w and drag on top of your mesh node or CTRL+click the template button on the node containing you base mesh) so you can see the underlying mesh while you groom.
Guide Groom node.Scattered Grooming
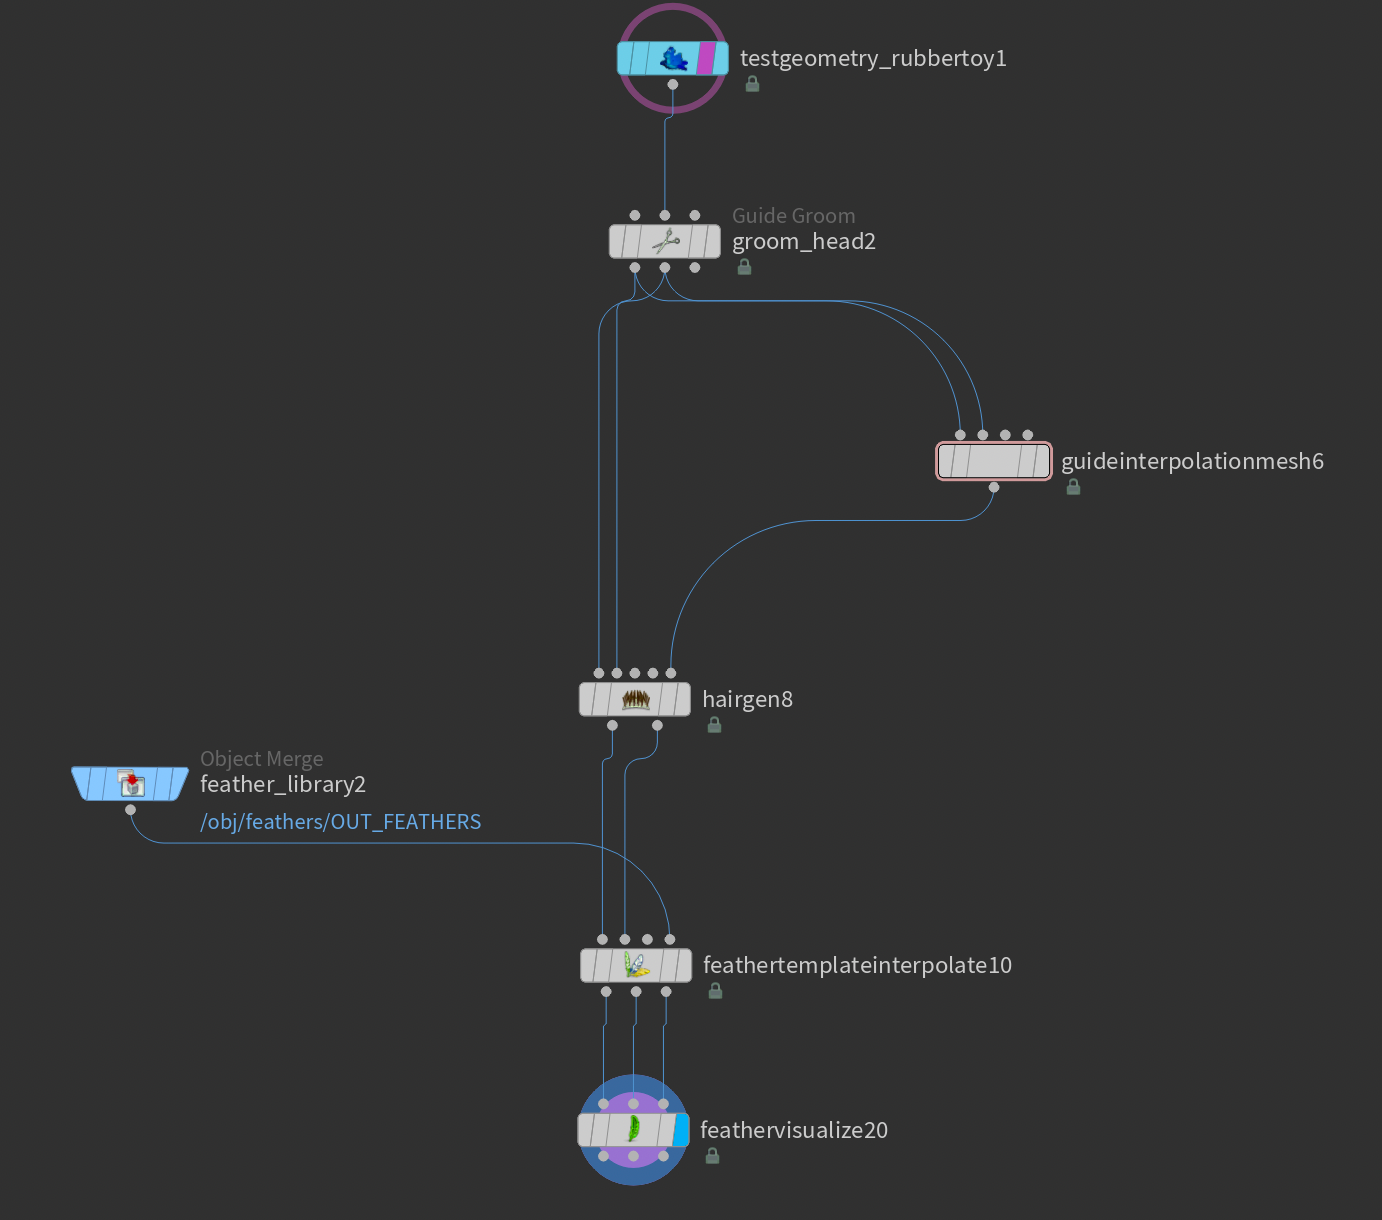
The scattered workflow consists of drawing guide curves on your mesh and then using a Hair Generate node to add additional curves around your guides. This is a quick way to cover large surfaces quickly and is useful for more broad areas of the bird like the body and head. It does however require a bit more setup.
You start the same way as with the manual workflow, with a Guide Groom using the same settings as in the previous section. This node will be where you'll draw your guide curves.
You need two additional nodes now - a Hair Generate and a.Guide Interpolation Mesh . The Hair Generate is responsible for generating additional curves based on your input guide curves, while the Guide Interpolation Mesh is responsible for interpolating the guide curve influences. It does this by generating a low-res proxy mesh which contains index and weight attributes that the Hair Generate uses to interpolate our guide curves. You may need to adjust Max Triangle Size in the Guide Interpolation Mesh to get the best results.
For the Hair Generate you need to plug the skin output from the Guide Groom into the first input, and the guides output into the second input (which is strangely opposite the order of outputs of the Guide Groom ). On the very last input, you plug in the output of the Guide Interpolation Mesh. You then need to set a few parameters in the Hair Generate under Guide Weights - turning on Compute Weights Using Skin Coordinates , Use Interpolation Mesh , and setting Skin Guide Method to Weight Array Pair (guides and weights) .
Optionally you may also want to turn off Grow Unguided Hair - that way the new curves will only generate in areas where you've placed your guide curves. Otherwise, the node will populate the entire mesh with hair.

The main setting you'll be tweaking after applying the above settings will be the Density / Total Count which determines the density of your feather instances. If you wish you can also control this with a density attribute (any float attribute - you could paint it using a Paint SOP for example). With that, you would be able to vary the density across the surface, which is pretty useful.
Interpolating Feathers from Hair Generate output
With the output from our Hair Generate node we still need to turn them from curves into proper feathers. You do this by plugging in a Feather Template Interpolate. Essentially this node interpolates your input curves and turns them into feathers based on the attributes stored on the curves and your feather atlas.
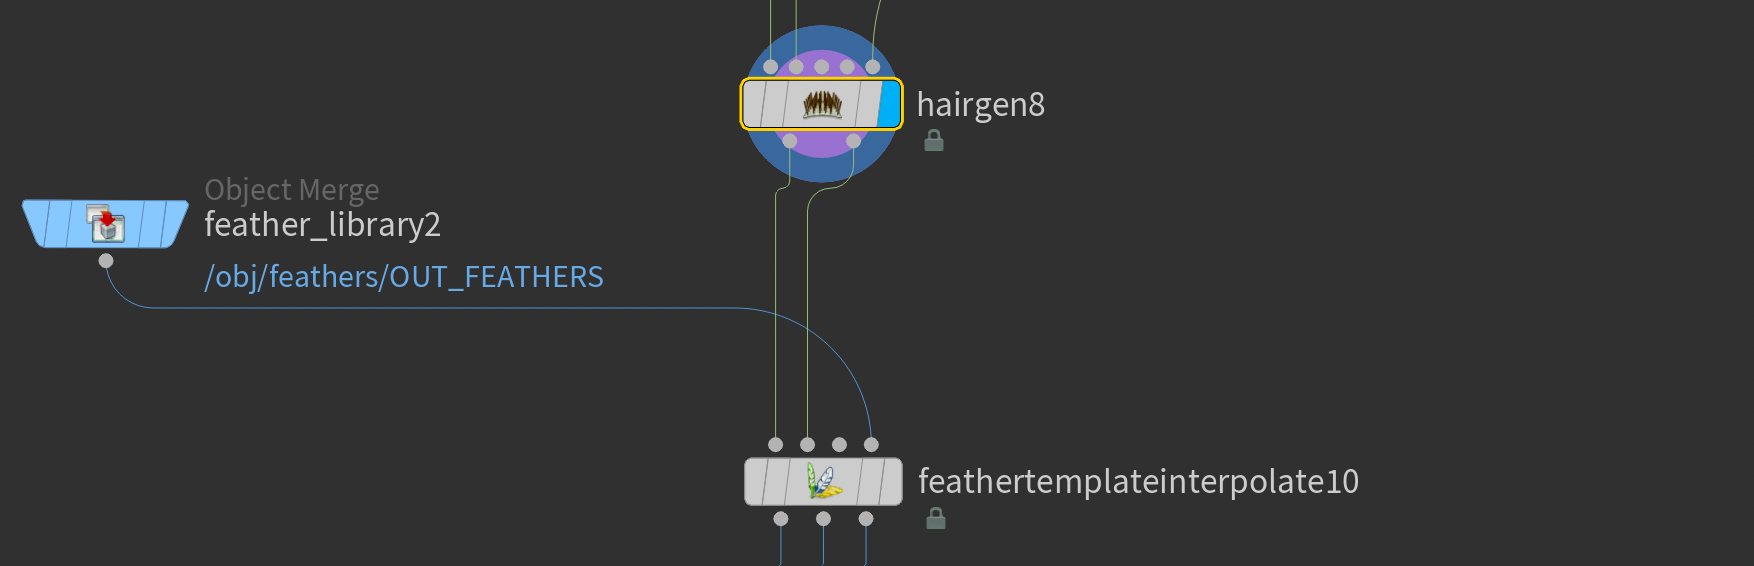
Feather Template Interpolate .This node has a lot of settings, enabling you to resample the barbs and shaft of your feathers, which is quite useful for optimization. There's also an Interpolate UVs toggle which I recommend turning on.
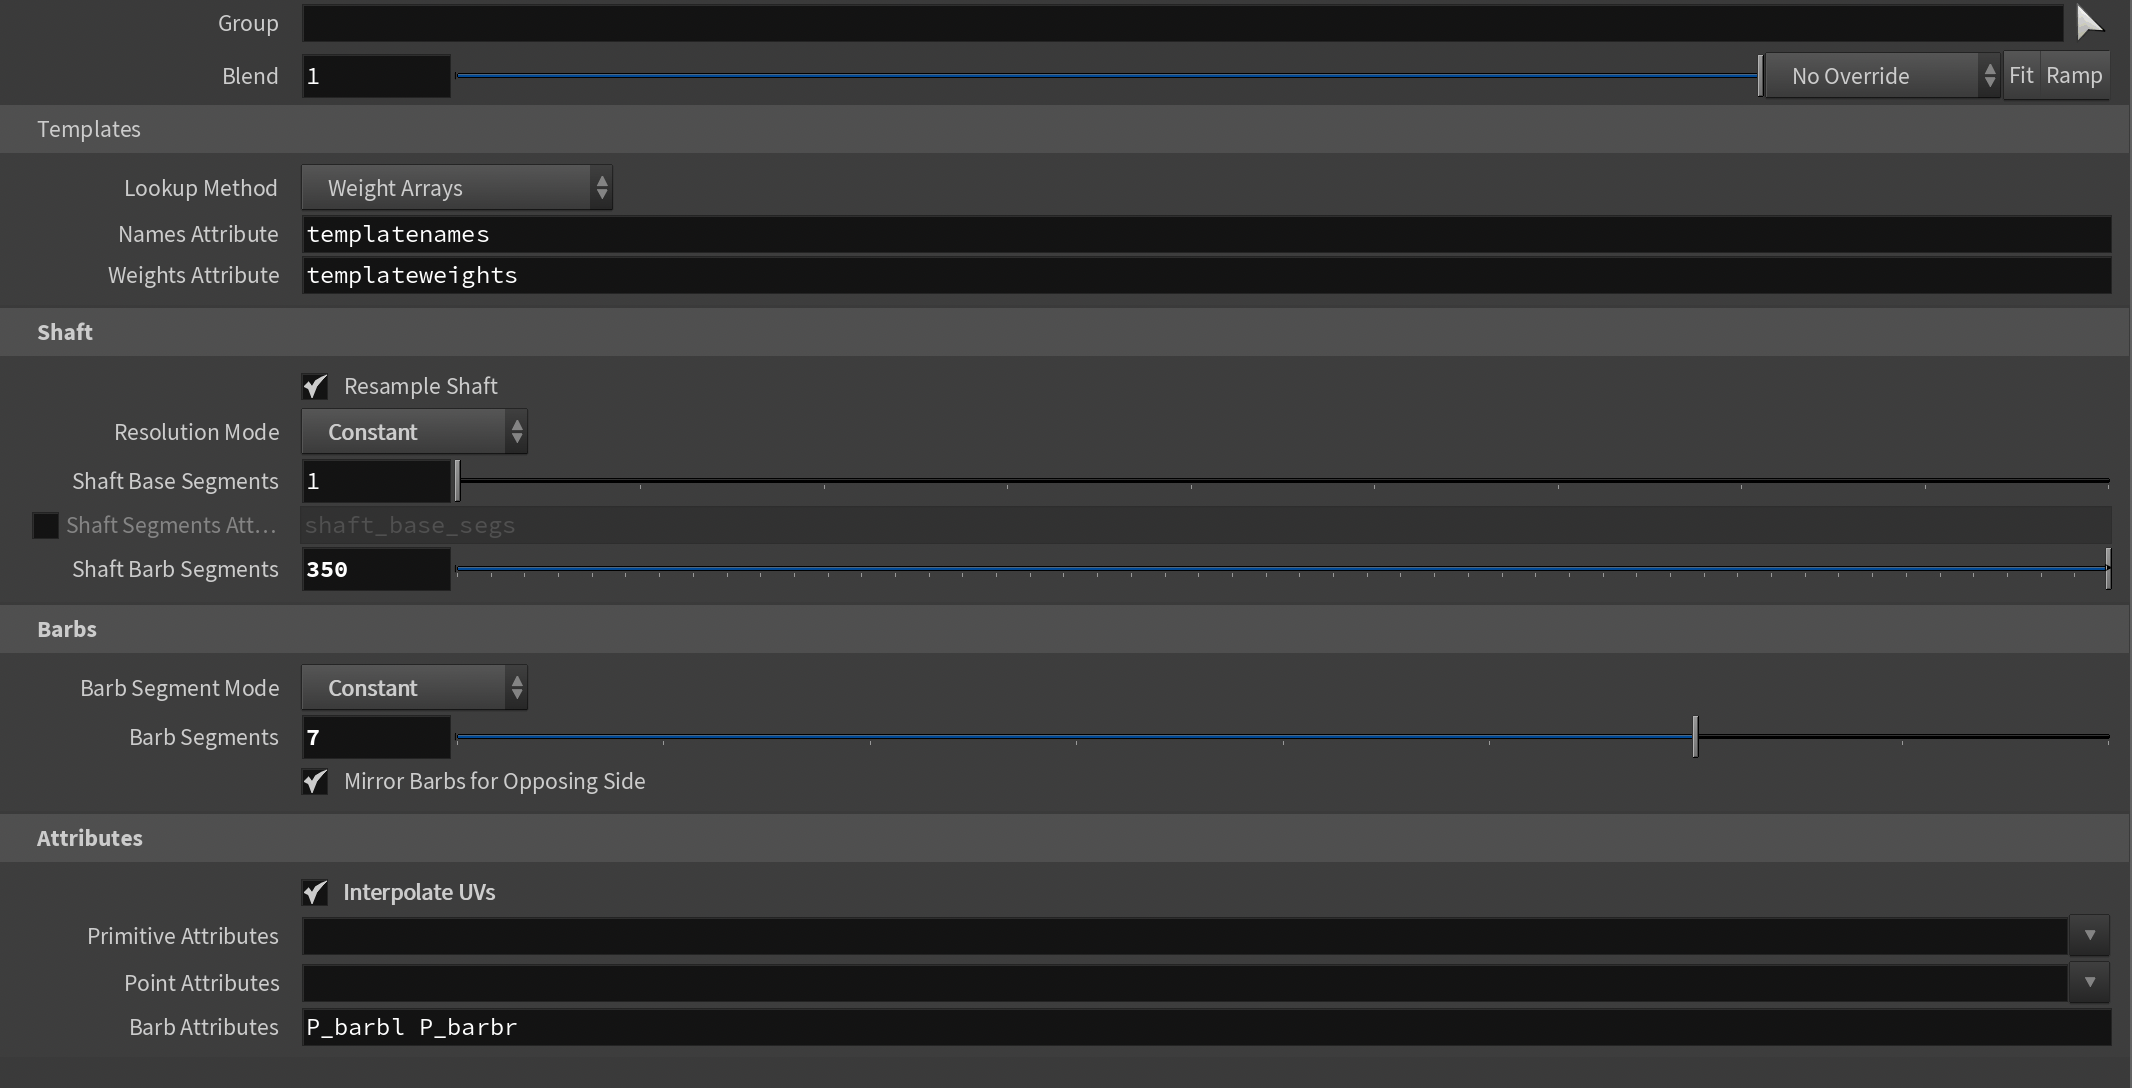
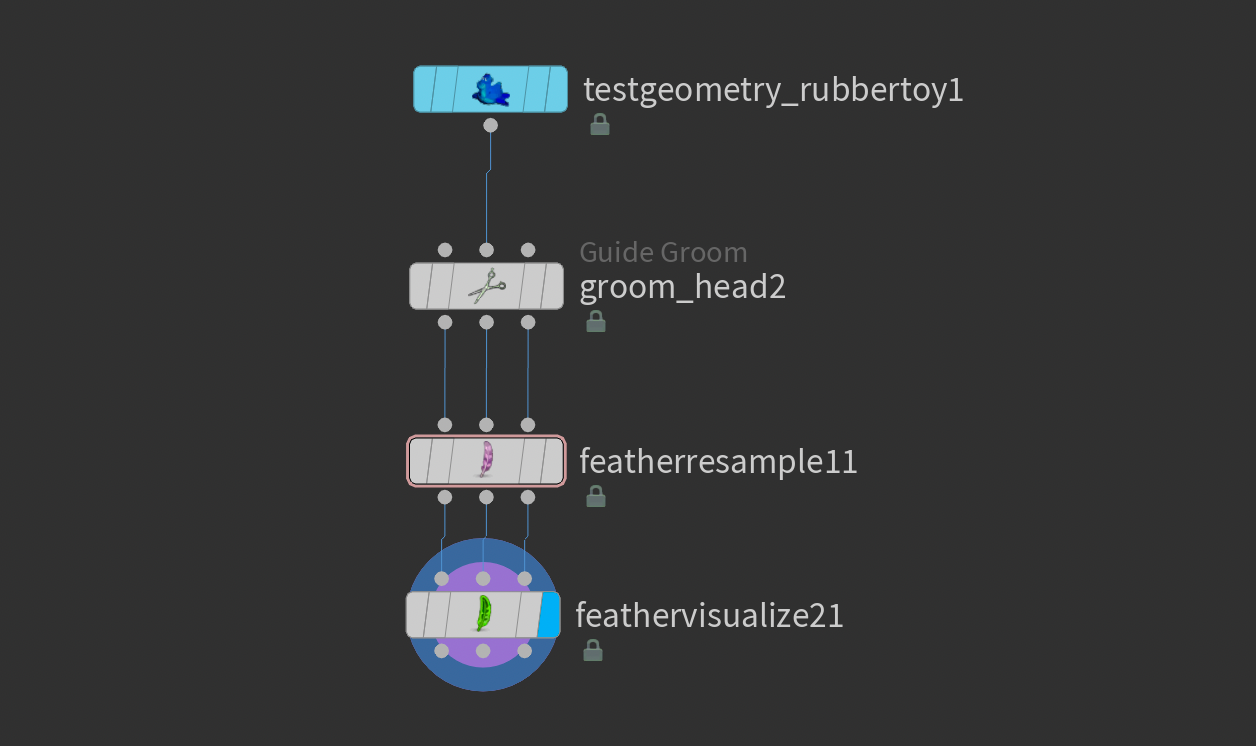
Feather Template Interpolate parameters.After this node, I'll often add a Feather Resample if I wish to do some additional resampling, as well as a Feather Visualize where I set the Barb Mode to Curve . This is mostly to make sure we're looking at the full feather and not a meshed version of it. If you want a faster preview version of your groom it can be useful to make a second stream where you have a different Feather Visualize node set to Surface as this can be faster to compute in the viewport.
You can also do more global look adjustments such as adding a Feather Noise for some extra breakup, or a Feather Width node to adjust the width of the barbs. The feather workflow is quite flexible, allowing you to use the same kinds of nodes at different steps in the process.
Feather Template Interpolate under my manual groom too. You don't need this, I simply added it here for some resampling.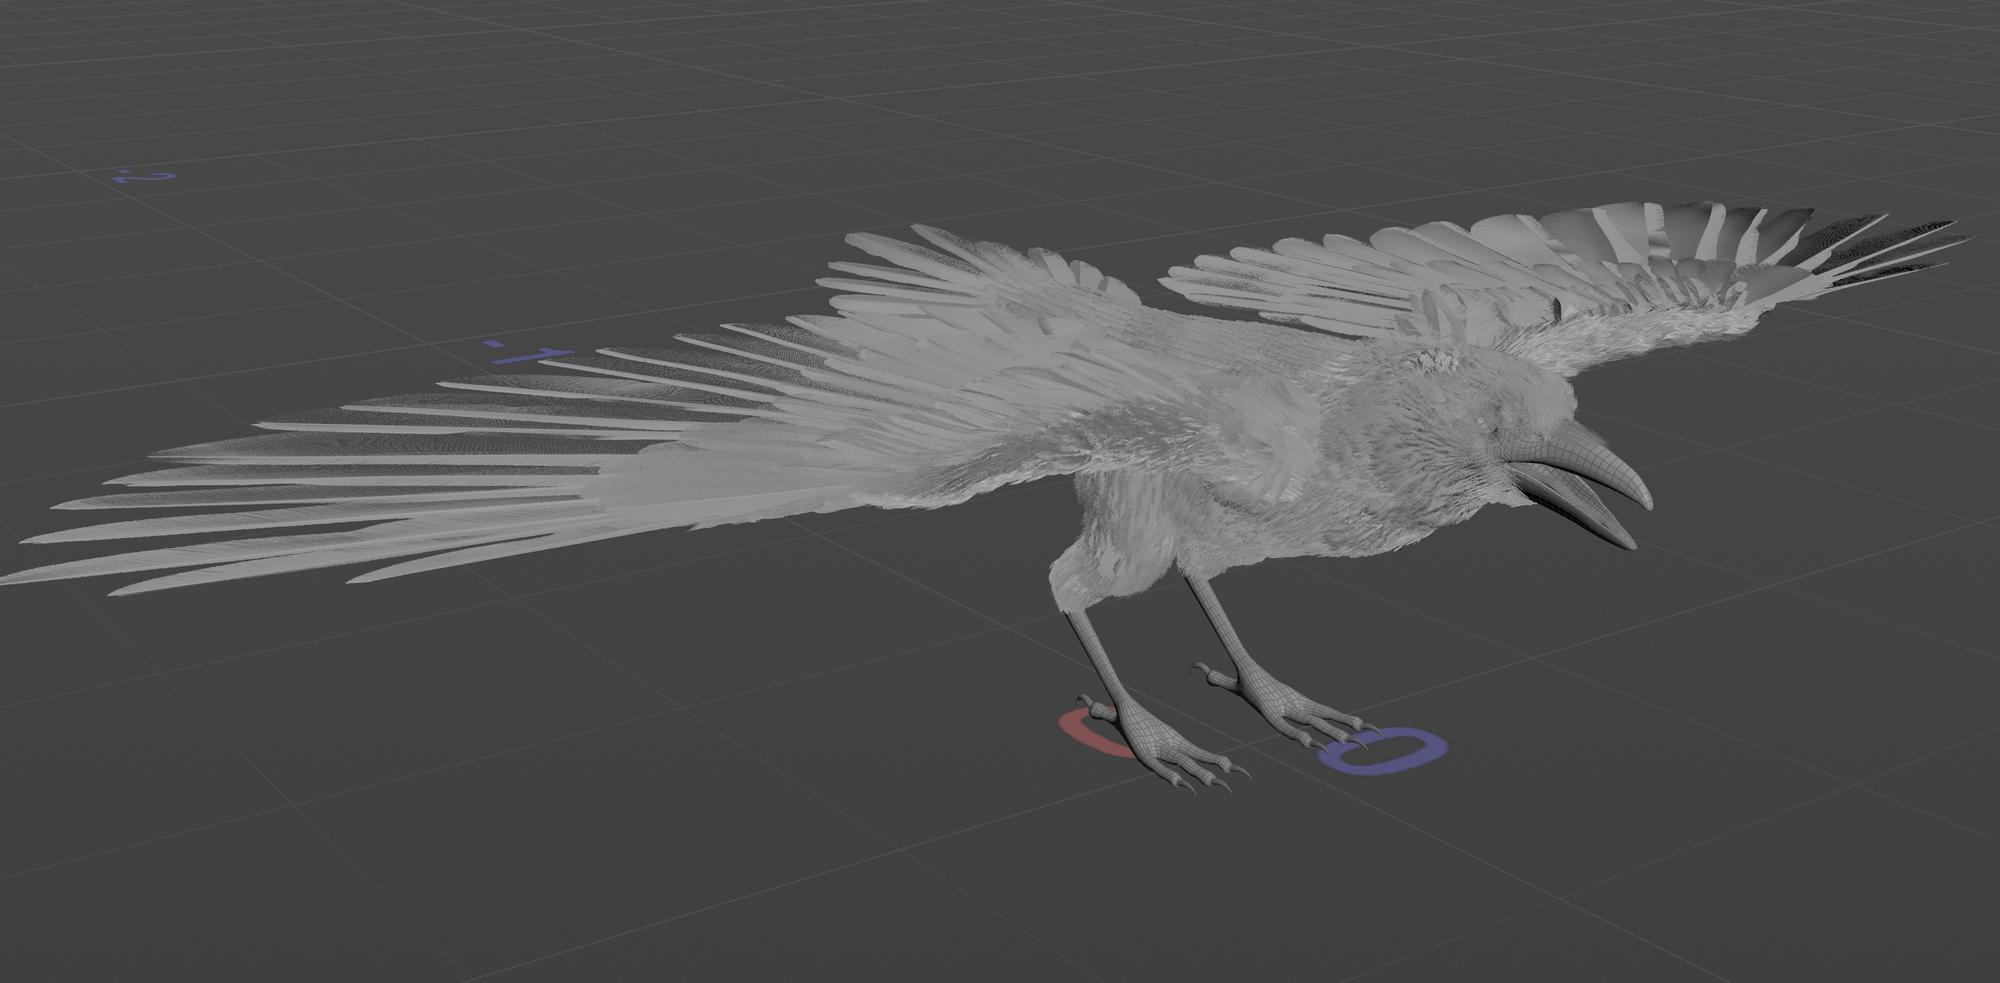
Rendering in Solaris
Exporting our feathers and rendering them using Solaris and Karma
SideFX provides a pretty elegant solution to rendering feathers in Solaris using their custom Feather Proceudral . To use all the features of it we must first export our groom properly though. I'll go over my approach below, but I'm also providing a custom HDA I've built to automate this process a bit. It may take some tinkering to use it properly in your pipeline, but I hope it can make things a bit easier.
Introduction to Procedurals
Procedurals in Houdini are a special group of nodes that allow you to generate geometry at render time. They're super useful and I hope to cover more of them in the future. Today the focus will be on the Feather Procedural node though.
Procedurals can be a bit strange to use at first because they don't automatically affect what you're rendering in the viewport. By default, the render procedurals are only activated once you do a proper offline render through for example husk (Houdini command line utility used for rendering USD files - this is what is run under the hood when you use a USD Render Rop ).
There are ways around this by using the Houdini Preview Procedurals node, which will invoke the Houdini Procedurals while working in the viewport. Keep in mind that it won't bake anything down into your USD file, it's just for previewing in the viewport.
Feather Procedural
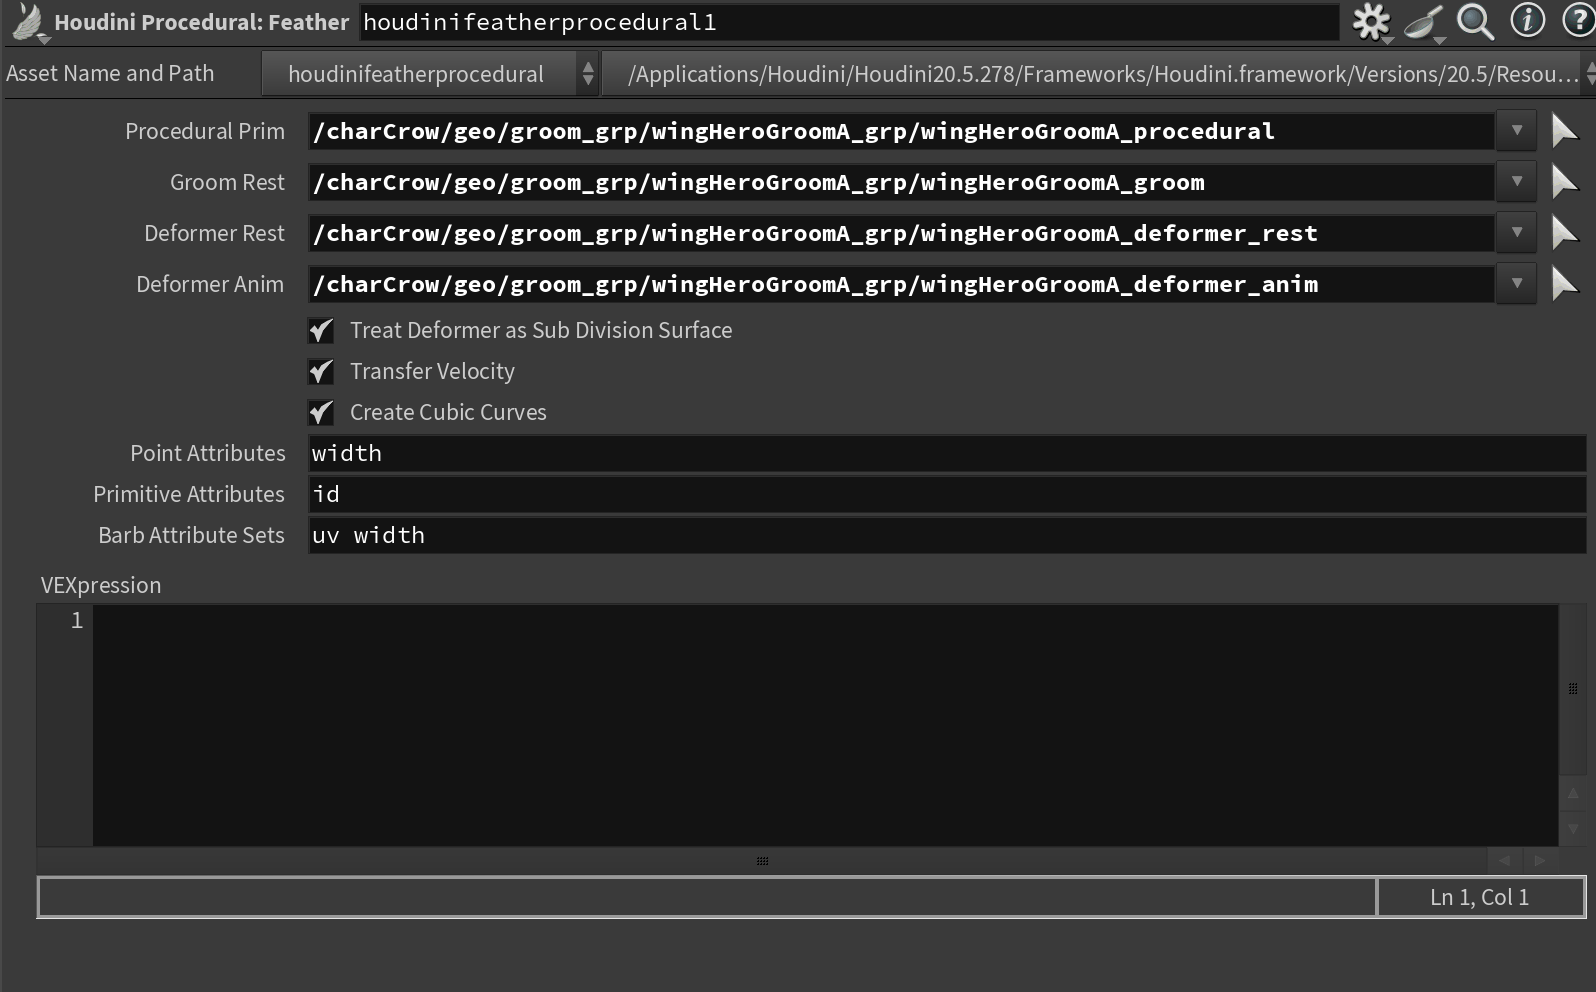
Let's go over the Feather Procedural in Houdini and take a look at its structure and parameters.
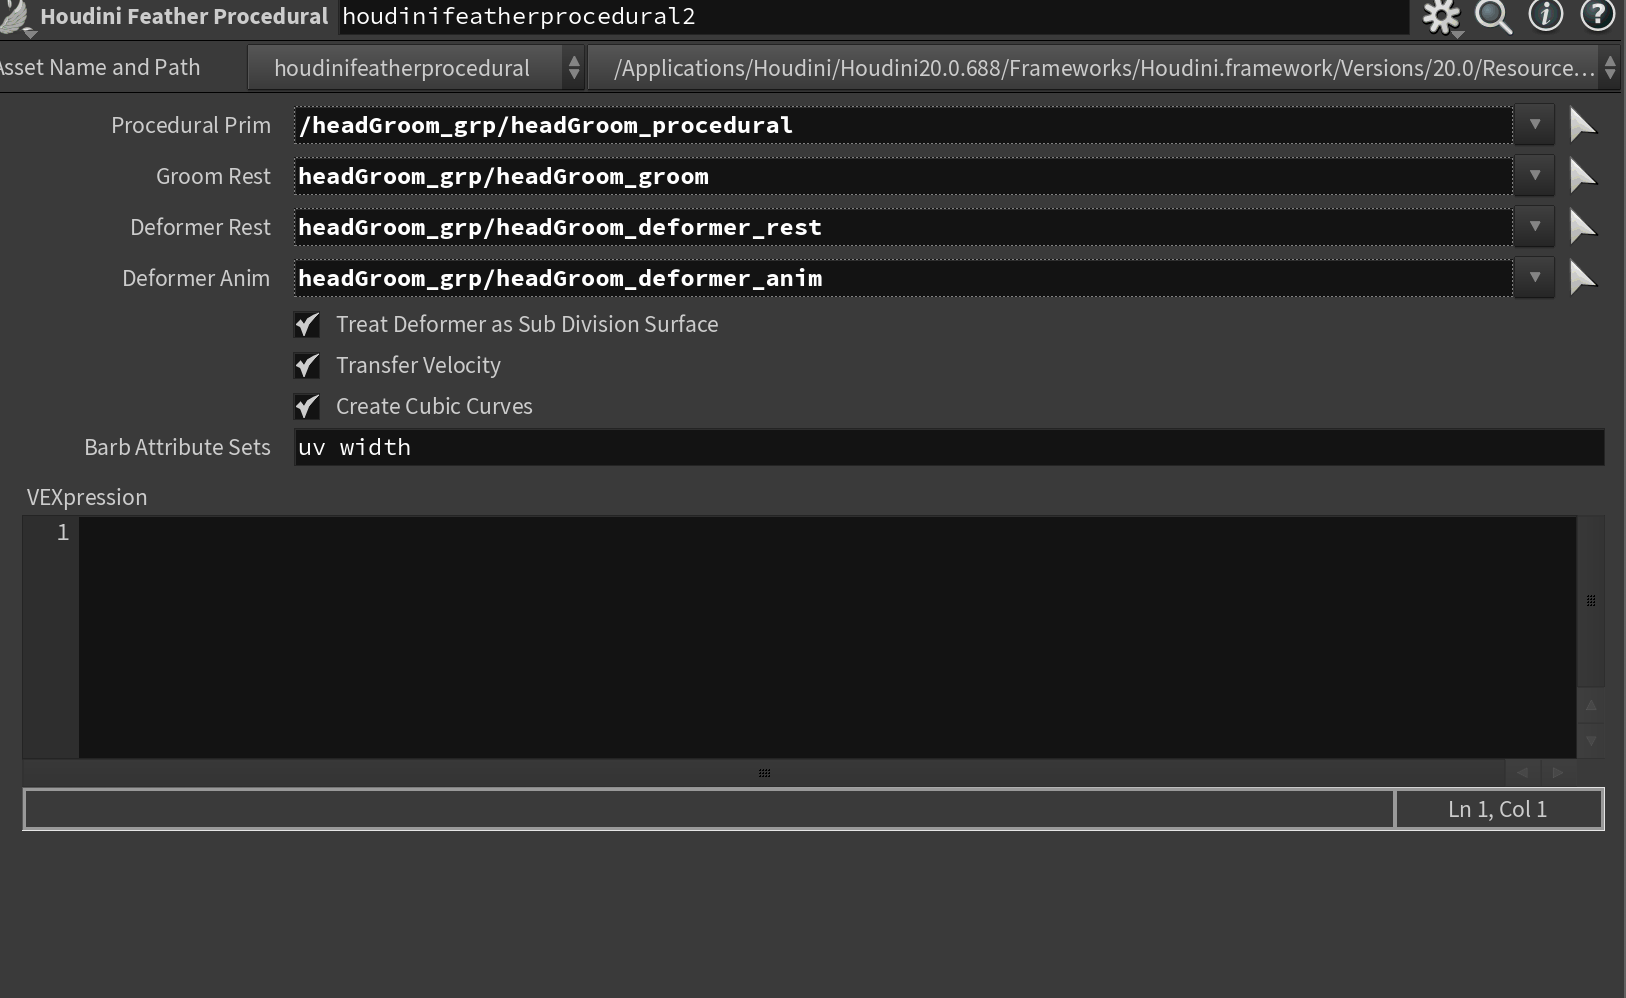
The main purpose of the Feather Procedural node is to turn your feather curves into proper feather geometry. The reason this node is needed is due to the nature of condensed feathers. By default when you import condensed feathers into Solaris with a SOP Import you'll just get the curves. We need the Feather Procedural to generate the feather barbs by interpolating the attributes we discussed earlier (like P_barbl, barborient , etc.). It all comes down to optimizing the data I/O.
In addition to this, you can also use the Feather Procedural to animate your feathers based on proxy "deformer" meshes - more on this later.
Feather Procedural in Solaris- we'll just get the underlying curves.The Feather Procedural takes up to 4 inputs, 3 of which you'll need to load from SOPs using a few SOP Import nodes. Here's a short breakdown of what they are:
Feather Procedural
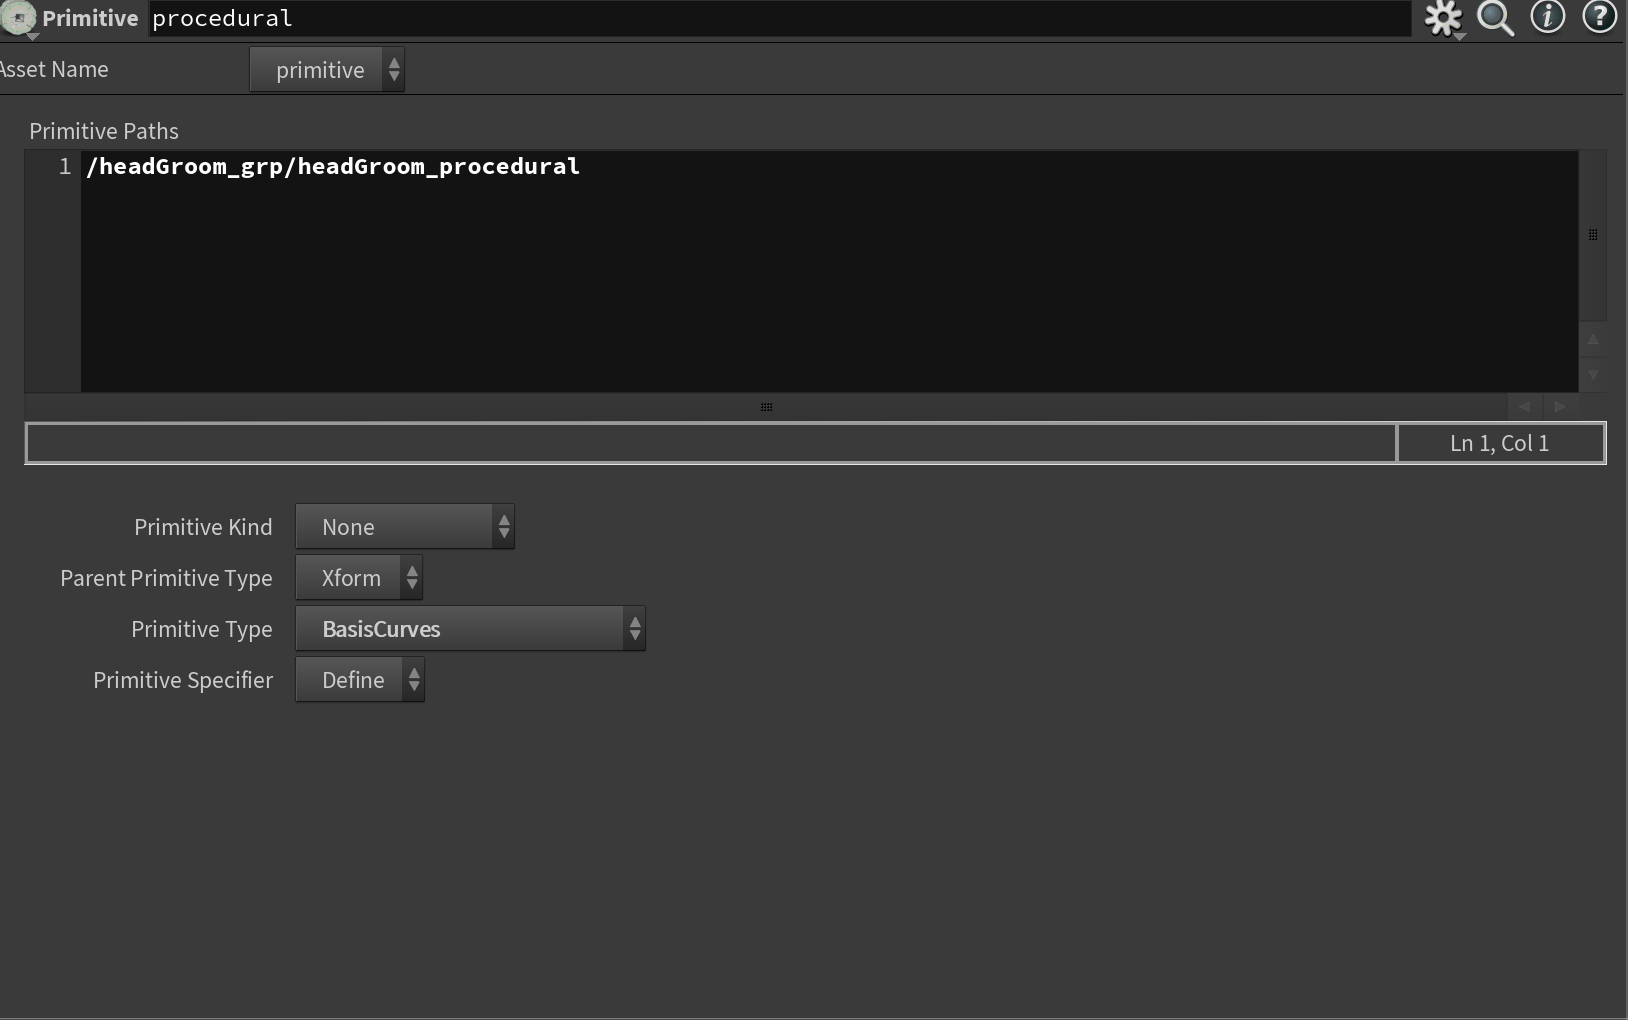
Feather ProceduralProcedural Prim - This is the only primitive you don't need to import from SOPs. For this, I recommend dropping down a Primitive LOP in Solaris and defining an empty primitive of type BasisCurves . This will be the heart of the procedural, responsible for pointing to all the other data and defining global settings for your feathers.
Primitive LOP defining an empty BasisCurves primitive.Groom Rest - This is the parameter that loads the output curves of your groom. You have to first load your groom into Solaris using a SOP Import before the Feather Procedural and set the path to point to that prim.
Deformer Rest (Optional) - This is the proxy mesh I mentioned earlier, usually generated in SOPs using a Feather Surface node and imported before the Feather Procedural using a Sop Import .
Deformer Anim (Optional) - Here you can plug in an animated version of your Deformer Rest proxy mesh. The Feather Procedural will automatically interpolate the "real" feather geometry based on this animation. It's a super elegant workflow for animating or simulating your feather grooms since an FX artist would simply have to override the Deformer Anim mesh with their added animation and everything should connect automatically in the render scene! It's also very lightweight to use as long as you make sure to keep your Deformer Rest somewhat reasonable in resolution.
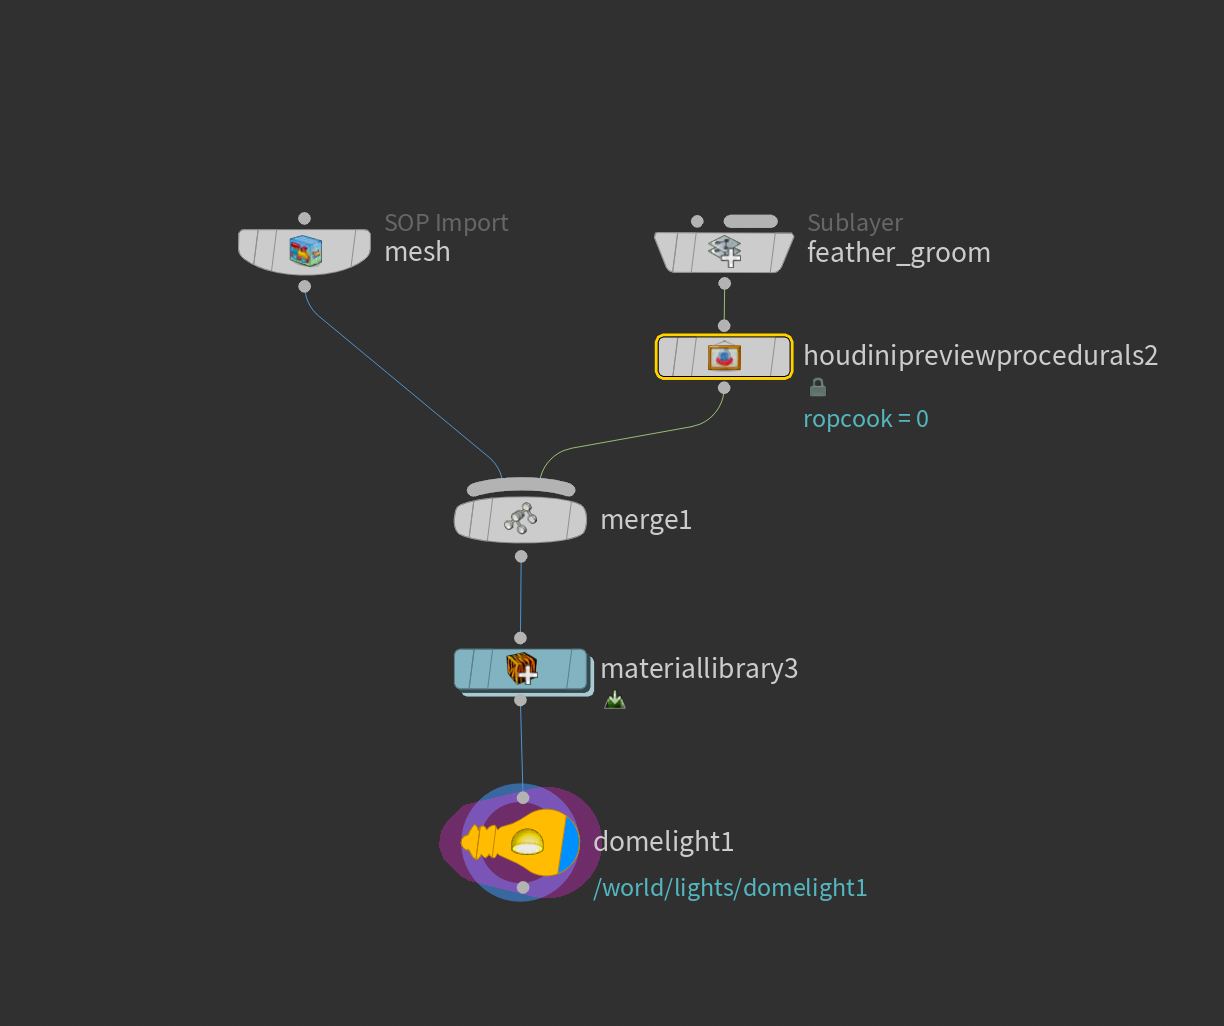
If you setup the Feather Procedural like above and plug in a Preview Houdini Procedurals node you'll be able to render your feathers in Solaris. Below is an example network to give you a better overview. You'll need to do this for each groom export you have.
Configure Primitive LOP . Otherwise, you'll render those as well - you only want to render the _procedural primitive as seen below.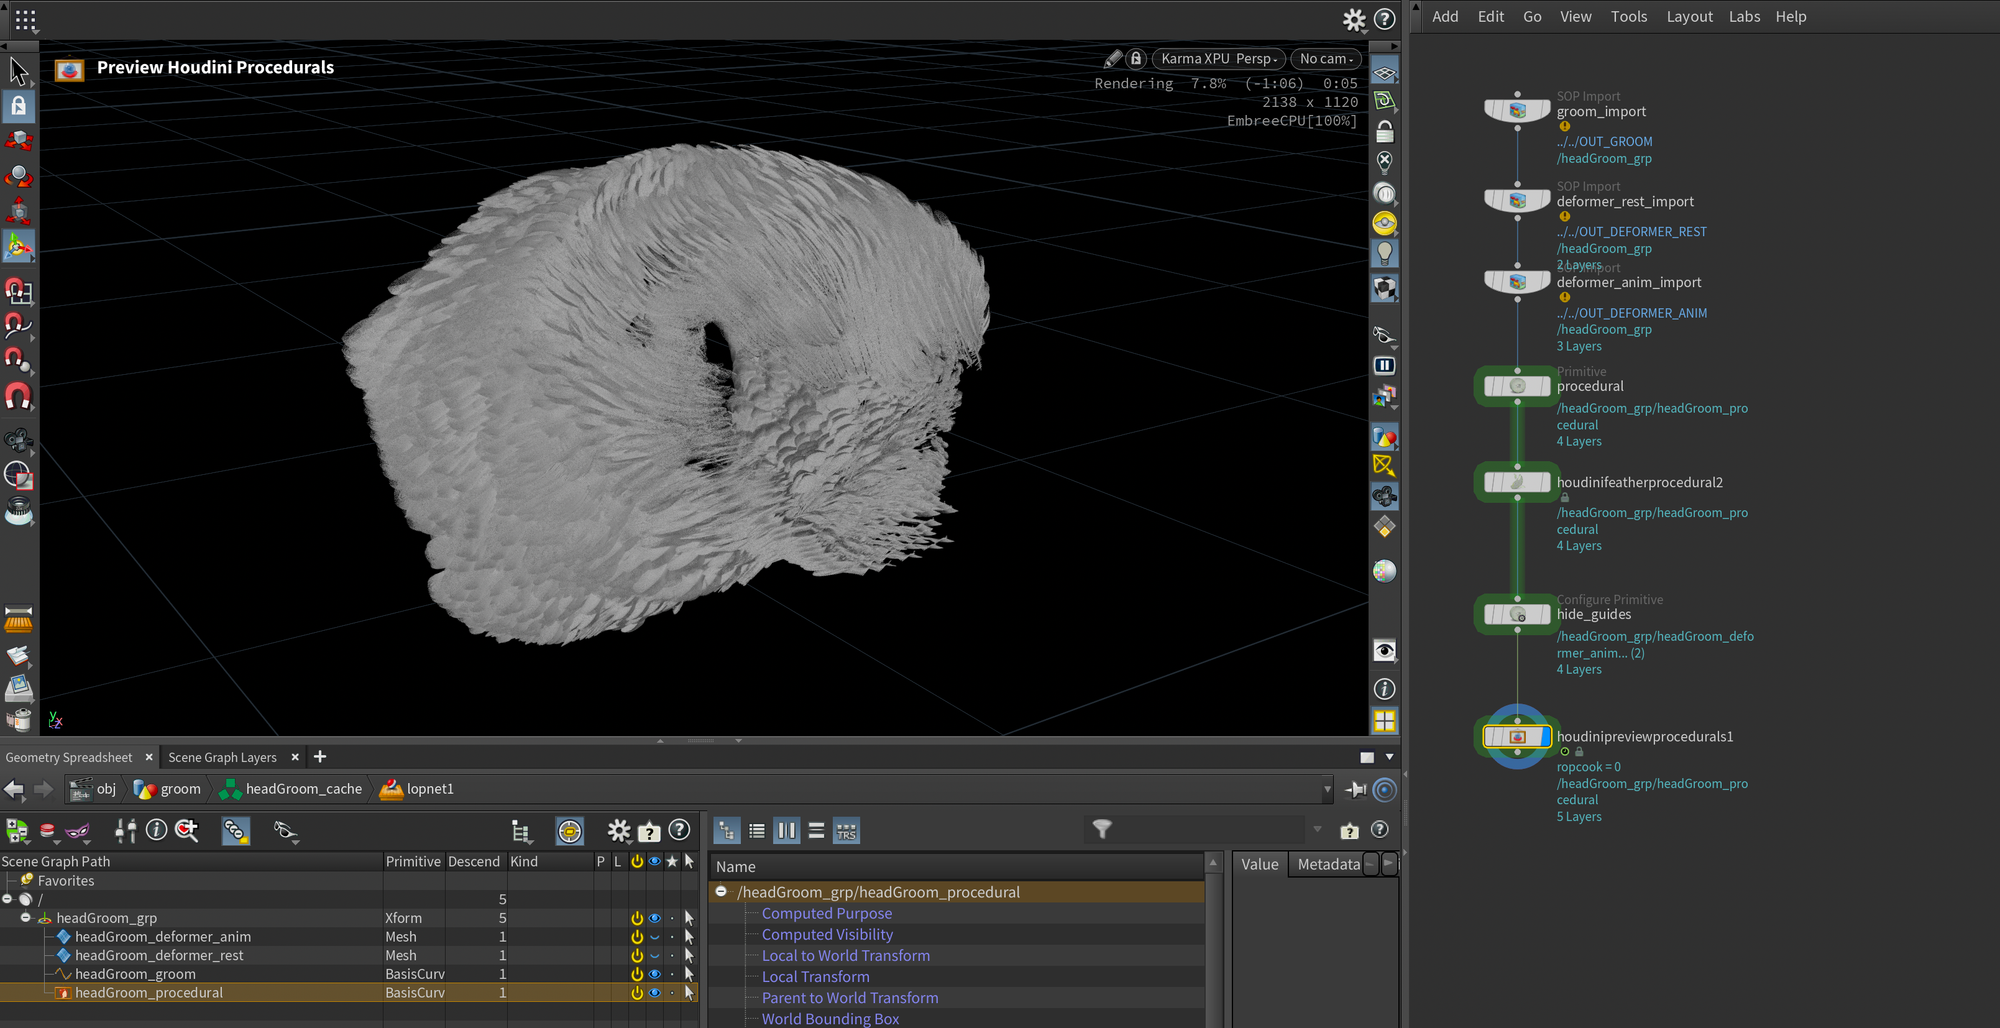
Houdini Preview Procedurals is only needed if you want to view your feathers in the viewport.Automating the process
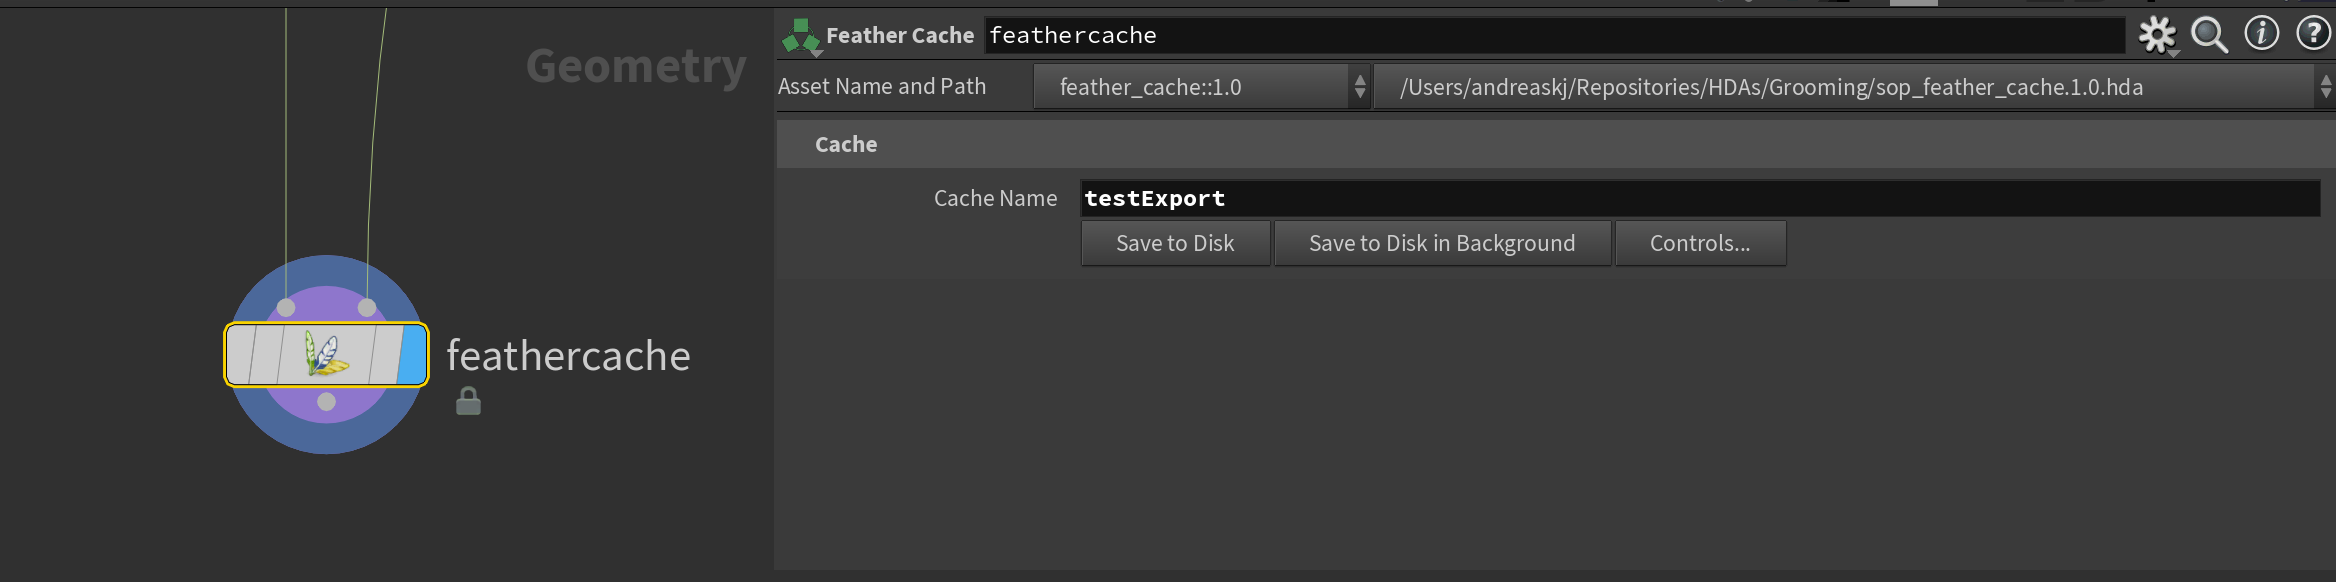
Now, I realize this is a lot of information to take in, especially if you're not comfortable with Solaris. Therefore I've created an HDA that you can just plug at the end of your groom in SOPs (with your groom and mesh/skin), assign a name using the Cache Name parameter and click Save to Disk . This will export a USD into $HIP/geo/grooms/ with the whole structure set up. Then all you need to do is load the USD using a Sublayer LOP in LOPs, add a Preview Houdini Procedural , and render.
This HDA will even create the deformer meshes setup for you, so if you import the deformer_anim primitive from LOPs to SOPs, animate or simulate it, and then import them back into LOPs you should automatically get working animated feathers (as long as you maintain all attributes).
The node also doubles as a file cache so you can save your groom without recooking.
Even if you would like to build the setup from scratch I would recommend inspecting this HDA if any of the steps above are unclear.
You can download it right here - works in all licenses of Houdini (even FX):
With that out of the way let's take a look at some shading!
Shading
Shading in Solaris for Karma XPU / Karma CPU
Karma comes pre-packaged with some great hair shaders that work in both CPU and XPU. In this section, I'll cover how I ended up using them and what to look out for. I'm assuming you're loading your feathers into Solaris in a hierarchy similar to below (which is what you'd get if you used the Feather Cache HDA I shared above).
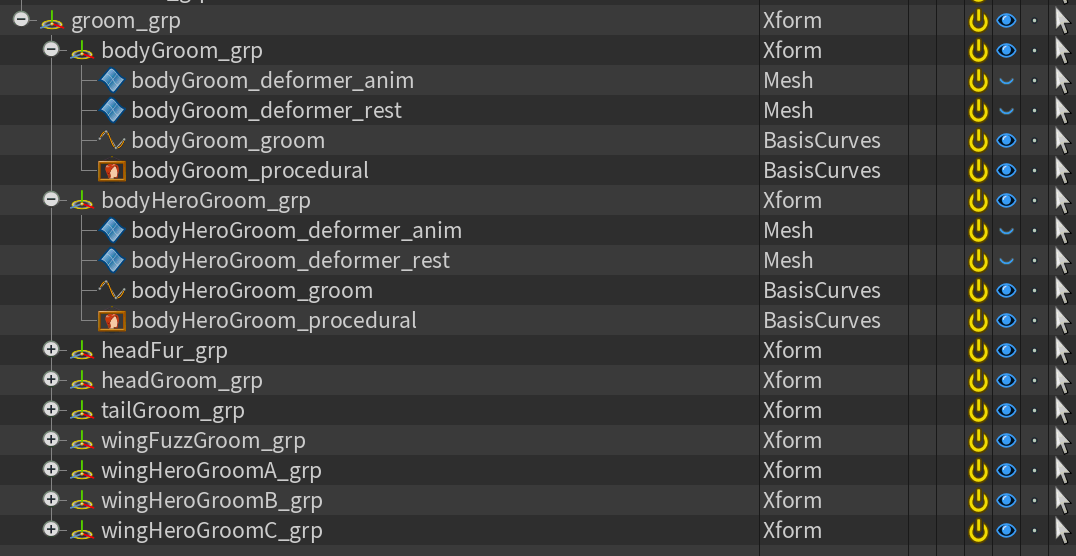
The first step is loading your base mesh into Solaris using a SOP Import , then you can load your feathers using a Sublayer (if you exported using the HDA from above) or by building the setup outlined above. At first, you'll see something like below when you render in the viewport.
As mentioned earlier, you won't see your feathers in the viewport render unless you drop down a Preview Houdini Procedurals LOP somewhere in your network.
It will however show up if you render a frame through a USD Render ROP (or through the command line with husk) - even without the Preview Houdini Procedurals. This mostly comes down to a performance concern. The Houdini Procedurals, like the Feahter Procedural , take a bit of time to cook, so it can be beneficial to selectively choose when you want to render it. In production, I like to have a separate stream with the Preview Houdini Procedurals node enabled so I only look at it when I want to get a better idea of the final frame, and not when I'm working on other parts of the scene.
Preview Houdini Procedurals LOP.
Let's get started on some shading. Start by putting down a Material Library like above, dive inside, and create a Karma Material Builder . By default, the network will come with a MtlX Standard Surface - remove this, and replace it with either a Karma Hair or a Karma Fur . Both of these are great shaders, but Karma Fur is an extended version of Karma Hair with a slightly different implementation that features more advanced features for modeling how light scatters inside fur. For this example, we'll go over Karma Fur but most of the same techniques apply to Karma Hair as well. In the section below I'll cover the most important parts of the Karma Fur shader, discussing the parameters I tweaked.
<groomCache>_proceduralKarma Fur Parameters
Color

This is one of the main sections of the shader to tweak. The primary parameters you'll want to tweak are Melanin , Thickness, and Base Color. Melanin is a natural pigment found in hair and helps determine the color and darkness of the hair. This parameter is handy for many types of hair, but I found that for a lot of feather shaders, it can be beneficial to turn off and base the color purely on your texture maps. That's what I've done in my crow shader as well. To disable the Melanin influence you can set the Melanin parameter to 0 - the shader will then use your texture/Base Color instead.
Thickness is another important parameter that determines how thick the strands are in terms of shading. Please note that this doesn't change the actual widths of your hair/barbs, it only impacts the look of the shader. Lower values will get the barbs closer to white. I found a value of 4 to work well in my case, but this will vary a lot depending on your groom and desired look.
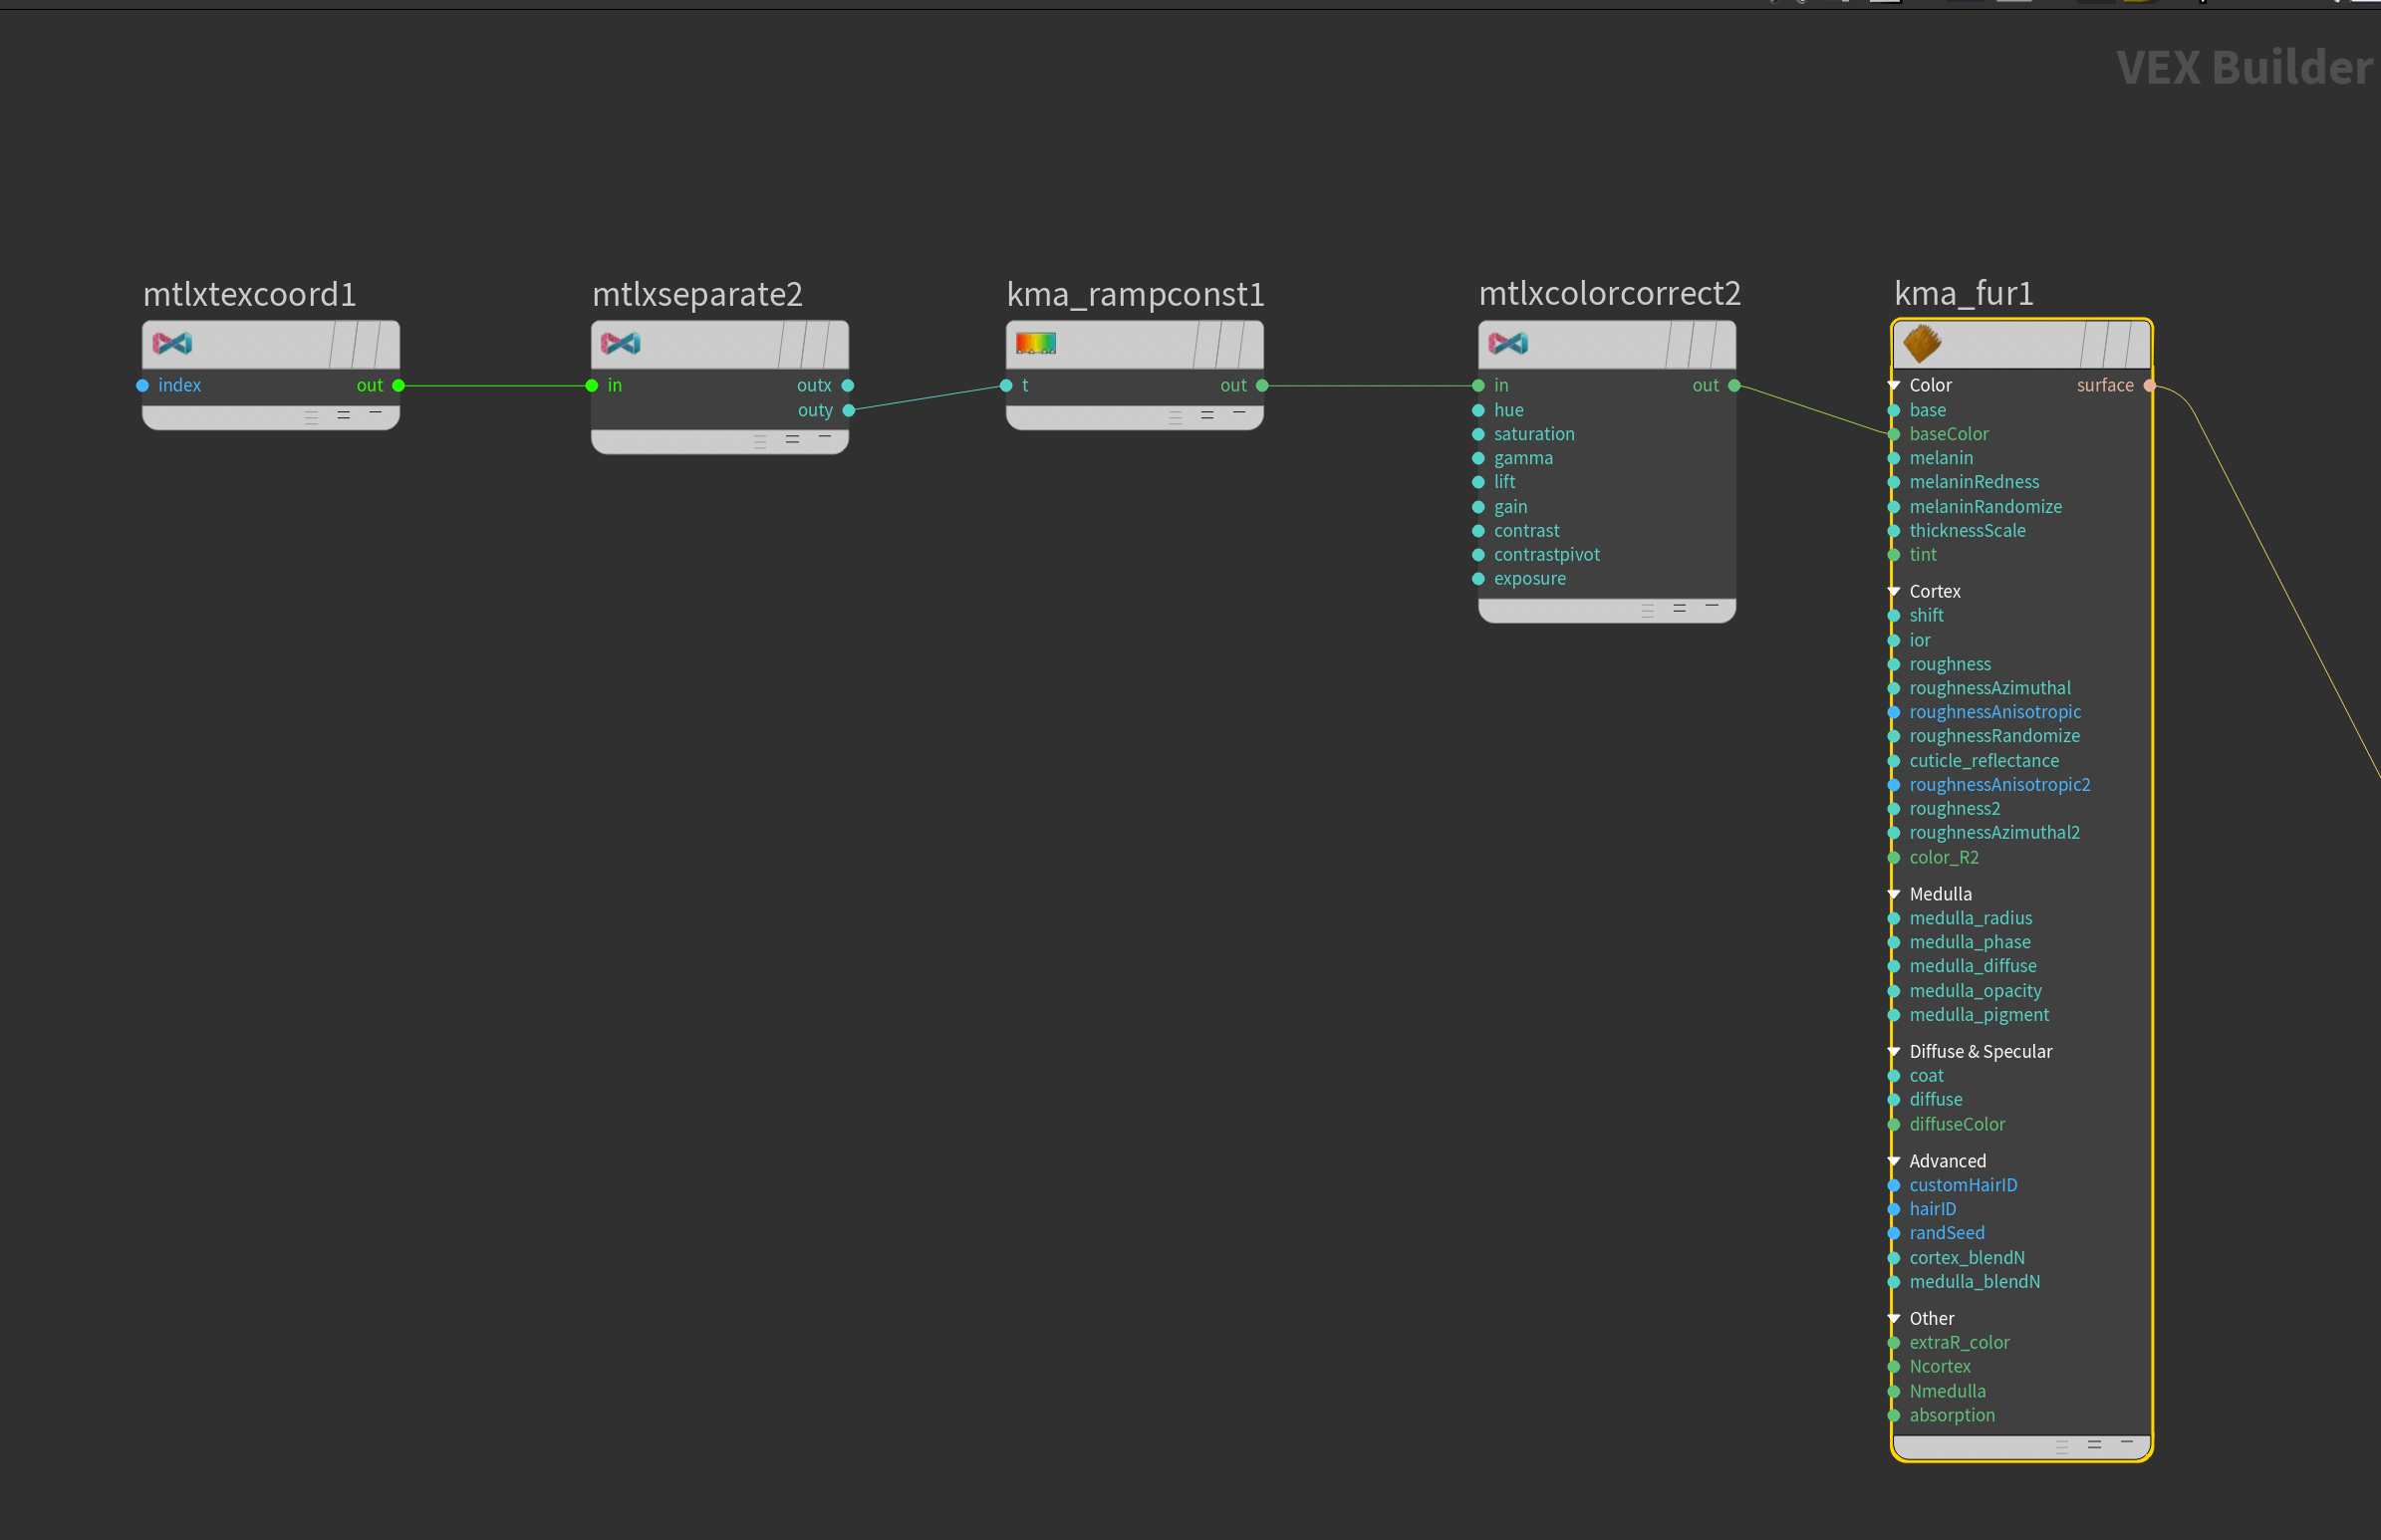
Base Color is simply the color of the hair (or dye if you're using higher values of Melanin ). In my case, I used the UVs on the feathers to create a subtle ramp along the shaft to slightly vary the colors of the feathers. Below you can see what the UVs look like by default. In my case, I extracted the V component from a MtlX Texture Coordinates (seen as green in the visualization below) using a MtlX Separate Vector 2 and plugging it into a Karma Ramp Const .

Base Color texture.Cortex
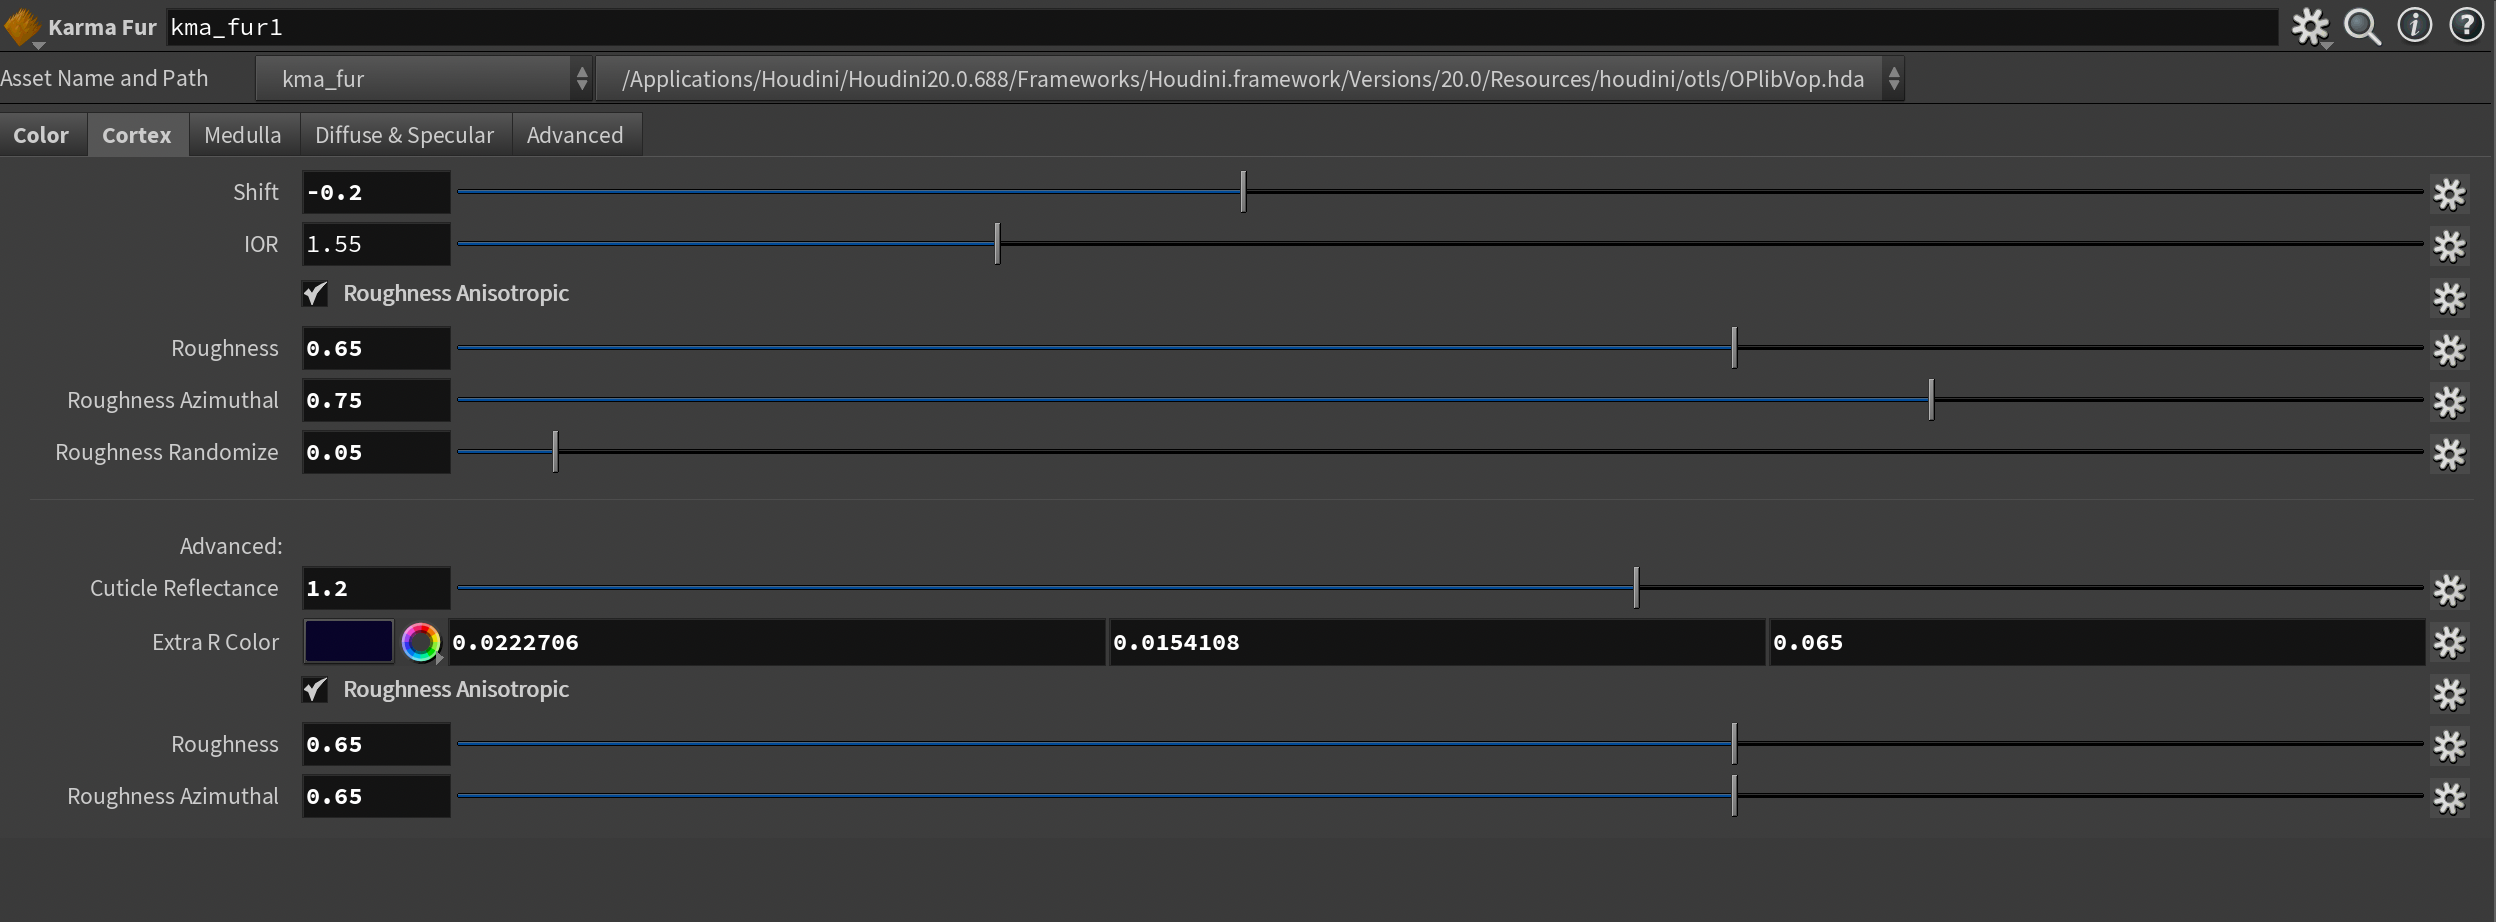
Cortex is equivalent to the Specular section of the Karma Hair shader. I found this the trickiest section to tweak as the appearance of feather specularity varies quite significantly under different lighting conditions. I'm still not convinced I've found the best combination, but I will share my findings either way. I highly recommend playing around with these settings as much as you can to find the perfect balance.
The main parameters here are Shift , IOR, Roughness , and to some extent the Cuticle Reflectance (this one is unique to Karma Fur). You can enable Roughness Anisotropic in two sections, which allows you to control if the light blurs as it travels through the hair, or travels more directly (tweaked through the Roughness Azimuthal parameter). This is optional of course, but I found it nice to tweak a tiny bit.
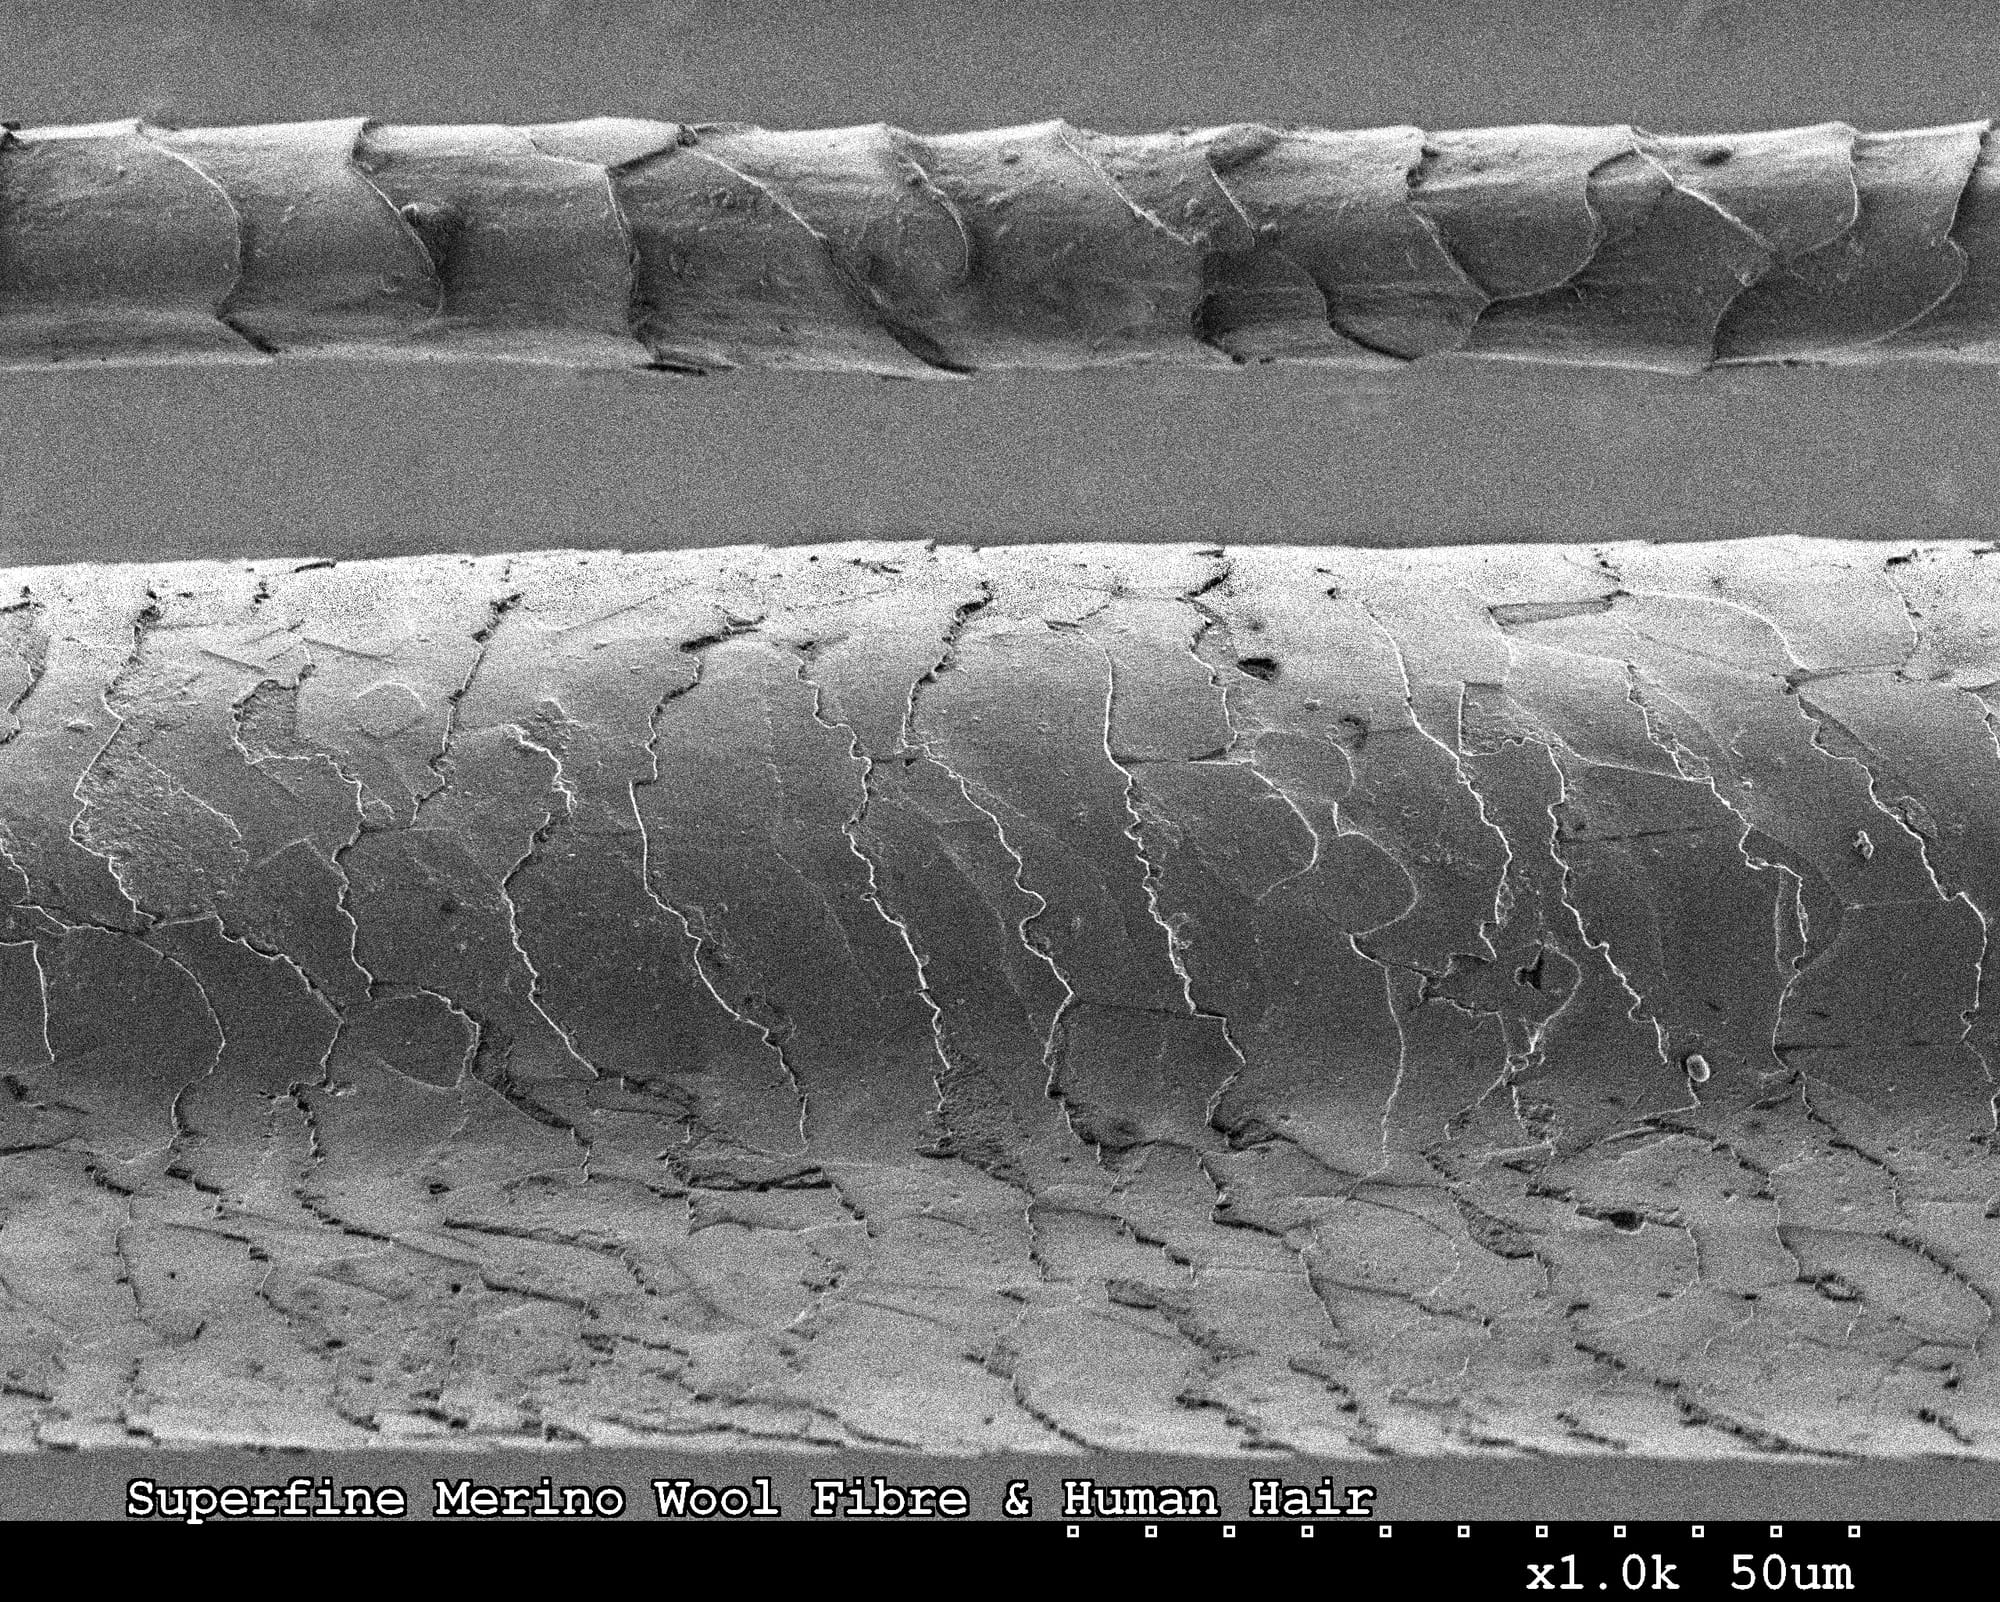
Shiftis the "Cuticle" angle - determining where along the hair strands/barb strands the highlight will appear. I found a value of -0.2 to work fairly well in my case. The cuticle is the outermost layer of the hair and consists of overlapping shapes formed from dead cells that you can see in the image below. This works quite closely with the IOR parameter which you may also want to tweak. In my case, I kept it to the default 1.55.
Roughness works mostly like in other shaders and represents the roughness of the specular component of the shader. I went for a slightly high value here to avoid the feathers looking too reflective. I also added a tiny bit of Roughness Randomize to vary specularity slightly per barb.
Cuticle Reflectance is another parameter for tweaking the specularity of the cuticle layer. This parameter serves as a way to model the shapes of the cuticle. In my case, I boosted this a bit for slightly tighter highlights in some areas and gave it a slightly blue tint using the Extra R Color to help give the feathers a bit of that thin-film blue/purple look you get on crow feathers from some angles. I think I want to revisit my approach to this in the future, but it worked pretty well as a starting point. This section also has its own Roughness parameters.
And those are the only parameters I touched in my crow feather shader. However, I highly recommend exploring Medulla (which represents the innermost layer of the hair) and Advanced as well. The Diffuse & Specular section is also worth a visit but it's mostly for additional artistic control.
Final render of crow with animation and feathers
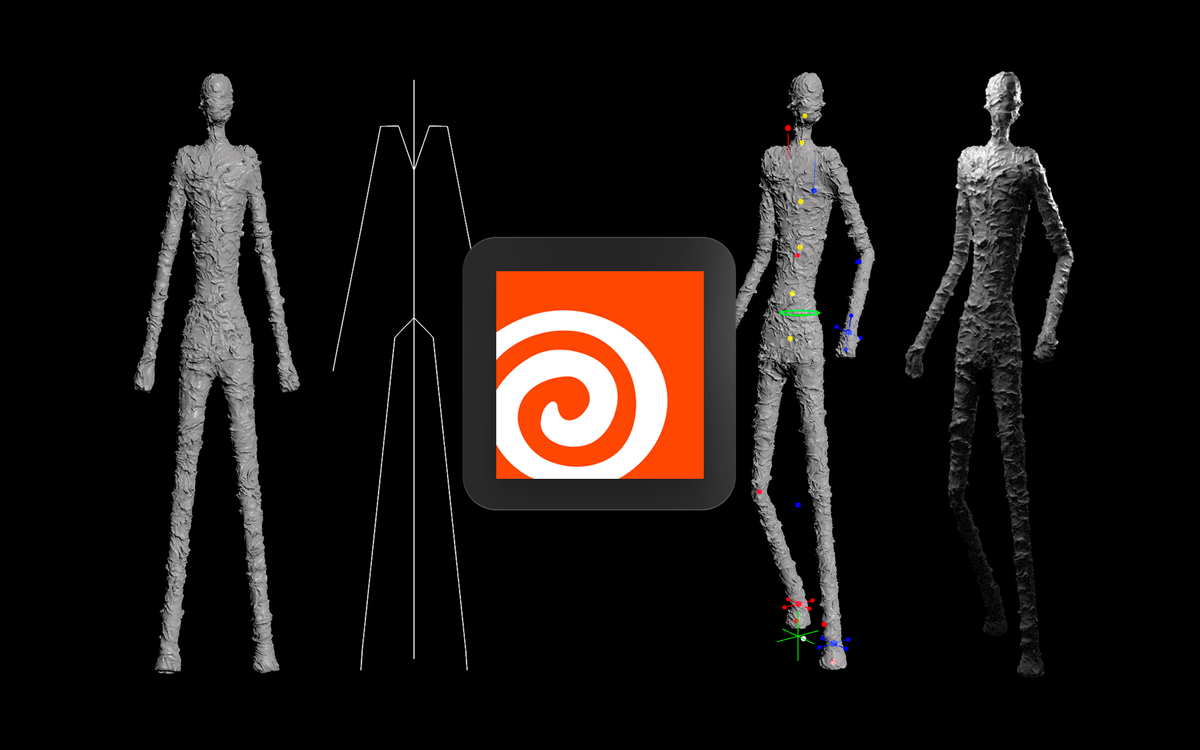
Rigging & Animation
Making our bird fly.
Houdini 20.5 introduces some great improvements to both the APEX rigging system and rigging characters with grooms in particular. In this section, I'll go over how I tackled animating and rigging my crow using a lot of these new additions, with a primary focus on the new APEX Add Groom node.
Preparing for APEX
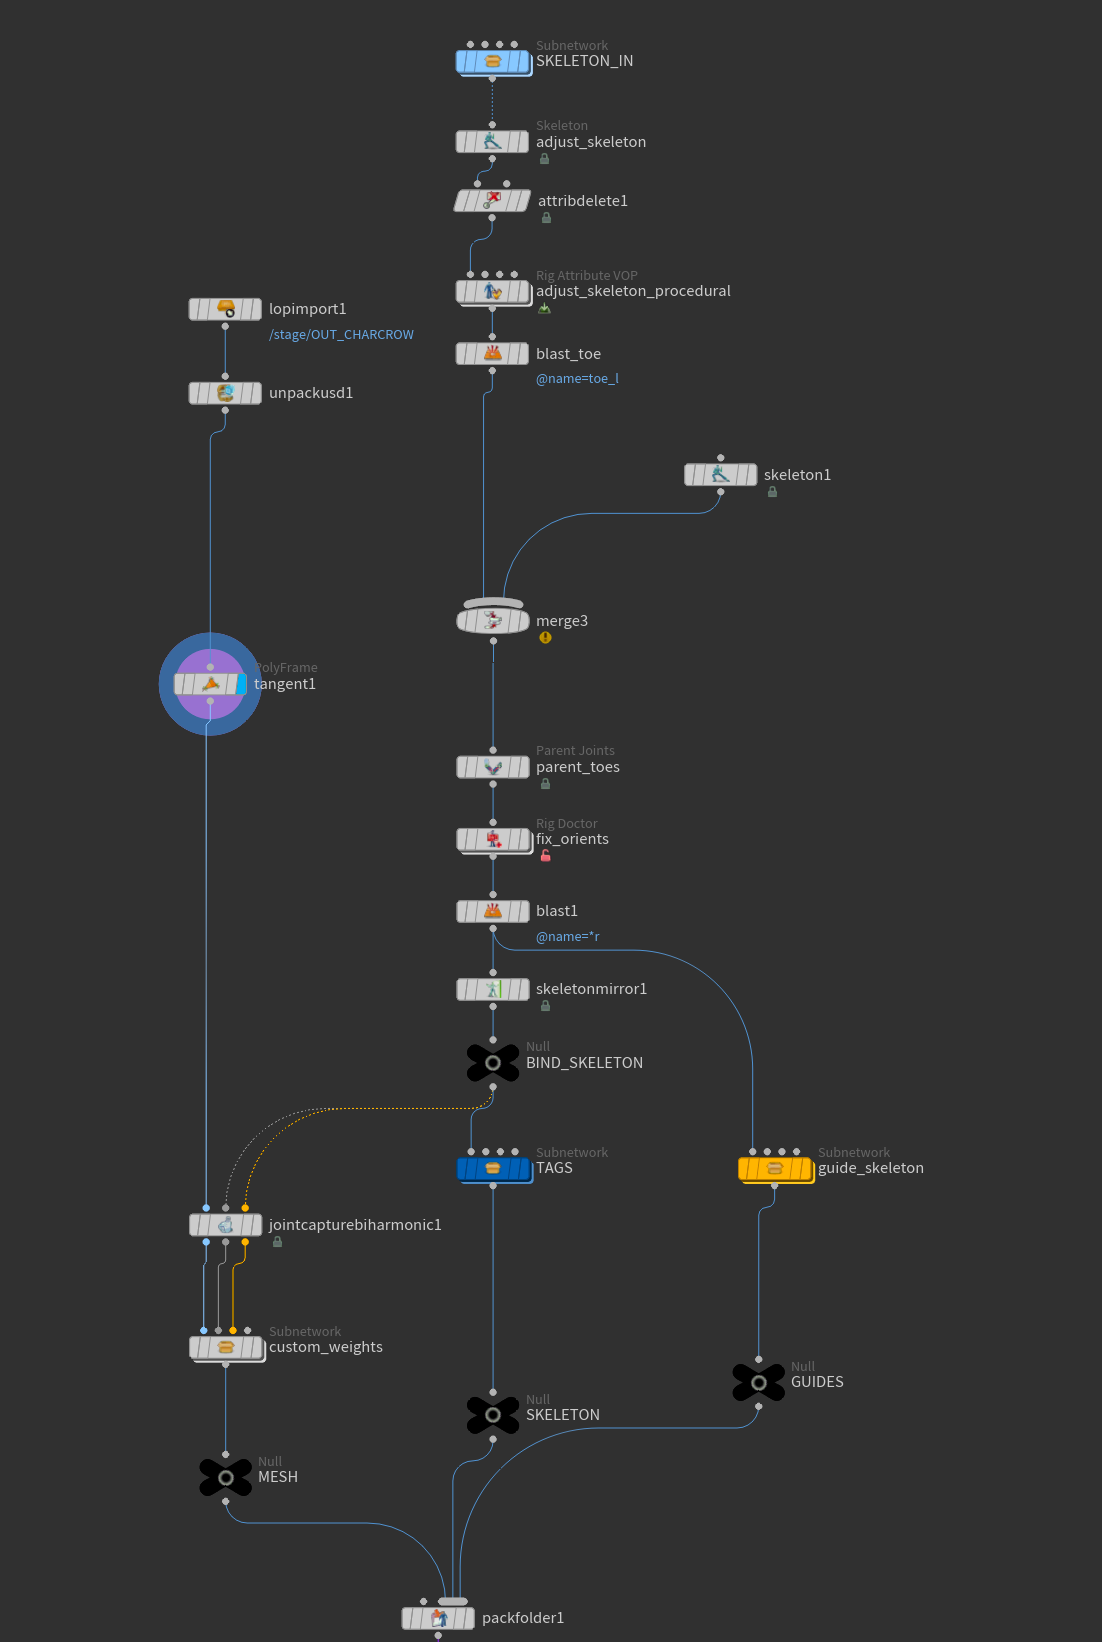
Polyframe/tagent SOP.As always, we have to pack our skeleton, skinned mesh, and guide skeleton into a Pack Folder before we can start rigging. To save time I won't cover this section in-depth, but you can read all about it in my previous APEX tutorial here:
PolyFrame node to generate a tangentu attribute. This needs to be added to your mesh and is a requirement for the APEX Add Groom node to function properly.
APEX Rig Setup
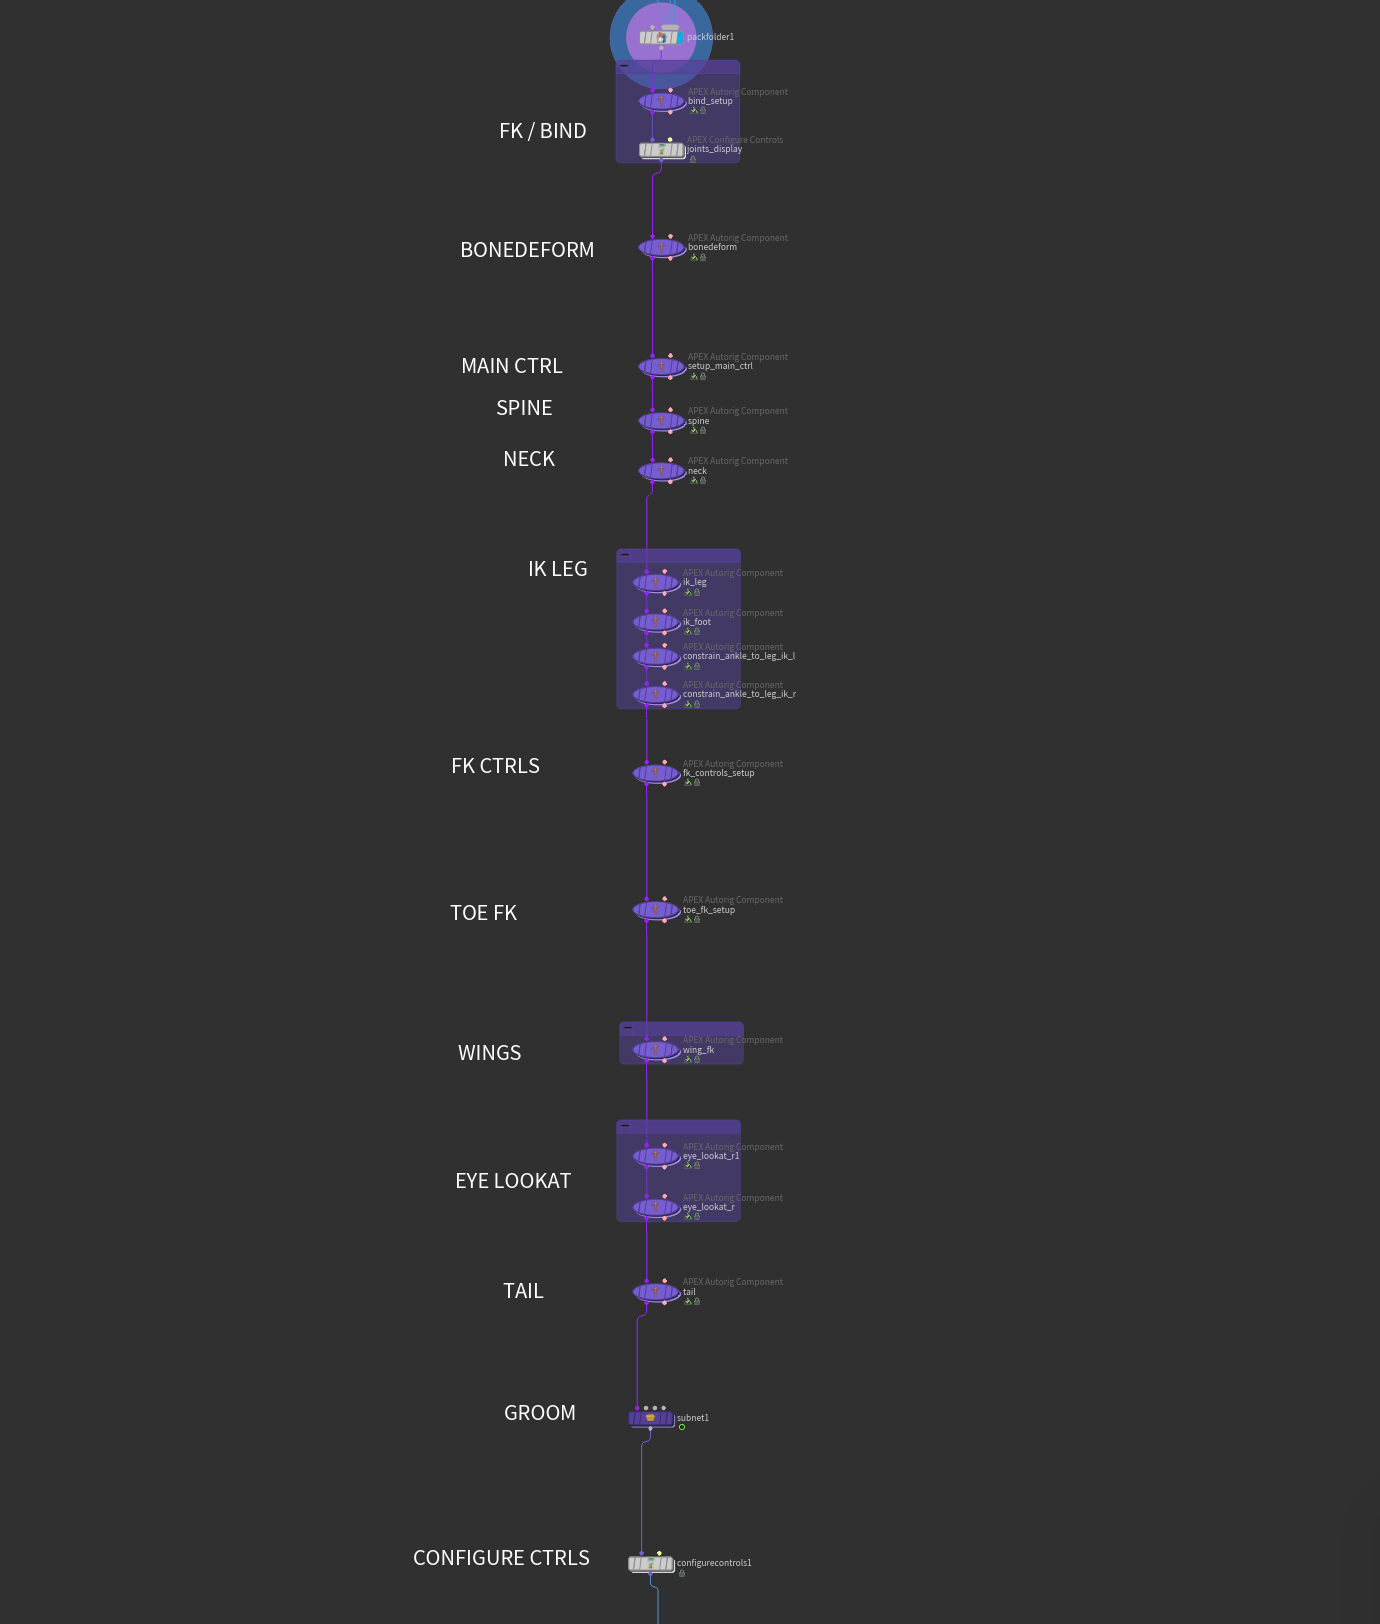
Let's take a look at the rig setup for the crow. As you may notice it contains no custom APEX rig components. A large reason for this is the addition of a lot of really useful Autorig Component presets from SideFX. Before we only had a handful, but it's a lot more feature-complete now and can handle a large amount of rigging tasks out-of-the-box. Let's break it down step-by-step. For a more beginner-friendly breakdown be sure to check out my previous tutorial mentioned above.
FK / Bind
As always we start our APEX rig by setting up a bind skeleton (and FK if we choose to expose anything) using the fktransform Autorig Component. This is primarily responsible for initializing the bind skeleton and is a requirement for a lot of other APEX Autorig Components.

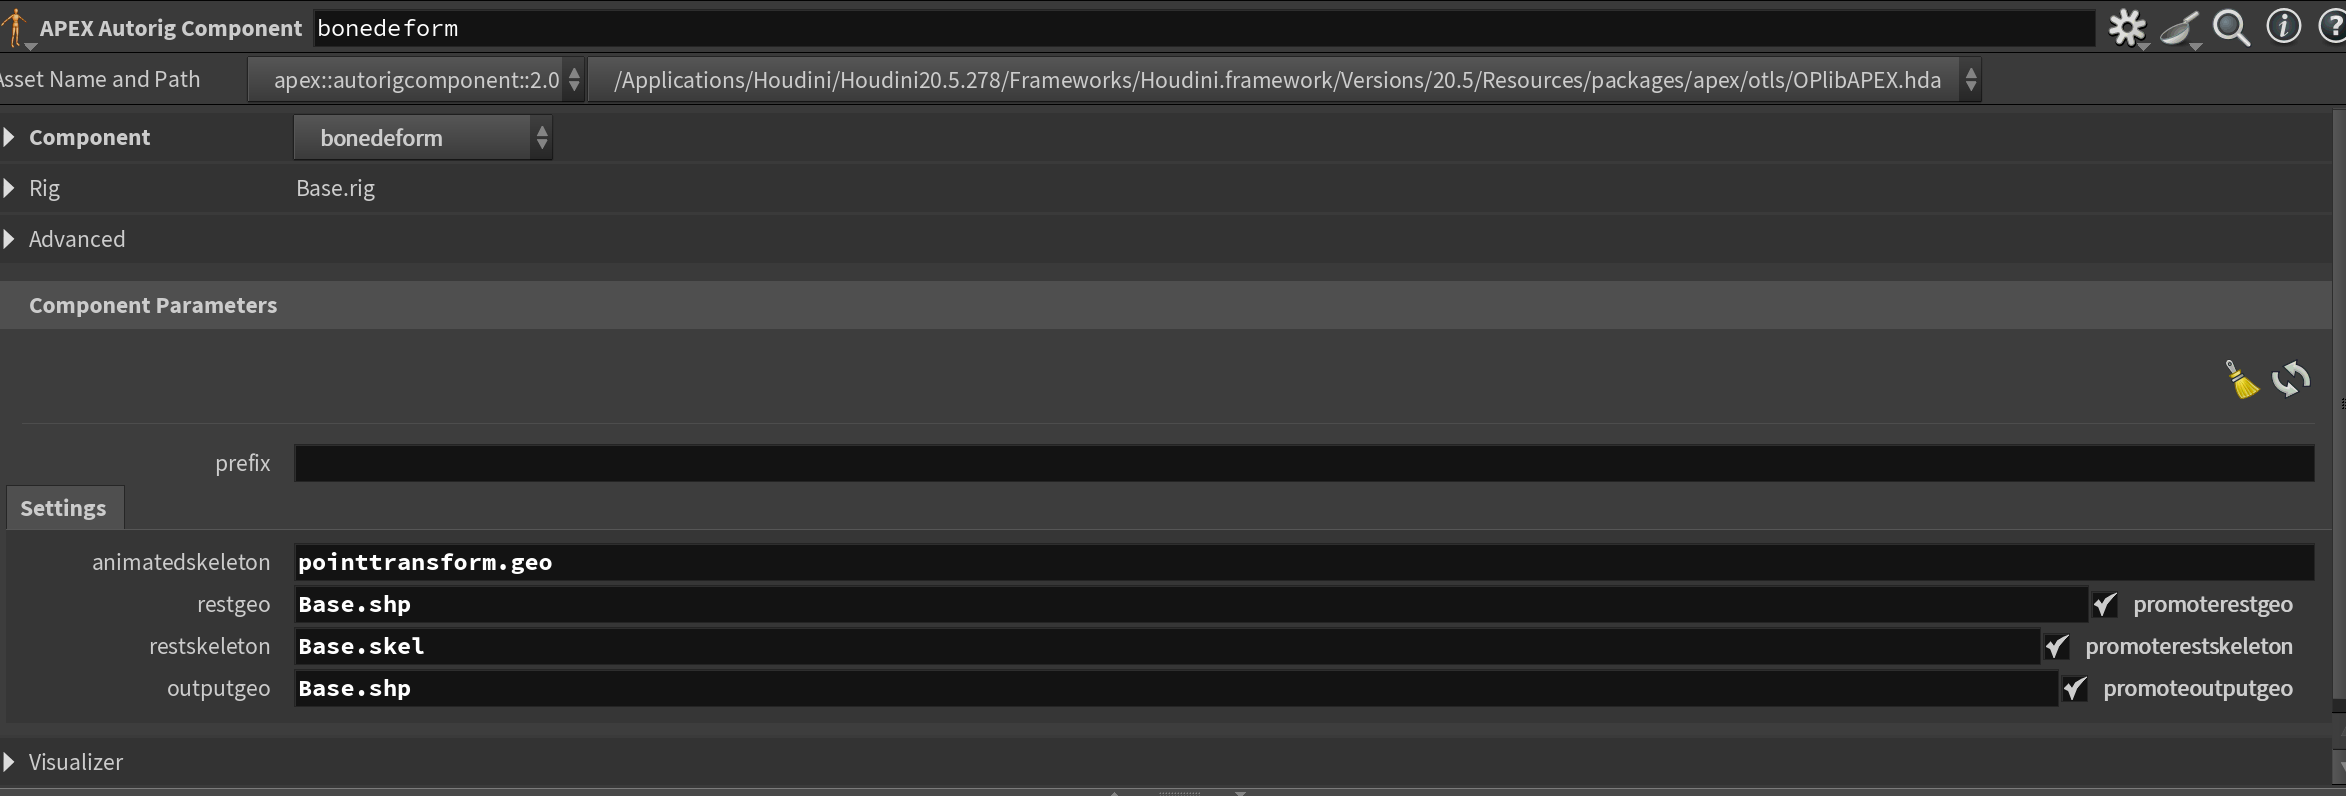
fktransform Autorig Component.Bonedeform
Bonedeform is what it sounds like and makes sure your bind skeleton deforms your skinned mesh.
bonedeform Autorig Component.Main Ctrl, FK Ctrls, Toe FK, Wings
I've batched all the above sections together because they use the same Autorig Component and are fairly straightforward. Using the transformdriver Autorig Component I define custom FK controls for various parts of my rig. This node will generate a new control based on an input Guide skeleton (or generate a new control based on an existing bone in your bind skeleton). For each "setup" in this node (you can add multiple transformdrivers in one node) you have 5 tabs:
Settings
This section decides which parts of the transform you want the control to have influence over. Note that this is not what's exposed to the animator. I recommend enabling them all for most cases.
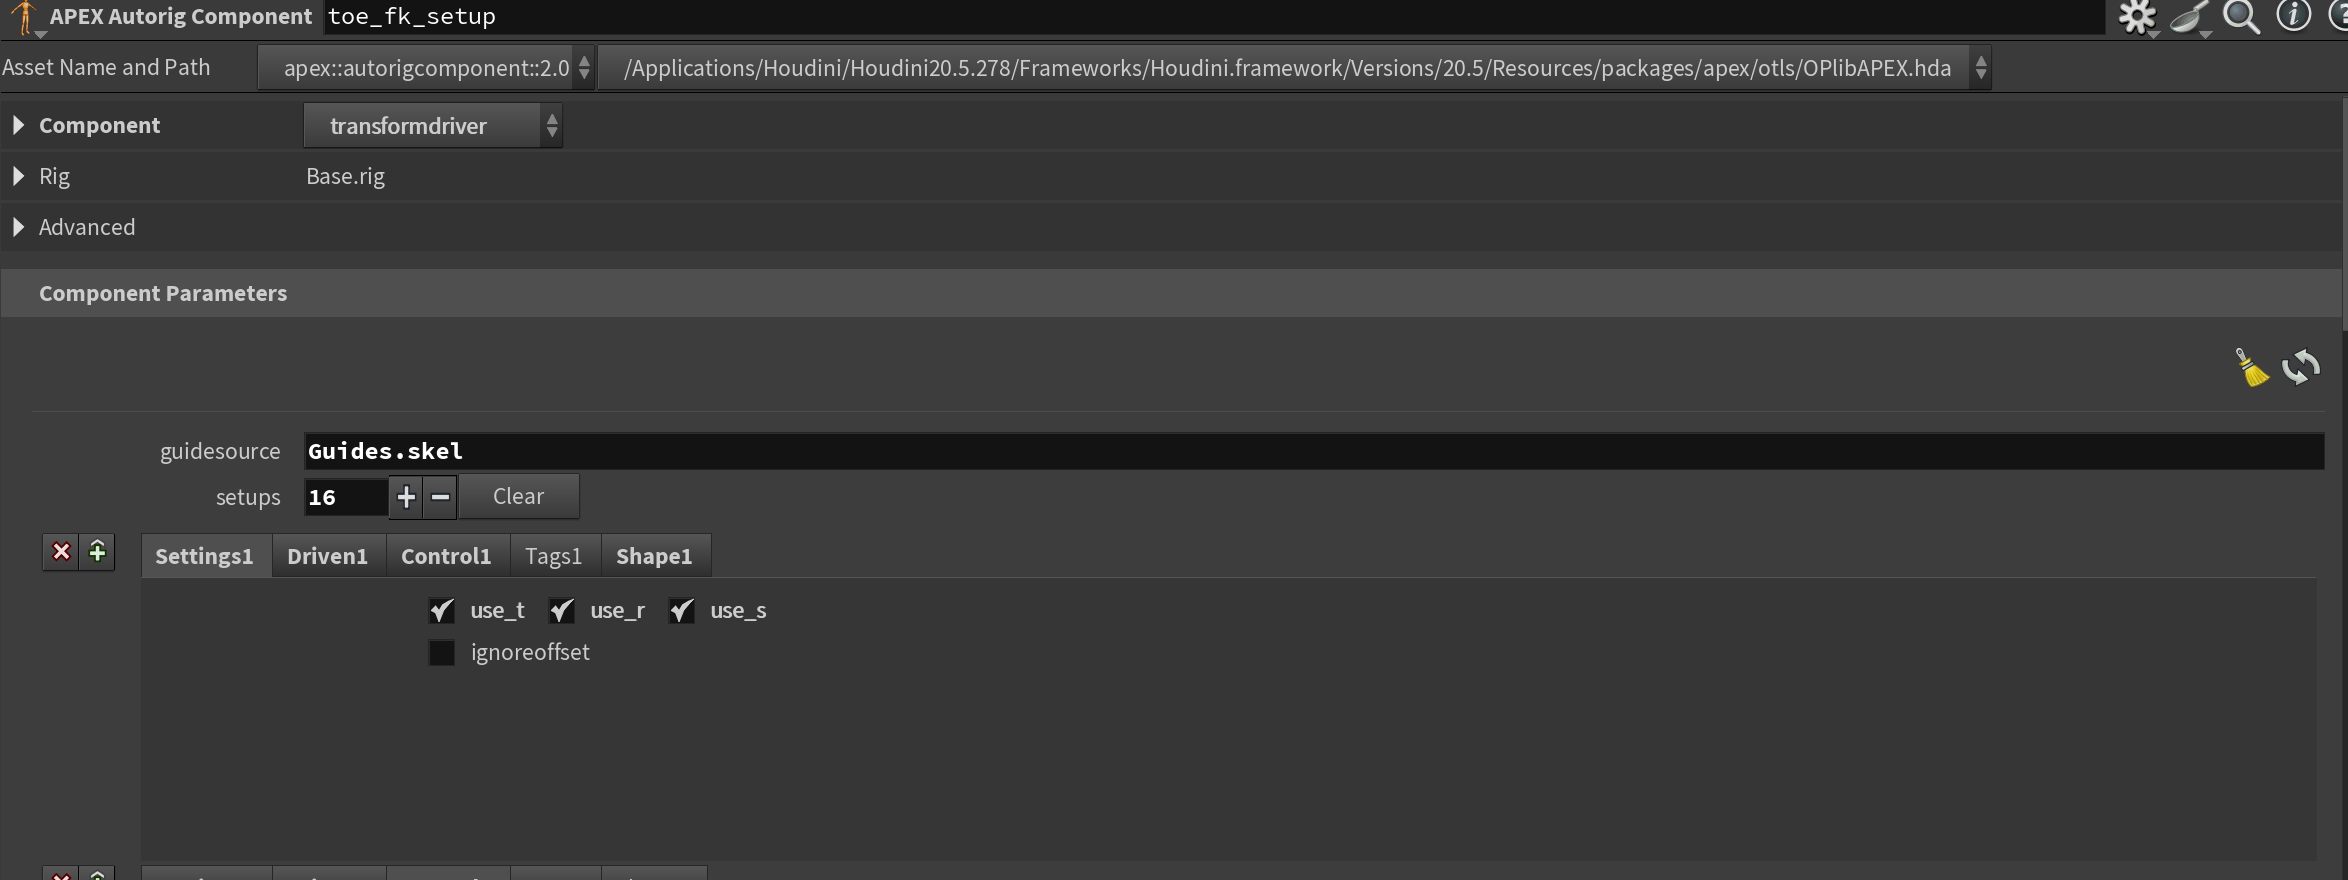
Driven
The driven tab simply points to the joint in your bind skeleton that you want the control to drive.
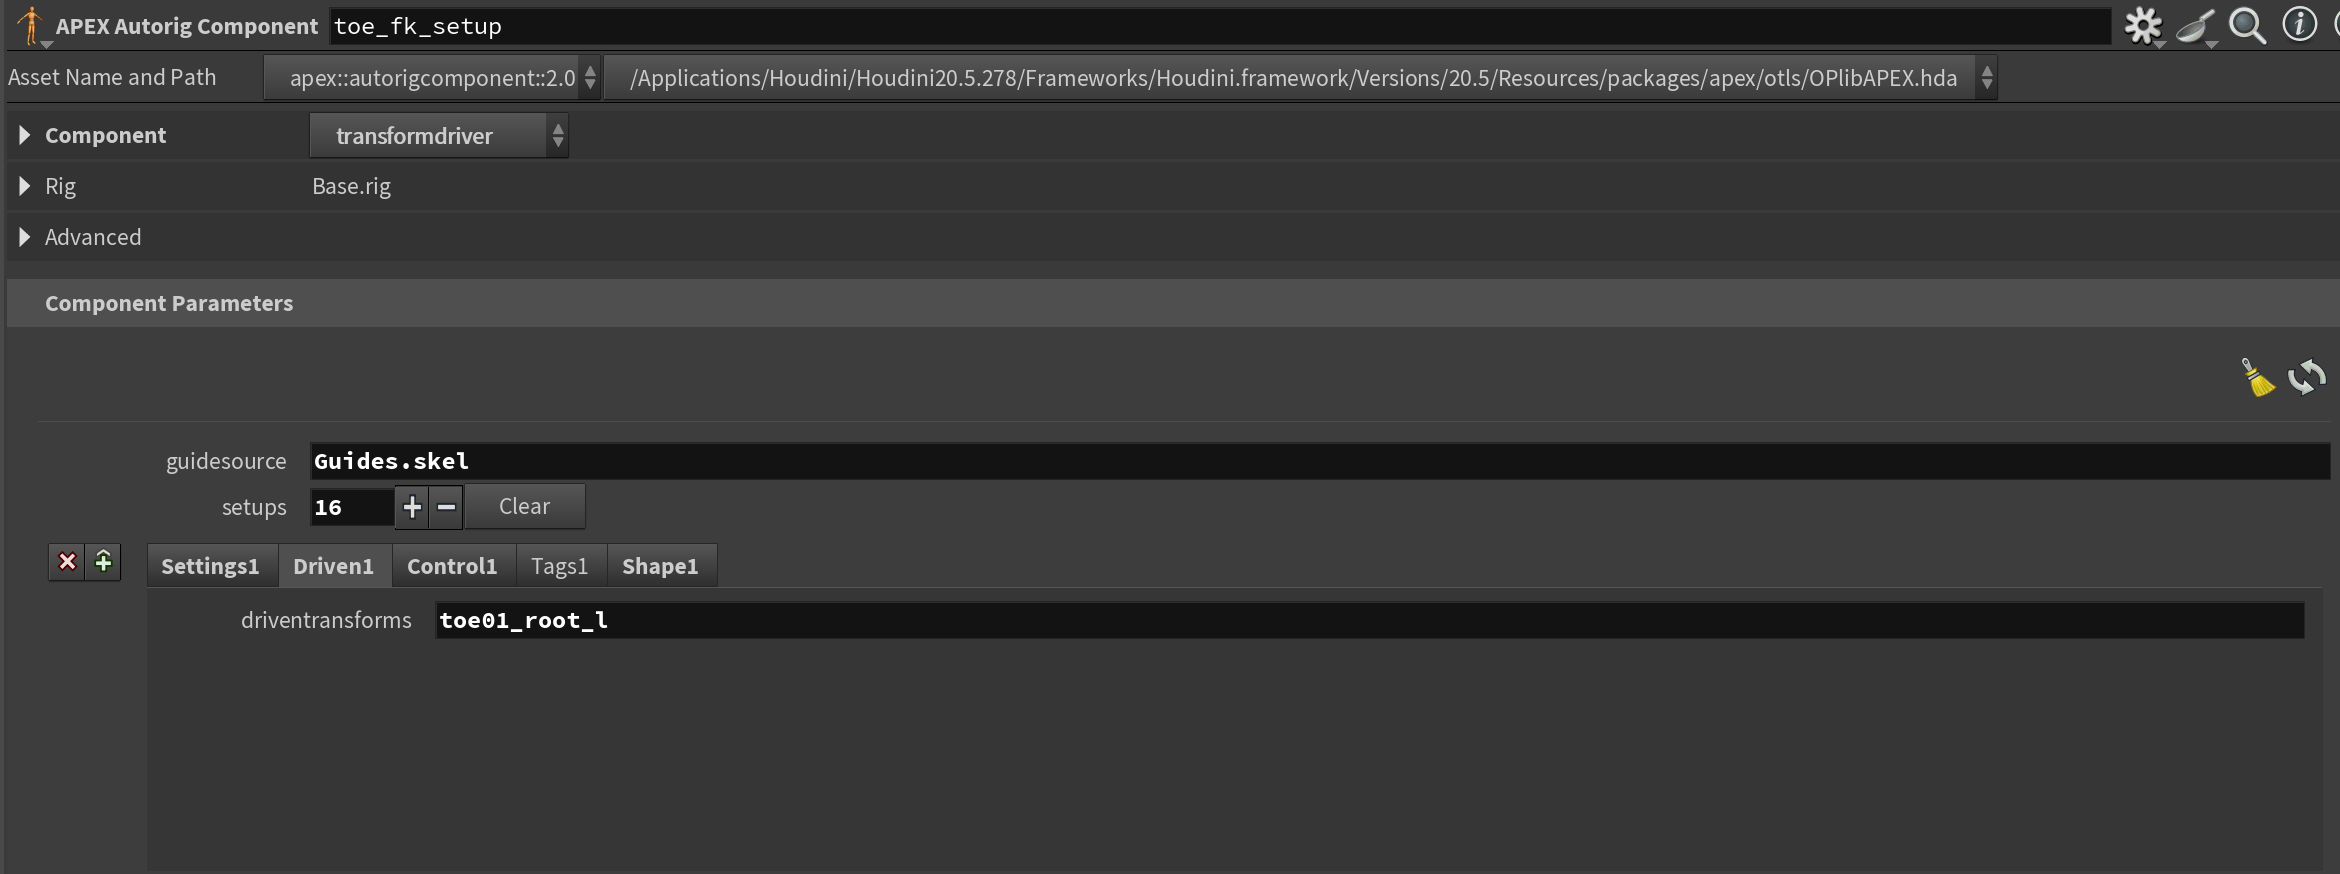
Control
Control is the primary section you'll want to adjust. The driver is the name of the control you want to create. It will use your guide skeleton if said joint exists, otherwise, it'll create it. If you need to create it in this node you should specify a driverguide which defines where the joint should be placed (this would usually be your bind joint). The driverparent defines which joint the control is parented under. This will largely depend on your hierarchy.

The Tags and Shape tabs allow you to define tags on your new controls and add a control shape respectively. I didn't use tags on these controls and the control shapes I defined later.
Spine, Neck, Tail
For all the above I used the spine Autorig Component to set up a spine system.
spine Autorig Component.This was also covered in my previous tutorial, but essentially I plugged in all of my spine bind joints into the Driven tab, set up my required controls on the Controls tab and set the controlhiearchy parameter to tangent or fk (depending on the behavior I wanted). For the spine I used tangent and for the neck and tail, I used fk .
IK Leg
smoothik Autorig Component.The IK Leg setup is pretty similar to the setup in my previous tutorial. The only change is that I have 2 IK legs - one for the first portion of the bird leg and one for the second. This is because the bird needs to bend its leg in two spots, so I essentially treated it as having two knees. I then added a transformdriver Autorig component at the end where I constrained the ikhandle of the first IK setup to the second. Using this setup I found that I got a very nice IK setup for my bird legs.
There's probably a smarter way to go about this - but I found this setup worked quite well for my purposes.
Eye Lookat
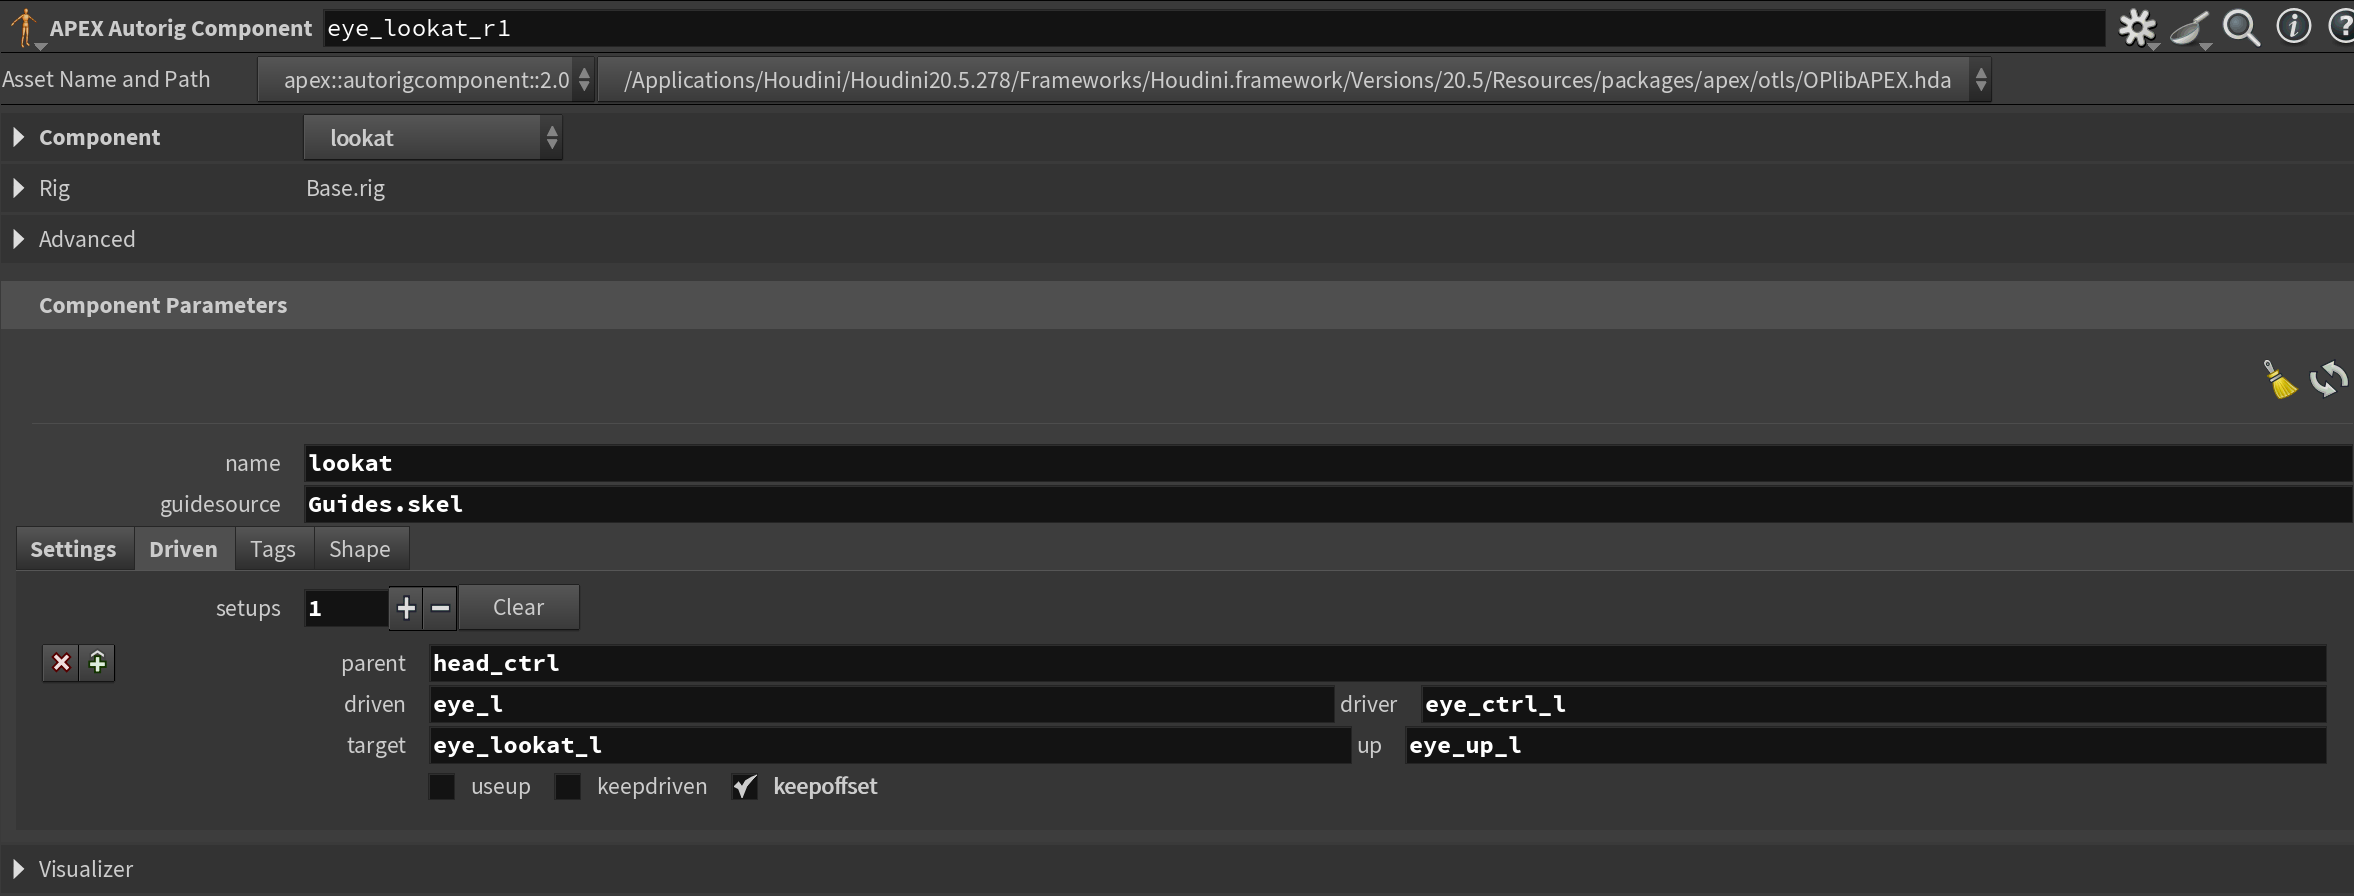
And now for one of the nice additions to Houdini 20.5 - the lookat Autorig Component. This component allows you to setup a lookat constraint - ideal for eyes.
The setup is quite straightforward. You'll need a target control (usually defined in the Guides skeleton) and then you simply need to define a parent control and which joint the lookat constraint should drive. Here I set it to the eye control itself.
You may need to adjust the transforms in the Settings tab to get the proper behavior.
lookat Autorig Component.APEX Add Groom
And here comes the meat of the new APEX Rigging additions for our setup - the APEX Add Groom node. This node enables you to add the proxy geometry of your feather groom (or regular groom) directly to the rig. This way the animators can preview the feather groom as they're animating, and even control parts of it if they so desire.
You'll need to load two parts of the groom for this to work - the groom curves and the proxy geometry surfaces. If you used my HDA to export your groom you can simply do a LOP import and grab the primitive labeled groom for the curves, and the deformer_anim for the proxy meshes. Then drop down an Unpack USD to Polygons and you're good to go! Of course, you can also load your groom directly from SOPs if you wish - I'm just trying to present an idea of how you might handle this in a USD production pipeline.
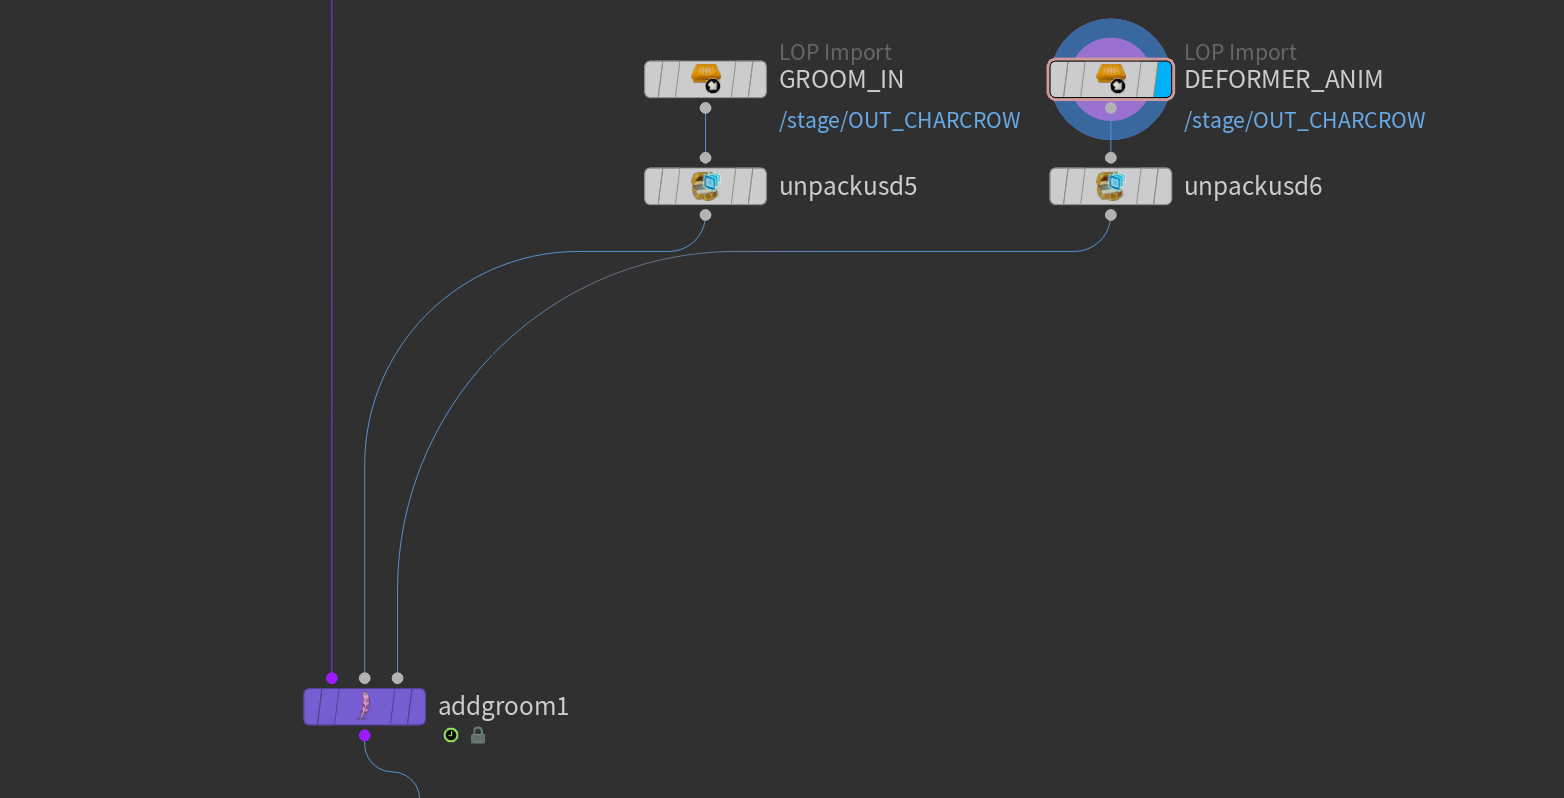
APEX Add Groomid attribute. This must match on your proxy and groom curves - otherwise, you'll get strange results or the node will cast an error.When you've plugged all of this into the node it should usually work out of the box - if you press enter in the viewport with the APEX Add Groom selected you should be able to see your feathers, and if you move your rig it should follow (this is where the tangentu attribute we defined earlier comes in).
Finally, you can add controls to the feathers themselves. The APEX Add Groom provides an easy way to add a ribbon-like control system to your feathers. You simply press the + button next to Control Groups , click the arrow next to Group and interactively select the feathers you want to add controls to. See below for a demo. It works really well in my experience so far.
APEX Add Groom.With all of that done you can save your rig using a File Cache and add an APEX Scene Add Character followed by an APEX Scene Animate to start animating your bird. When you're done you can use an APEX Scene Invoke to extract your animated mesh and add simulation or just export.
APEX Add Groom come out as a separate "key" in your APEX output when using the APEX Scene Invoke called GroomSurfaces.shp by default. You can also extract the curves if you want through the Groom.shp "key".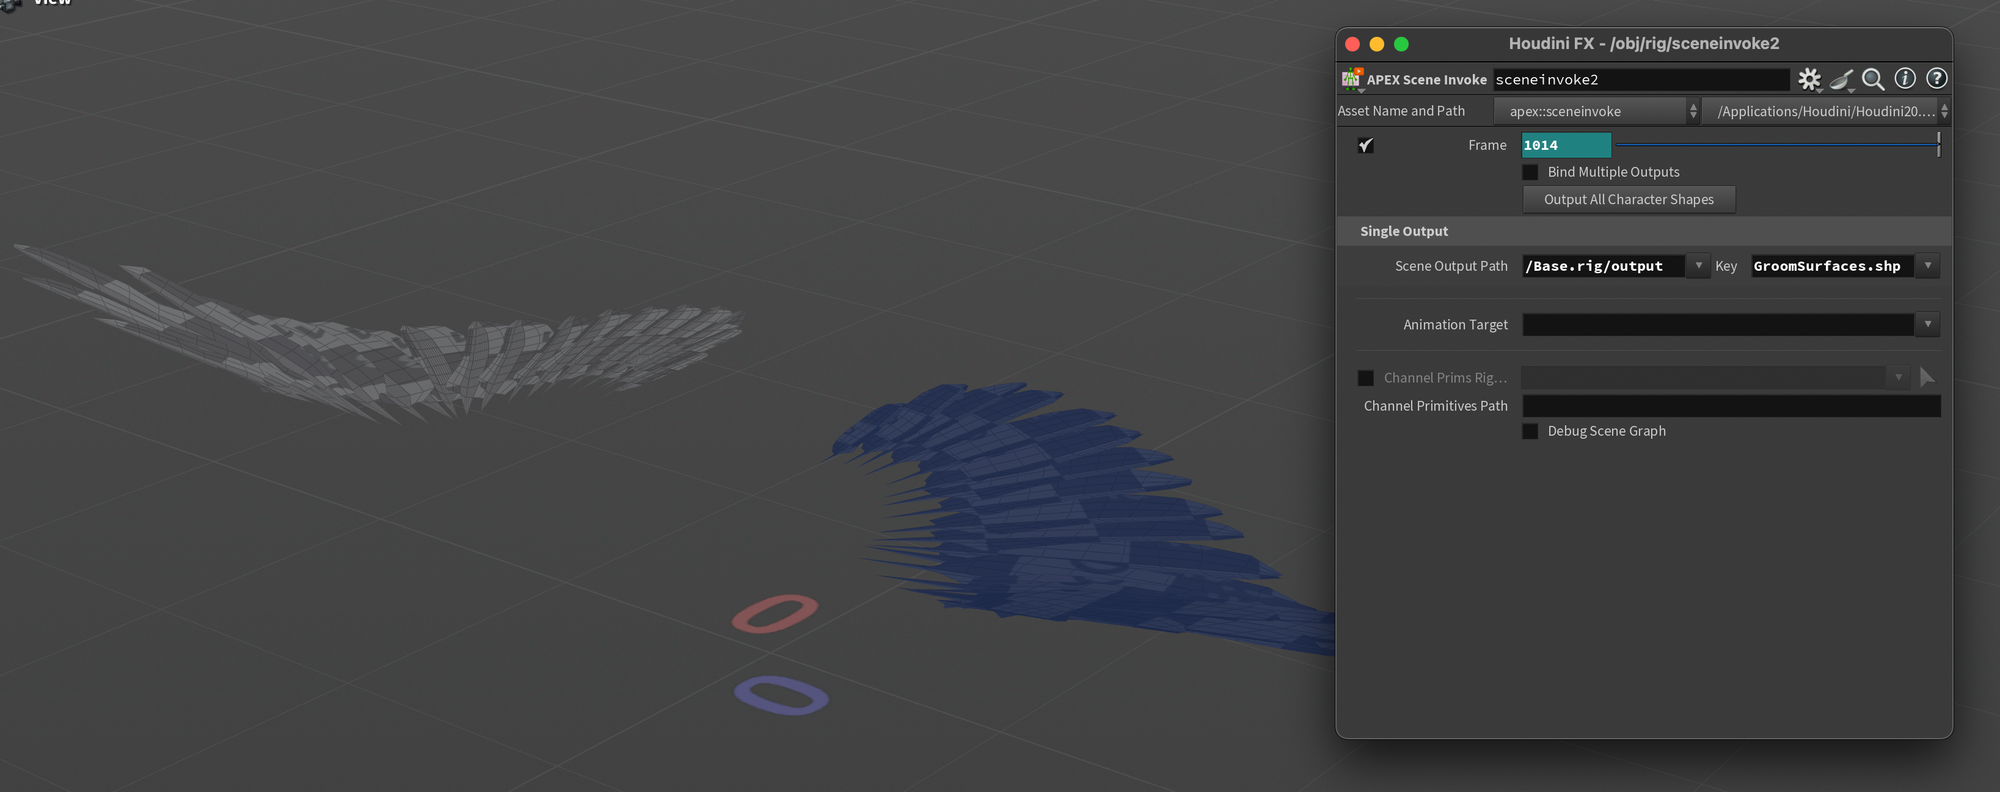
In my bird I only added the wing feathers to the rig, the other feathers were later deformed with the animated mesh using a Guide Deform. The same could be achieved with a regular Point Deform. This was all done on the proxy geo so I could use the Feather Procedural in Solaris to deform the real feathers based on the proxy geo (as covered earlier). For this to work you only need to make sure that the topology and attributes of the Deformer Rest in the Feather Procedural matches the Deformer Anim . Then it doesn't matter if you simulate or add your proxy feathers to your rig directly - as long as you make sure to point to the output of those in the Deformer Anim parameter of the Feather Procedural Solaris will take care of the rest.
Conclusion & Project Files
Just wanted to thank you all for reading this far. It's been such a rewarding journey writing this blog already, and I appreciate everyone who has subscribed or shared my articles. Thank you so much for your continued support.
If you're interested in reading more articles like this (or getting an update when the APEX and animation section is out) please consider subscribing to my newsletter below to get my posts straight to your inbox!
In addition, due to popular demand, I've recently started to provide project files. If you're interested you can get the project files for the grooming part of this setup on my Gumroad. In addition to getting access to my houdini scenes you'll also help support the free content I provide on this blog.
This is naturally completely optional and the articles on this blog will continue to be free.